Neo Concert Edition Atoms install
For Jersey Jack Pinball: Guns N’ Roses · Toy Story · Godfather · Avatar · Harry Potter · Elton John
Time to install: 20–30 minutes.
Concert Editions are sync’d to your machine’s lighting via the LumiSync module — no flasher trigger required. You’ll connect a few cables to specific factory connections (game-specific), mount the light bars on Xeno + Magna-Mounts, and you’re done.
⚠ Read this before starting
- Most kits ship with Xeno Mounts and you MUST use them with the Magna-Mounts. Both are required for proper install. Exceptions: Elton John and Avatar use Magna-Mounts only (no Xenos).
- Don’t power up or “test” the lights until they’re properly installed on the Xeno Mounts. The exposed LED chips can hit playfield mechanisms or snag during raise/lower.
- Install at your own risk — if you’re not comfortable inside your pinball machine, email us first.
Need help during the install? Email us — we respond fast.
Step 1
Power up & connect the LumiSync module
Lay out your shipment and locate the harnesses and the LumiSync black heat-shrink PCB module (the one with the multi-colored ribbon cable).
Plug the power supply into your service port (just inside the coin door to the right), then connect both power supplies to the splitter.
Plug the larger power end into the LumiSync black PCB module. See the diagram:

Connect game-specific cables — find your machine
Each cable from the multi-colored ribbon goes to a specific factory connector on your game. You’ll unplug the factory cable, plug in the Pin Stadium “Y” splitter inline, then plug the factory cable back into the splitter. Pick your game:
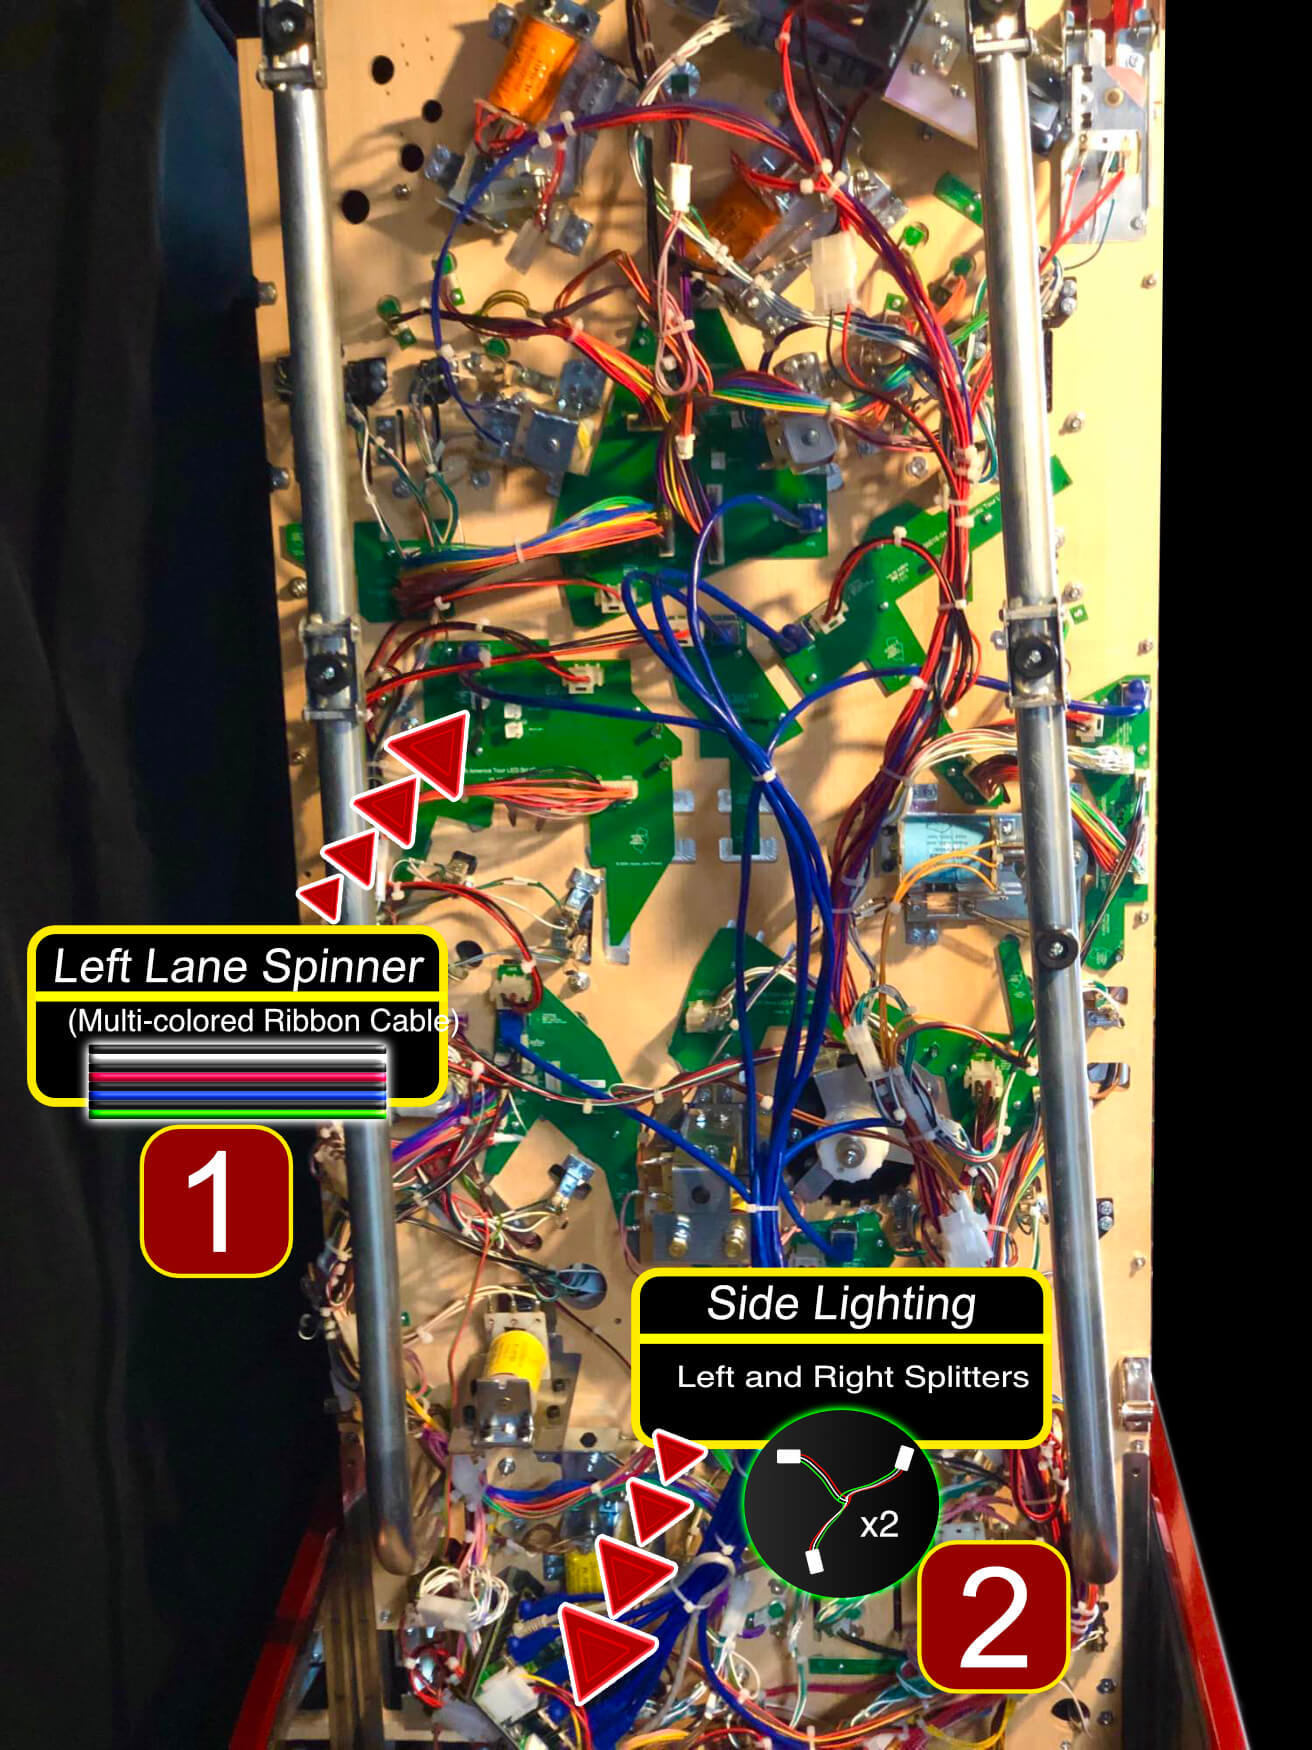
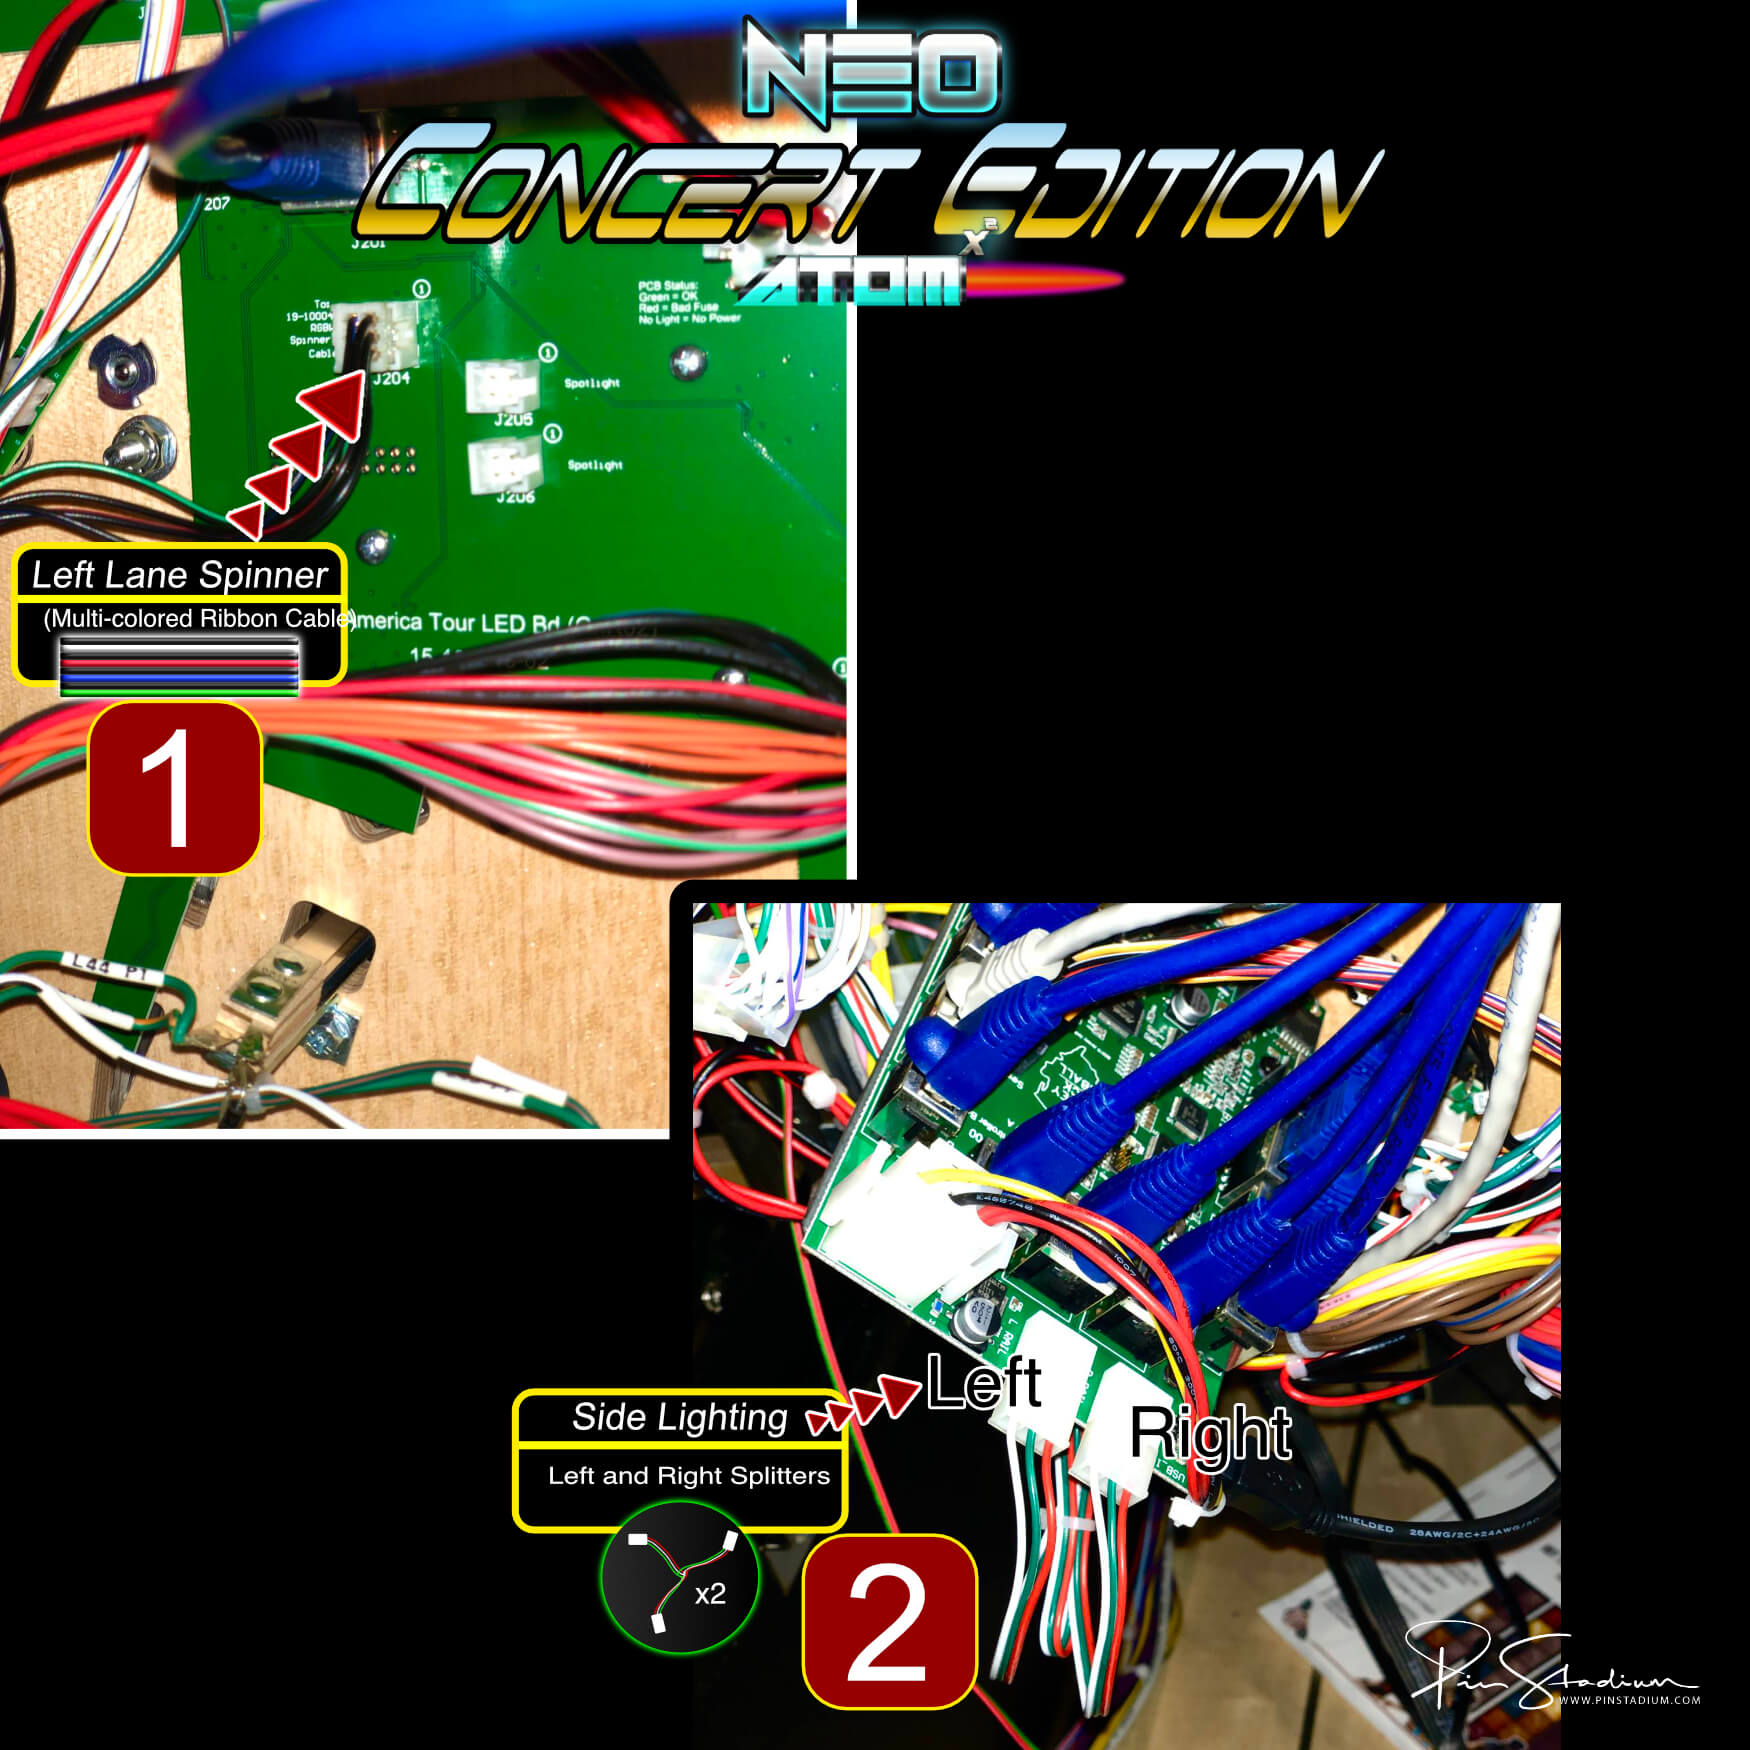
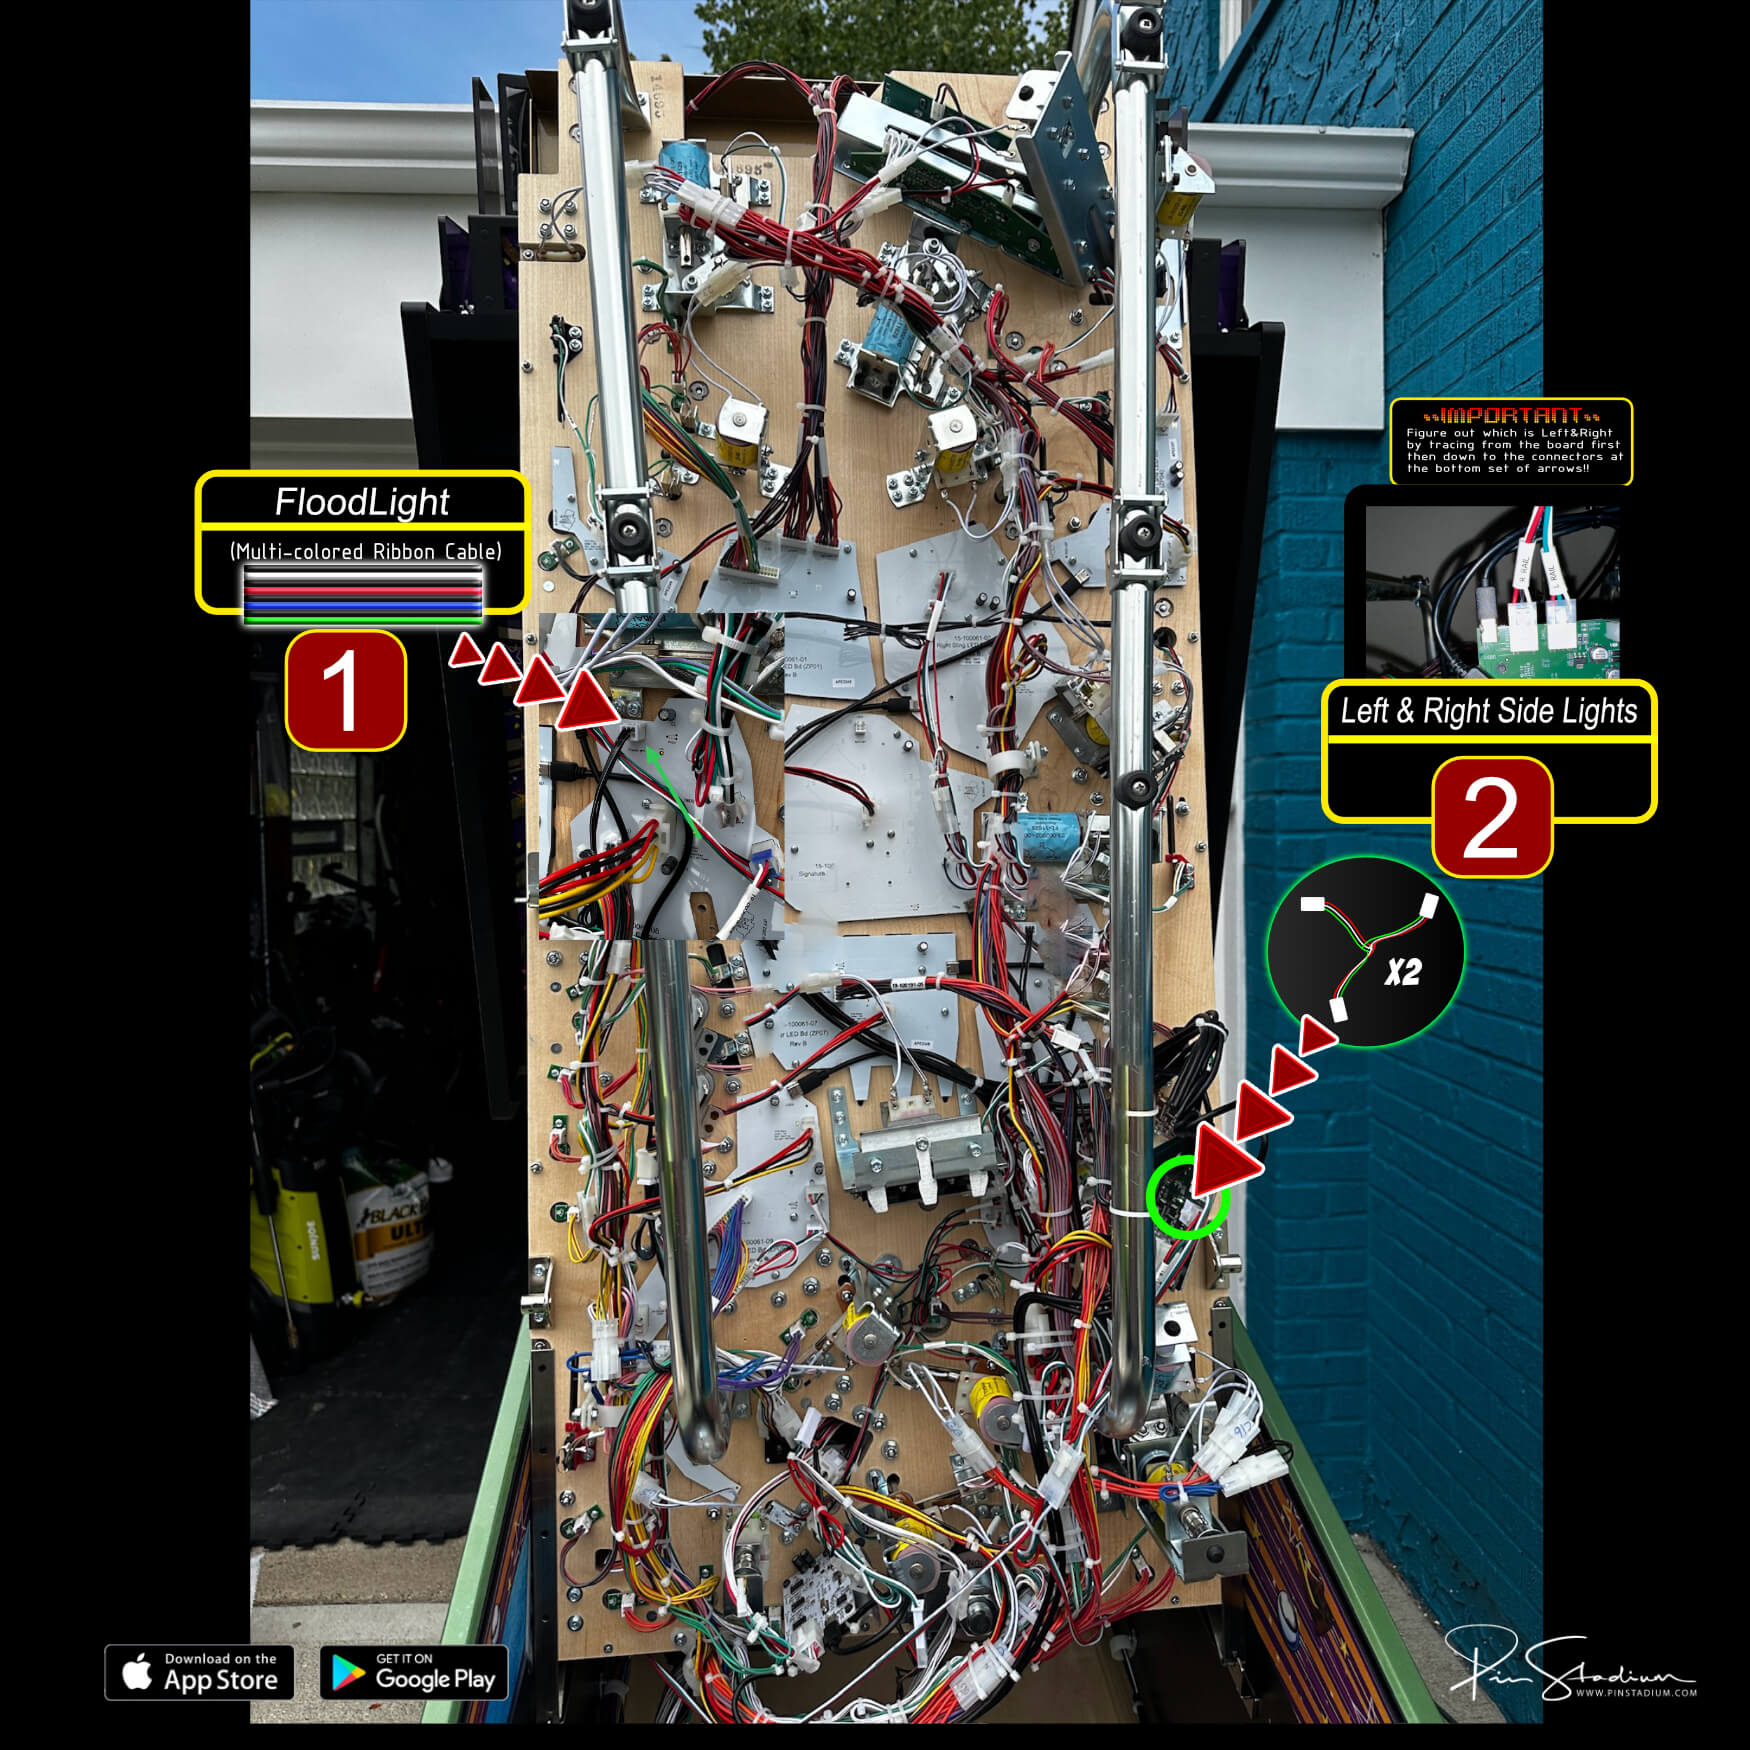
Connection #1 — LEFT LANE SPINNER (J204): connect the “Y” splitter (the one wired to Red/Green/Blue/White/Black) to this connector on the playfield.
Connection #2 — LEFT & RIGHT SIDE LIGHTING: connect the two smaller 3-wire (Red/Green/White) splitters to the factory side-lighting connectors. Match Left to Left and Right to Right or you’ll mirror the factory light show.
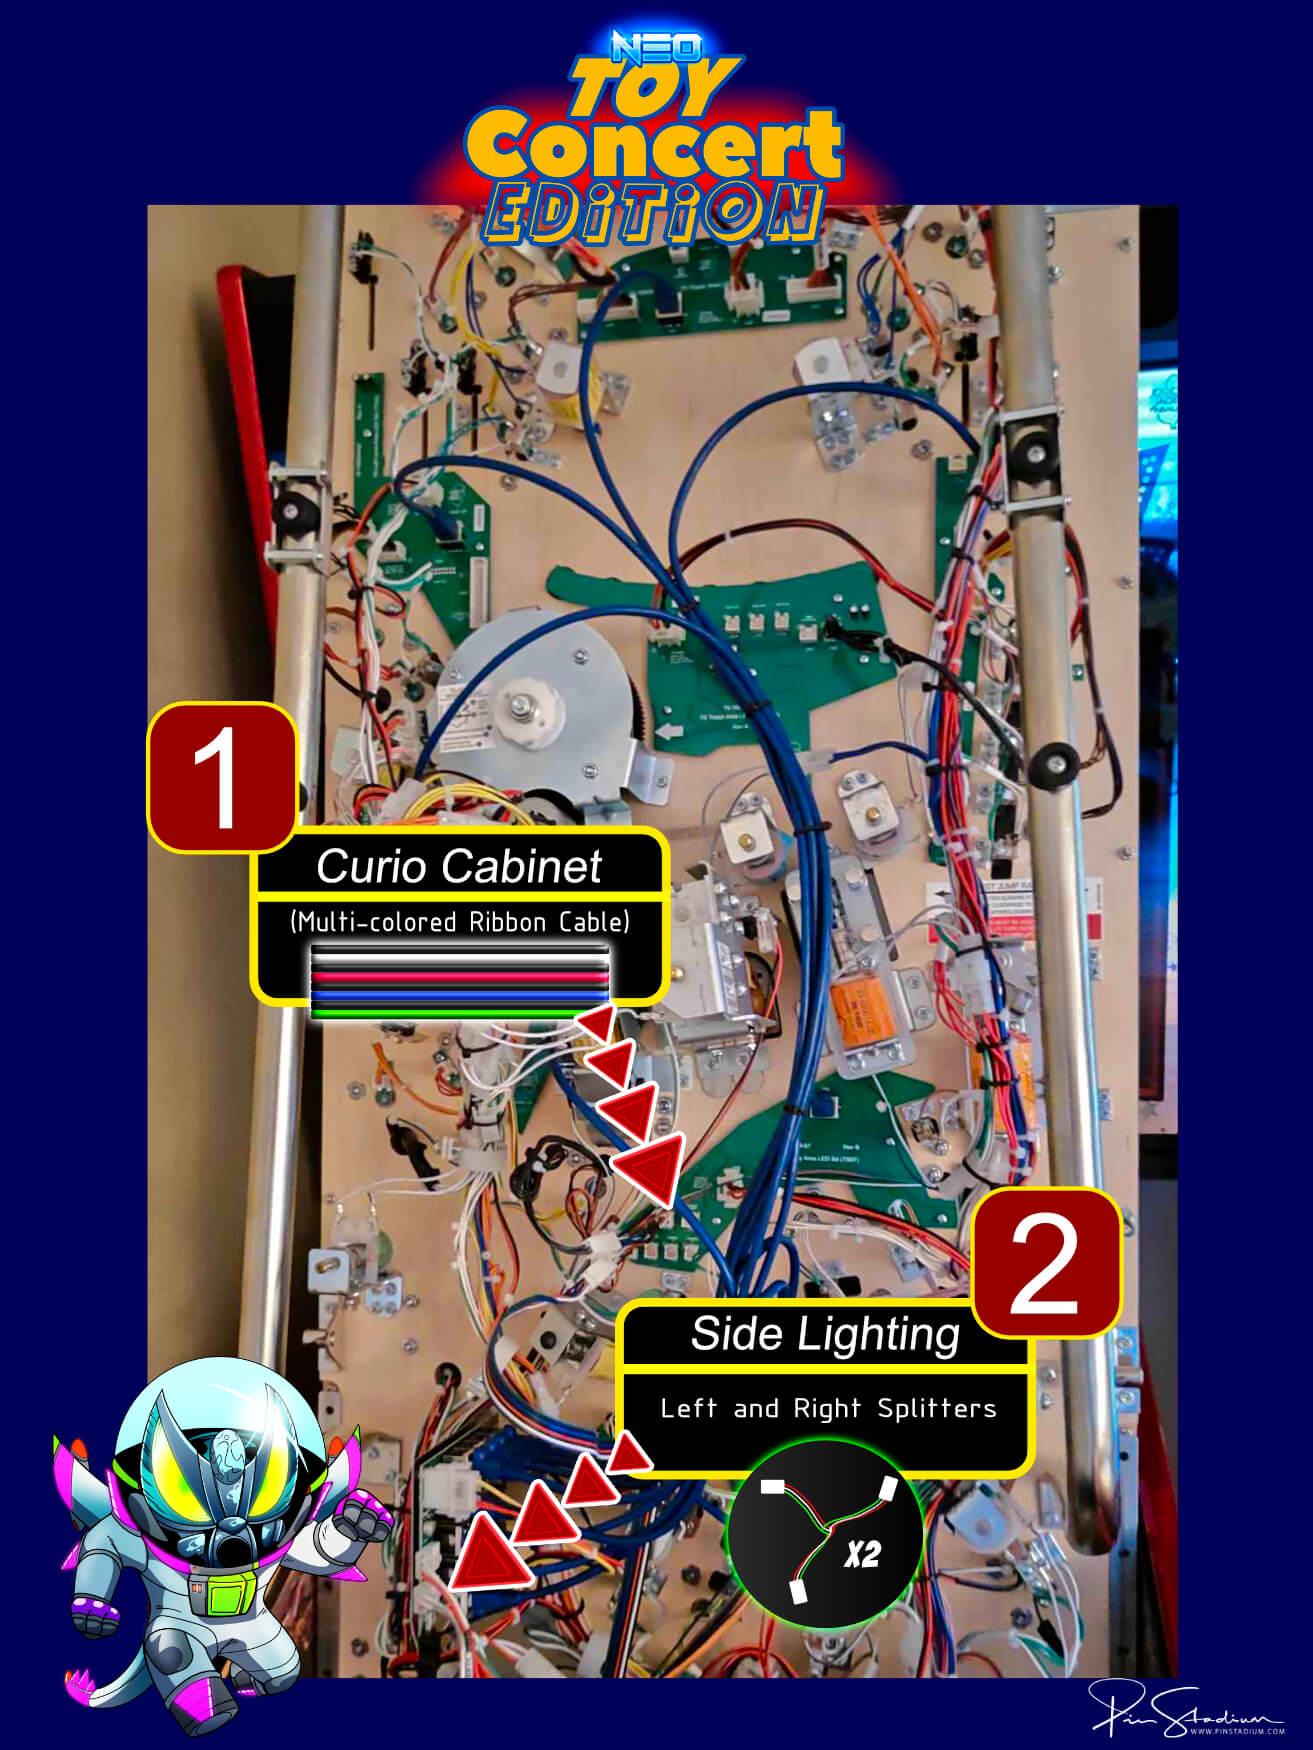
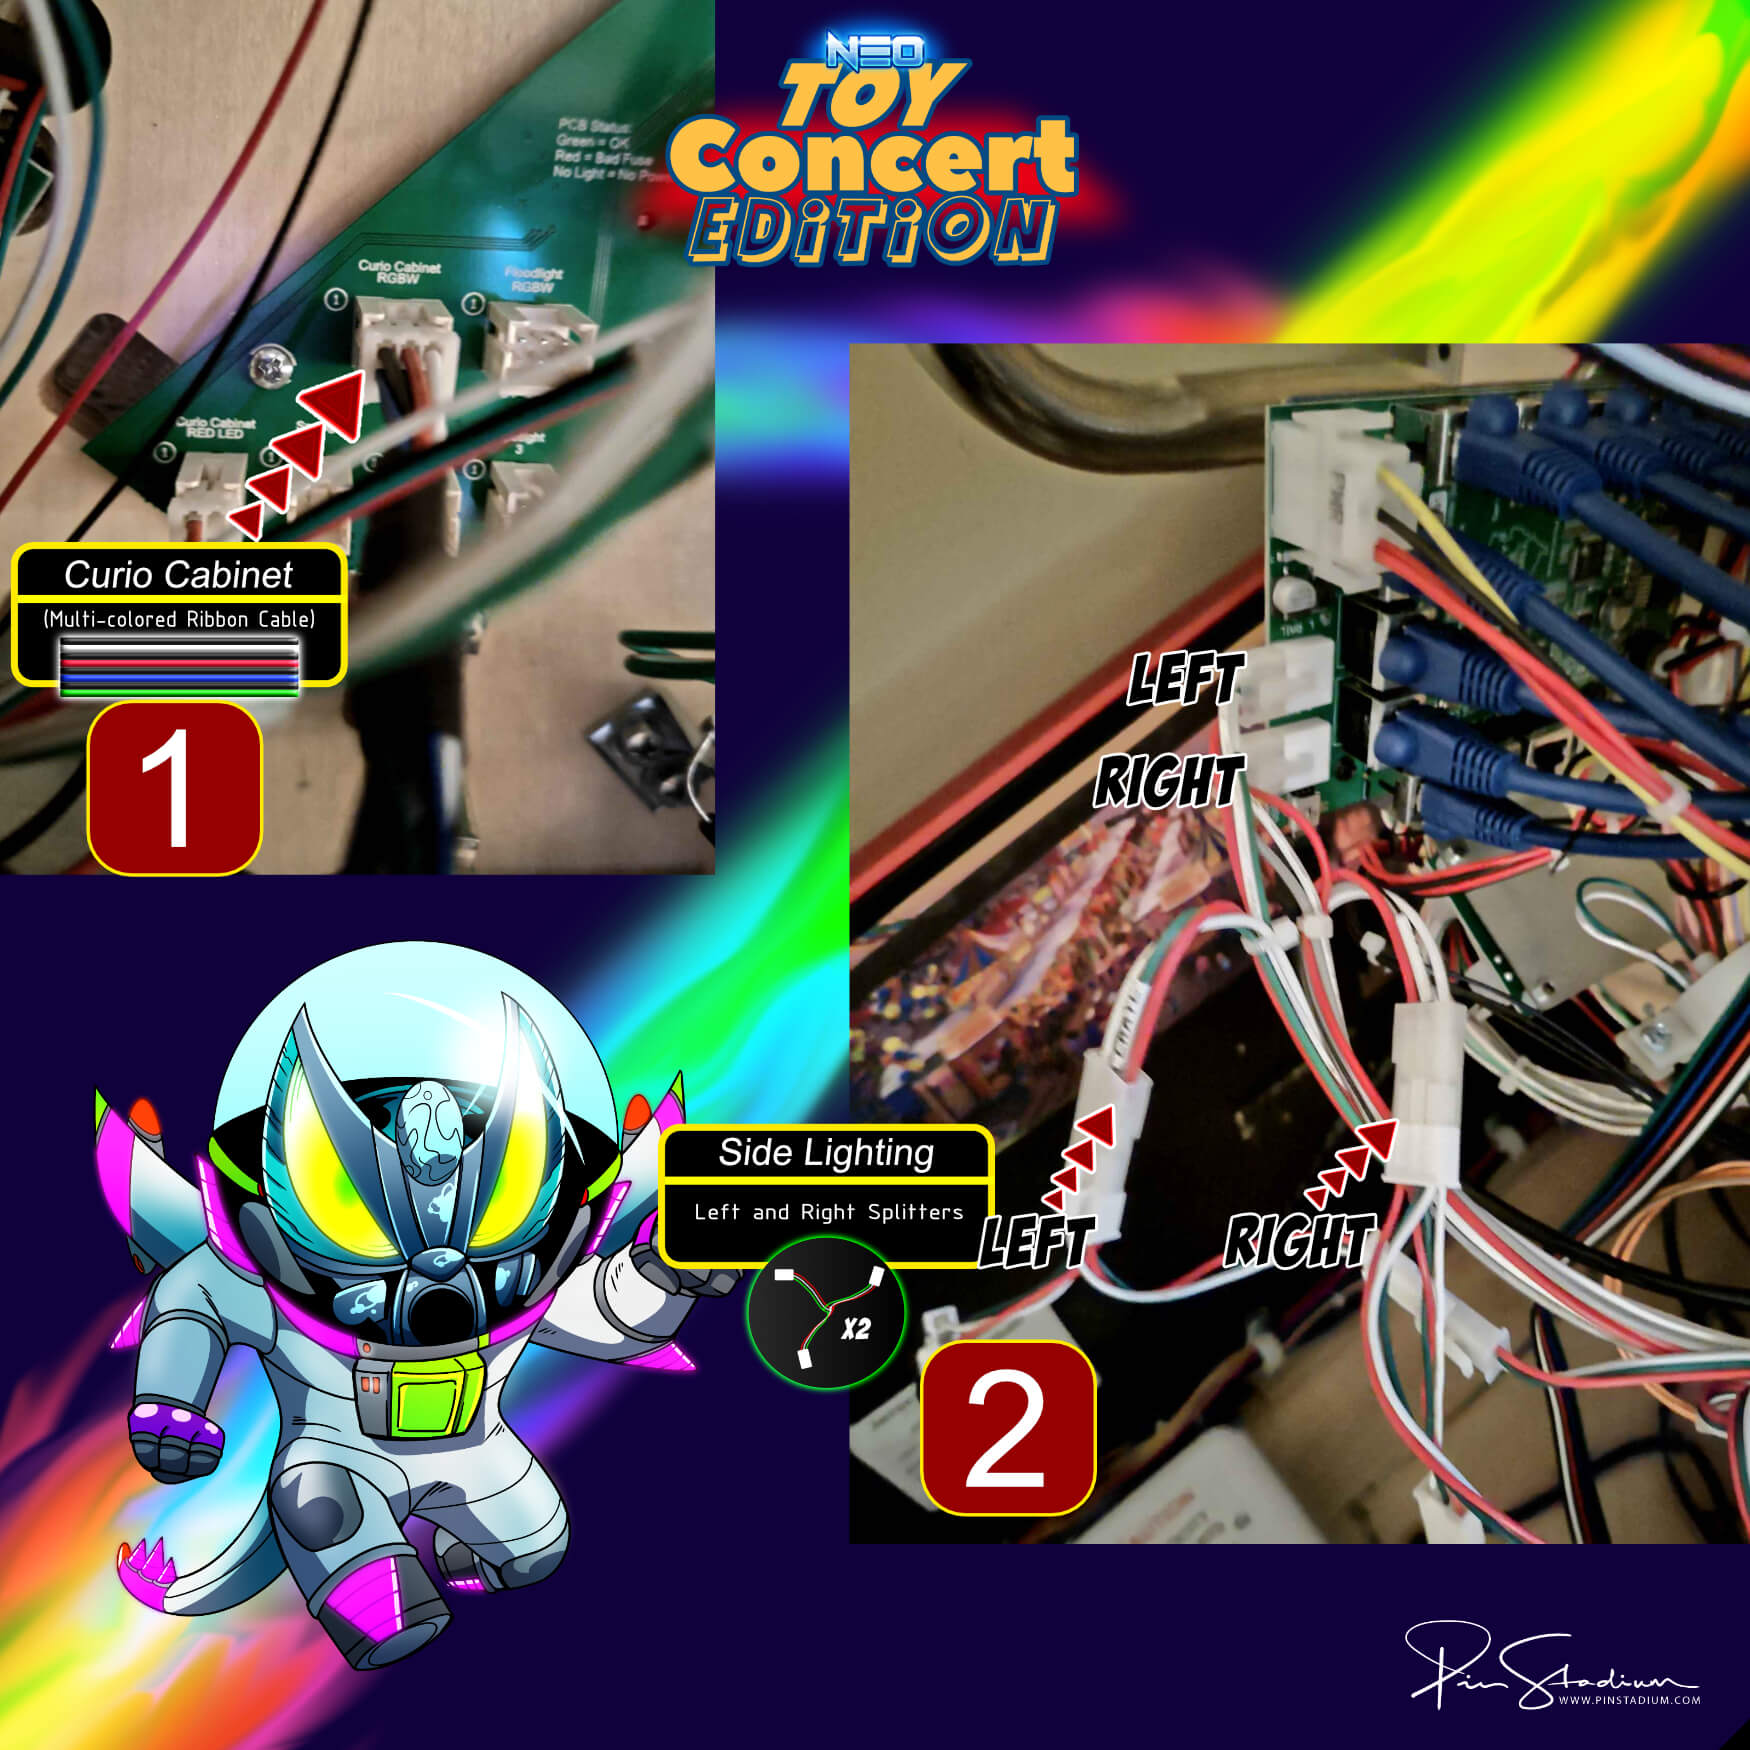
Connection #1 — Curio Cabinet RGBW(1): on the TS Woody Area LED Bd (TS07), plug the “Y” splitter (Red/Green/Blue/White/Black) into this connector.
Connection #2 — LEFT & RIGHT SIDE LIGHTING: connect the two smaller 3-wire splitters to the side-lighting factory adapters (NOT directly to the factory board). Match Left to Left, Right to Right.
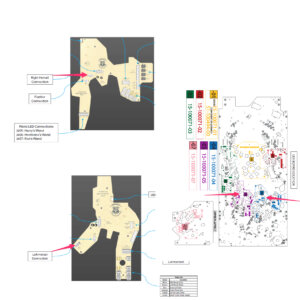
Connection #1 — J-601 Center Arc Beacon: on the CENTER LED BOARD (GF06), use the wire-tap ends from the Red/Green/Blue/White/Black cable. Wire taps: Black to position 1, Red to 2, Blue to 3, Green to 4. (White/Black is not used.)
Connection #2 — LEFT & RIGHT SIDE LIGHTING: connect the two smaller 3-wire splitters to the side-lighting factory connectors at the bottom of the playfield (with playfield raised). Match Left to Left, Right to Right — trace from the factory board first.

Connection #1 — Shaker motor: unplug the factory shaker connector and plug the Blue/Black “Y” splitter inline.
Connection #2 — Factory UV Spotlight (under playfield): if your cable has a “Y” adapter on the end, remove it and use the provided wire-tap adapter instead. Clip the wire-tap on, then pressure-fit the ends into the back of the UV Spotlight factory connection. Finding the sweet spot may take a few attempts — polarity doesn’t matter.
Connection #3 (Left/Right Side Rail Lights): we recommend NOT connecting these — leaving them disconnected actually increases the UV effect during UV modes.
![]()
![]()
Connect the Left and Right Hot Rails, then connect the Red/Black cable from the second module to the shaker motor.
Floodlight (#1) and Factory Side Lighting (#2): see the diagram below for the specific connection points.
Note: Elton John uses Magna-Mounts only (no Xeno Mounts).
Step 2
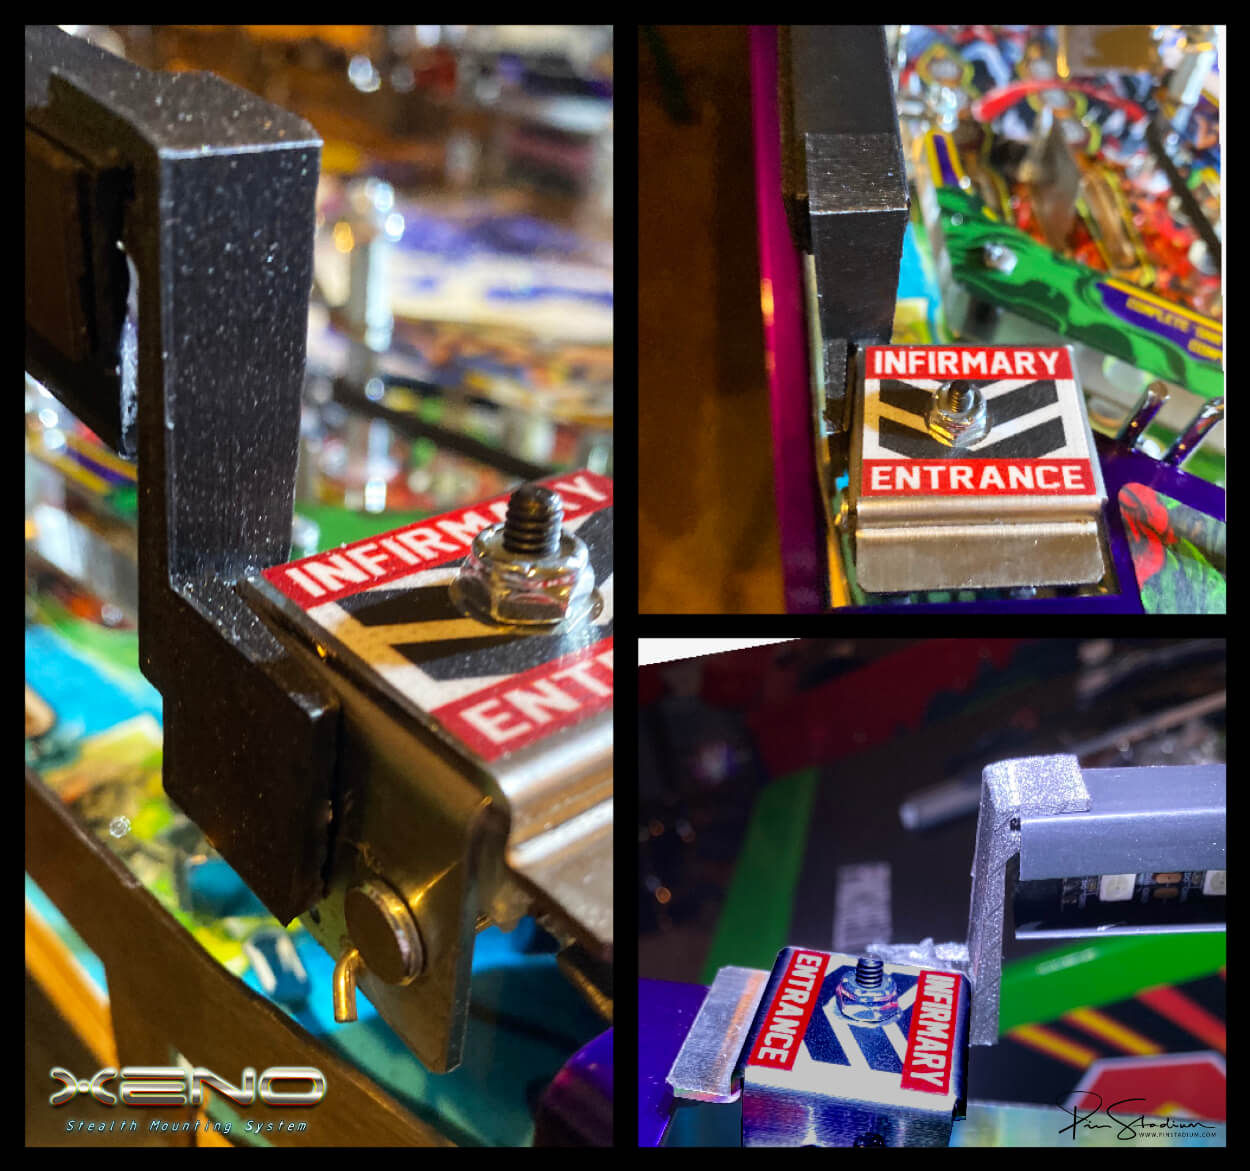
INSTALL XENO MOUNTS: These are used for convenience by making so you never having to remove the lights when raising and lowering the playfield. They are vital for properly routing of the cables in the rear so they do not get pinched and damage the cables which will in turn damage the LEDs. There is room for error for the user if you don’t use these as there is not much clearance back there and it’s likely the cable will get damaged. Be sure to use Xeno Mounts as they are amazing for many reasons. Note that Xeno Mounts do not fit in Elton John and Avatar machines at this time and you will simply use the Magna-Mounts. If you have the Neo “X” Concert Edition Atoms(these have the Lumi-Motion) then you will simply use the Magna-Mounts for the install, otherwise you will have clearance issues and possibly damage the lights. You can will just use the Magna-Mounts and then it is suggested to remove the one post on the right side HERE. Very simply and quick to take out.
GNR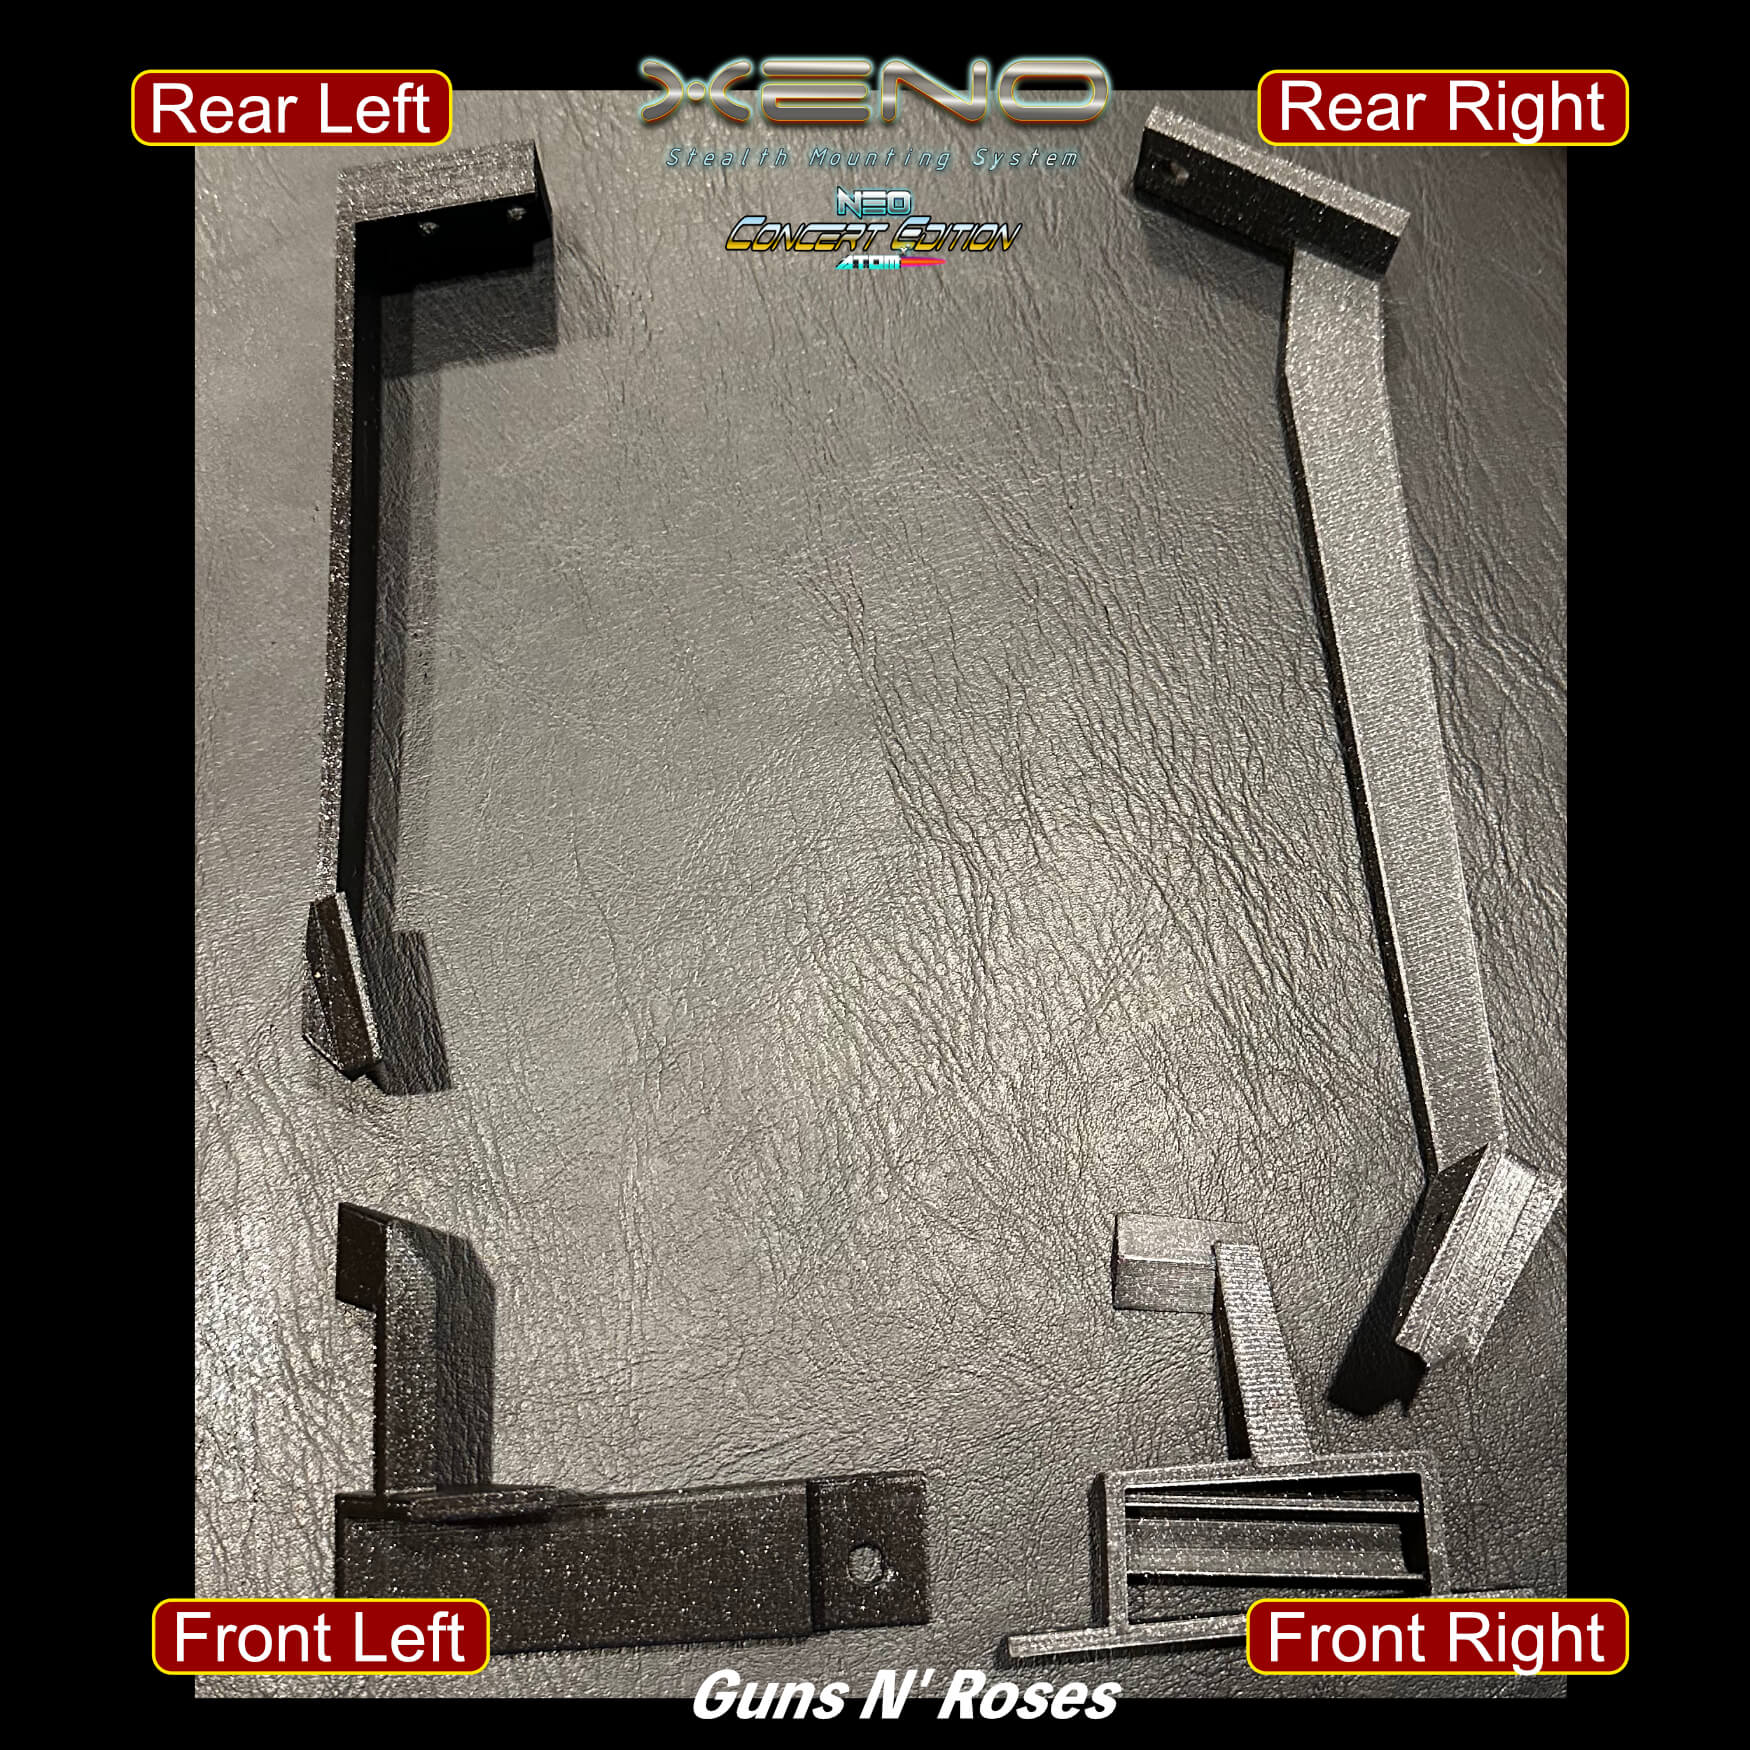

Install Xeno Mounts:
NOTE: On all Xeno Mounts for the Neo Concert Editions Atoms you will pressure fit end of the front end of the light bar into the the triangle shaped top mount of the front Xeno Mounts
Front Right Xeno:
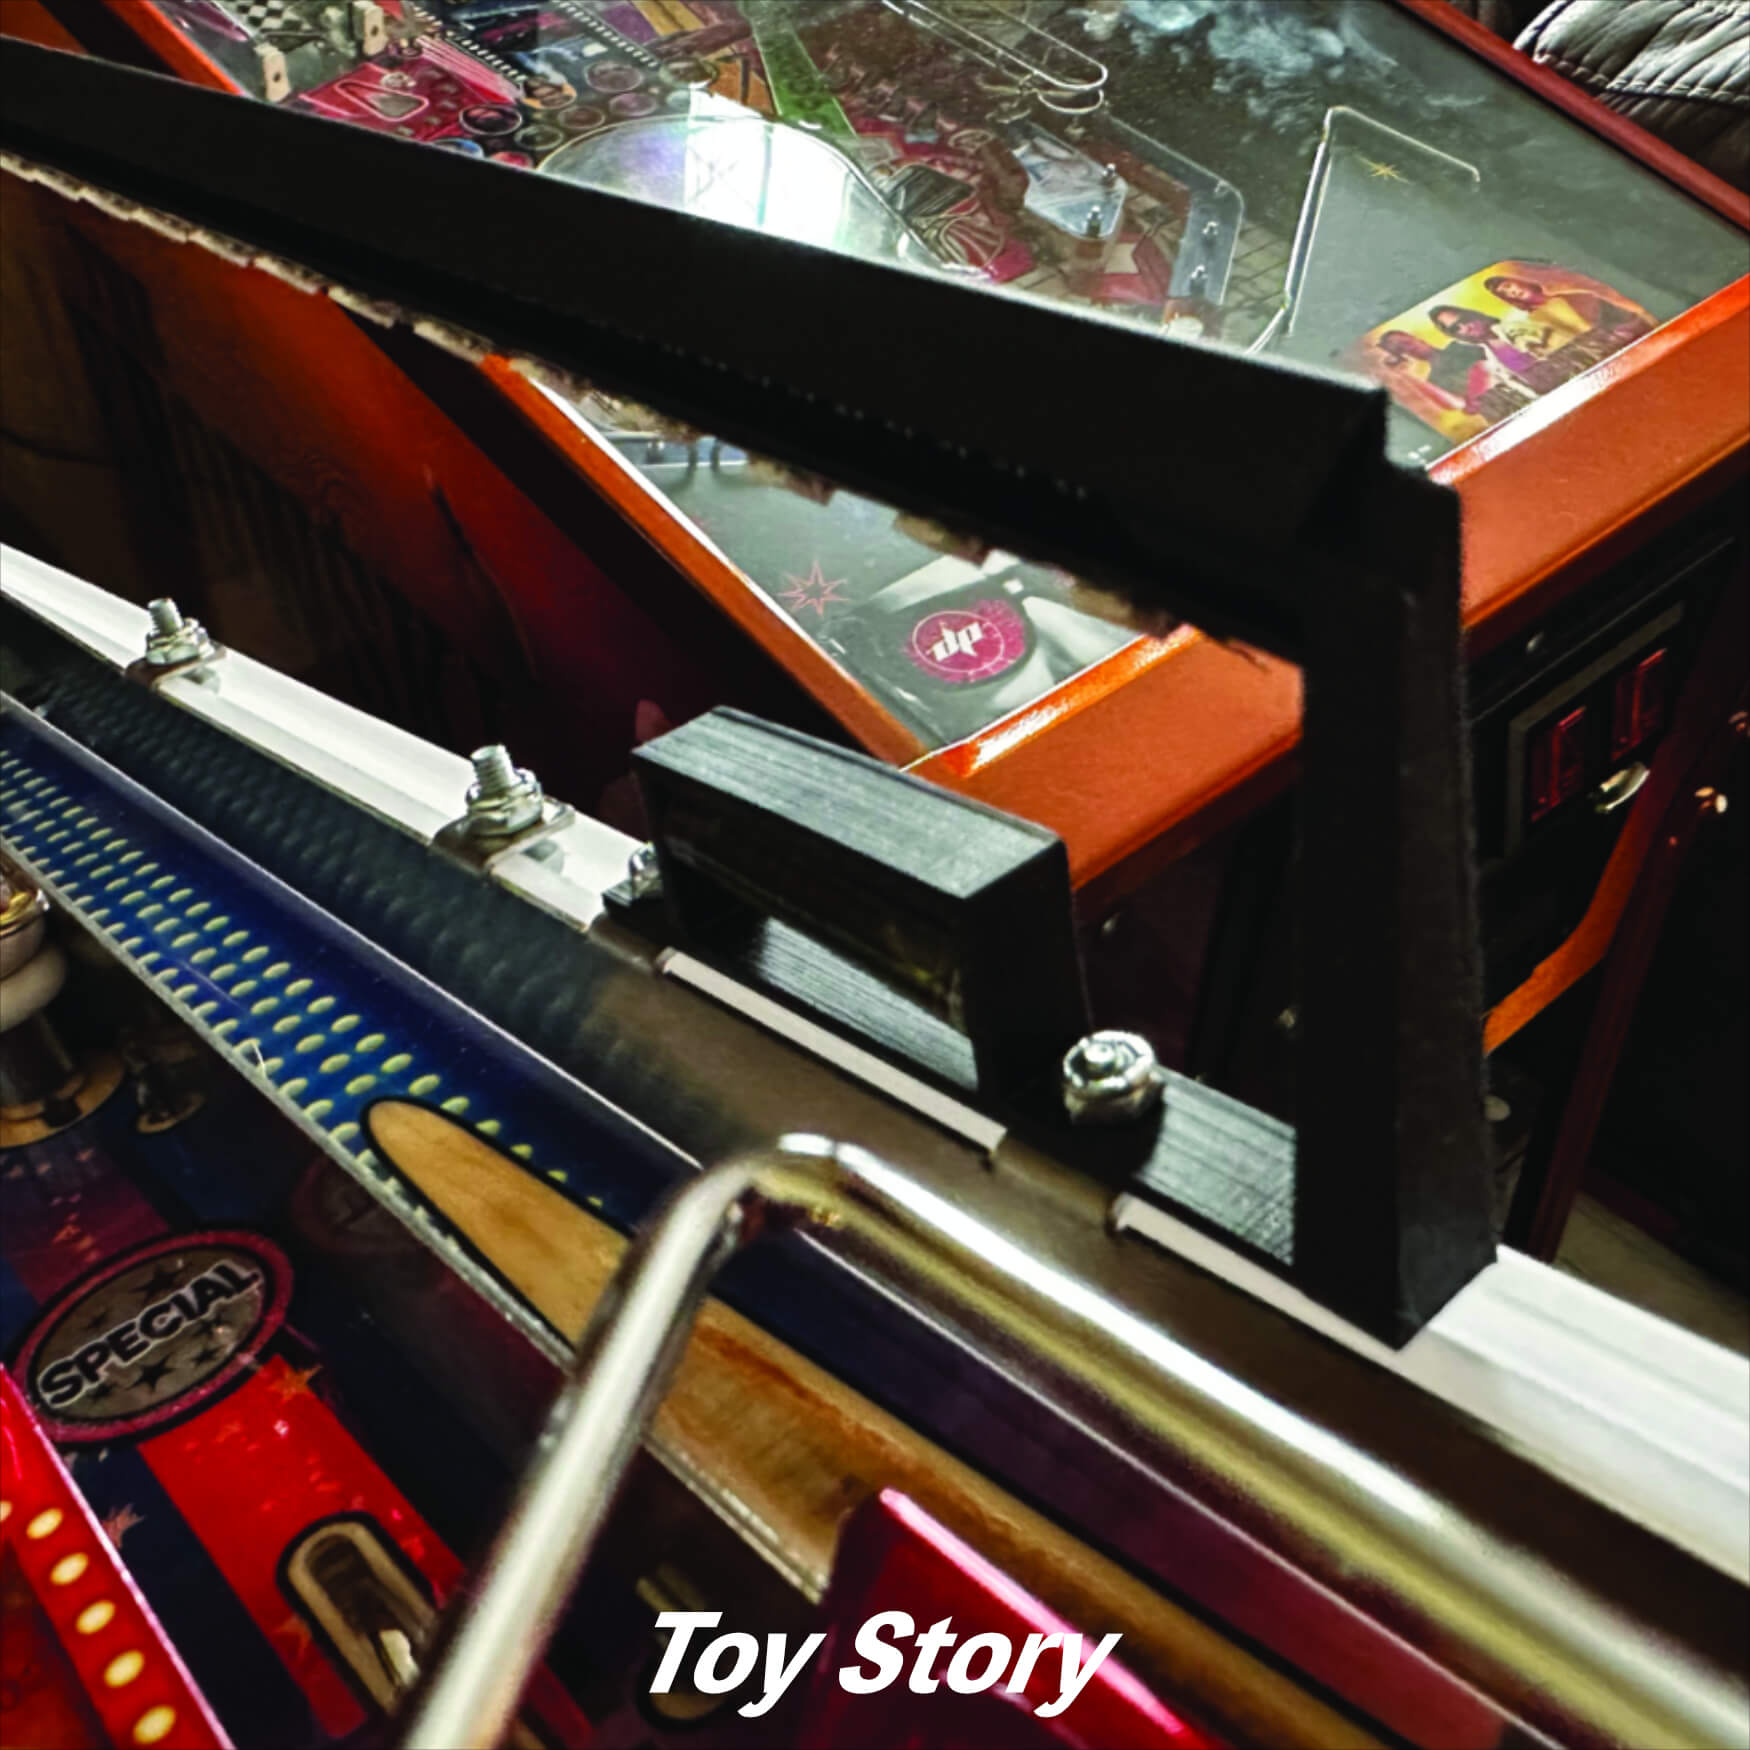
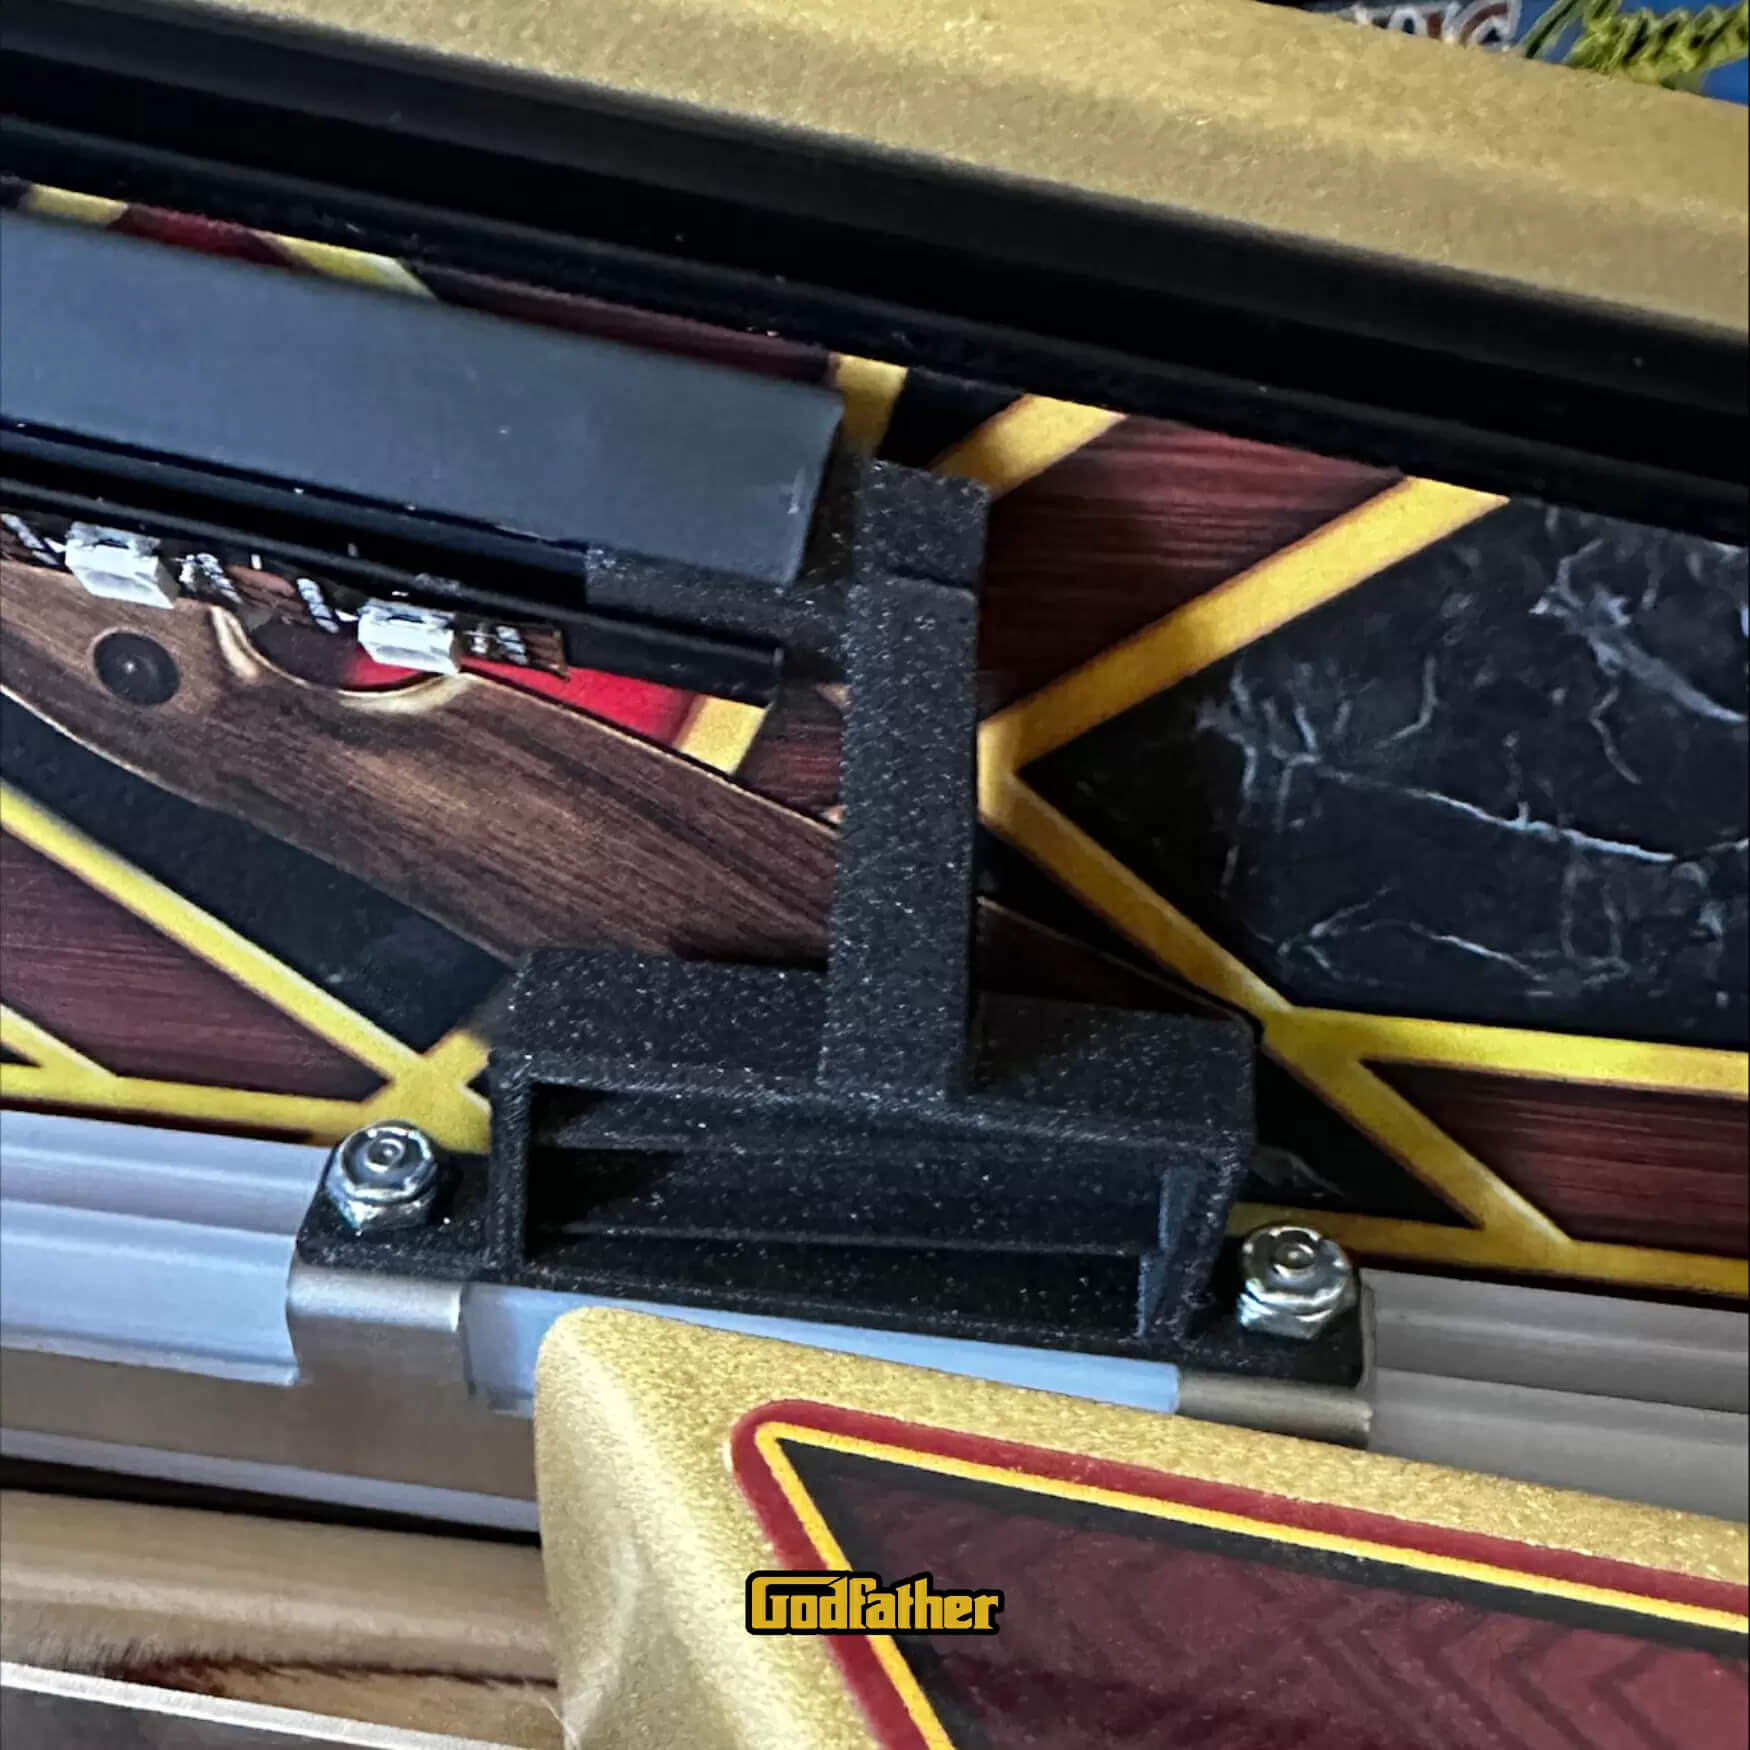
For Toy Story / GNR / Godfather:
Remove the factory bubble leveler located on the bottom right side of the playfield. This is done by removing the 2 screws holding it in place and then replace it with the #1 Xeno Mount. The with a very small flathead screwdriver, pop out the factory bubbler and then pressure fit it into the Xeno Mount. Important: Make note of the bubble orientation and marks BEFORE you remove it from the factory one so that you know which way to insert it into the #1 Xeno Mount
GNR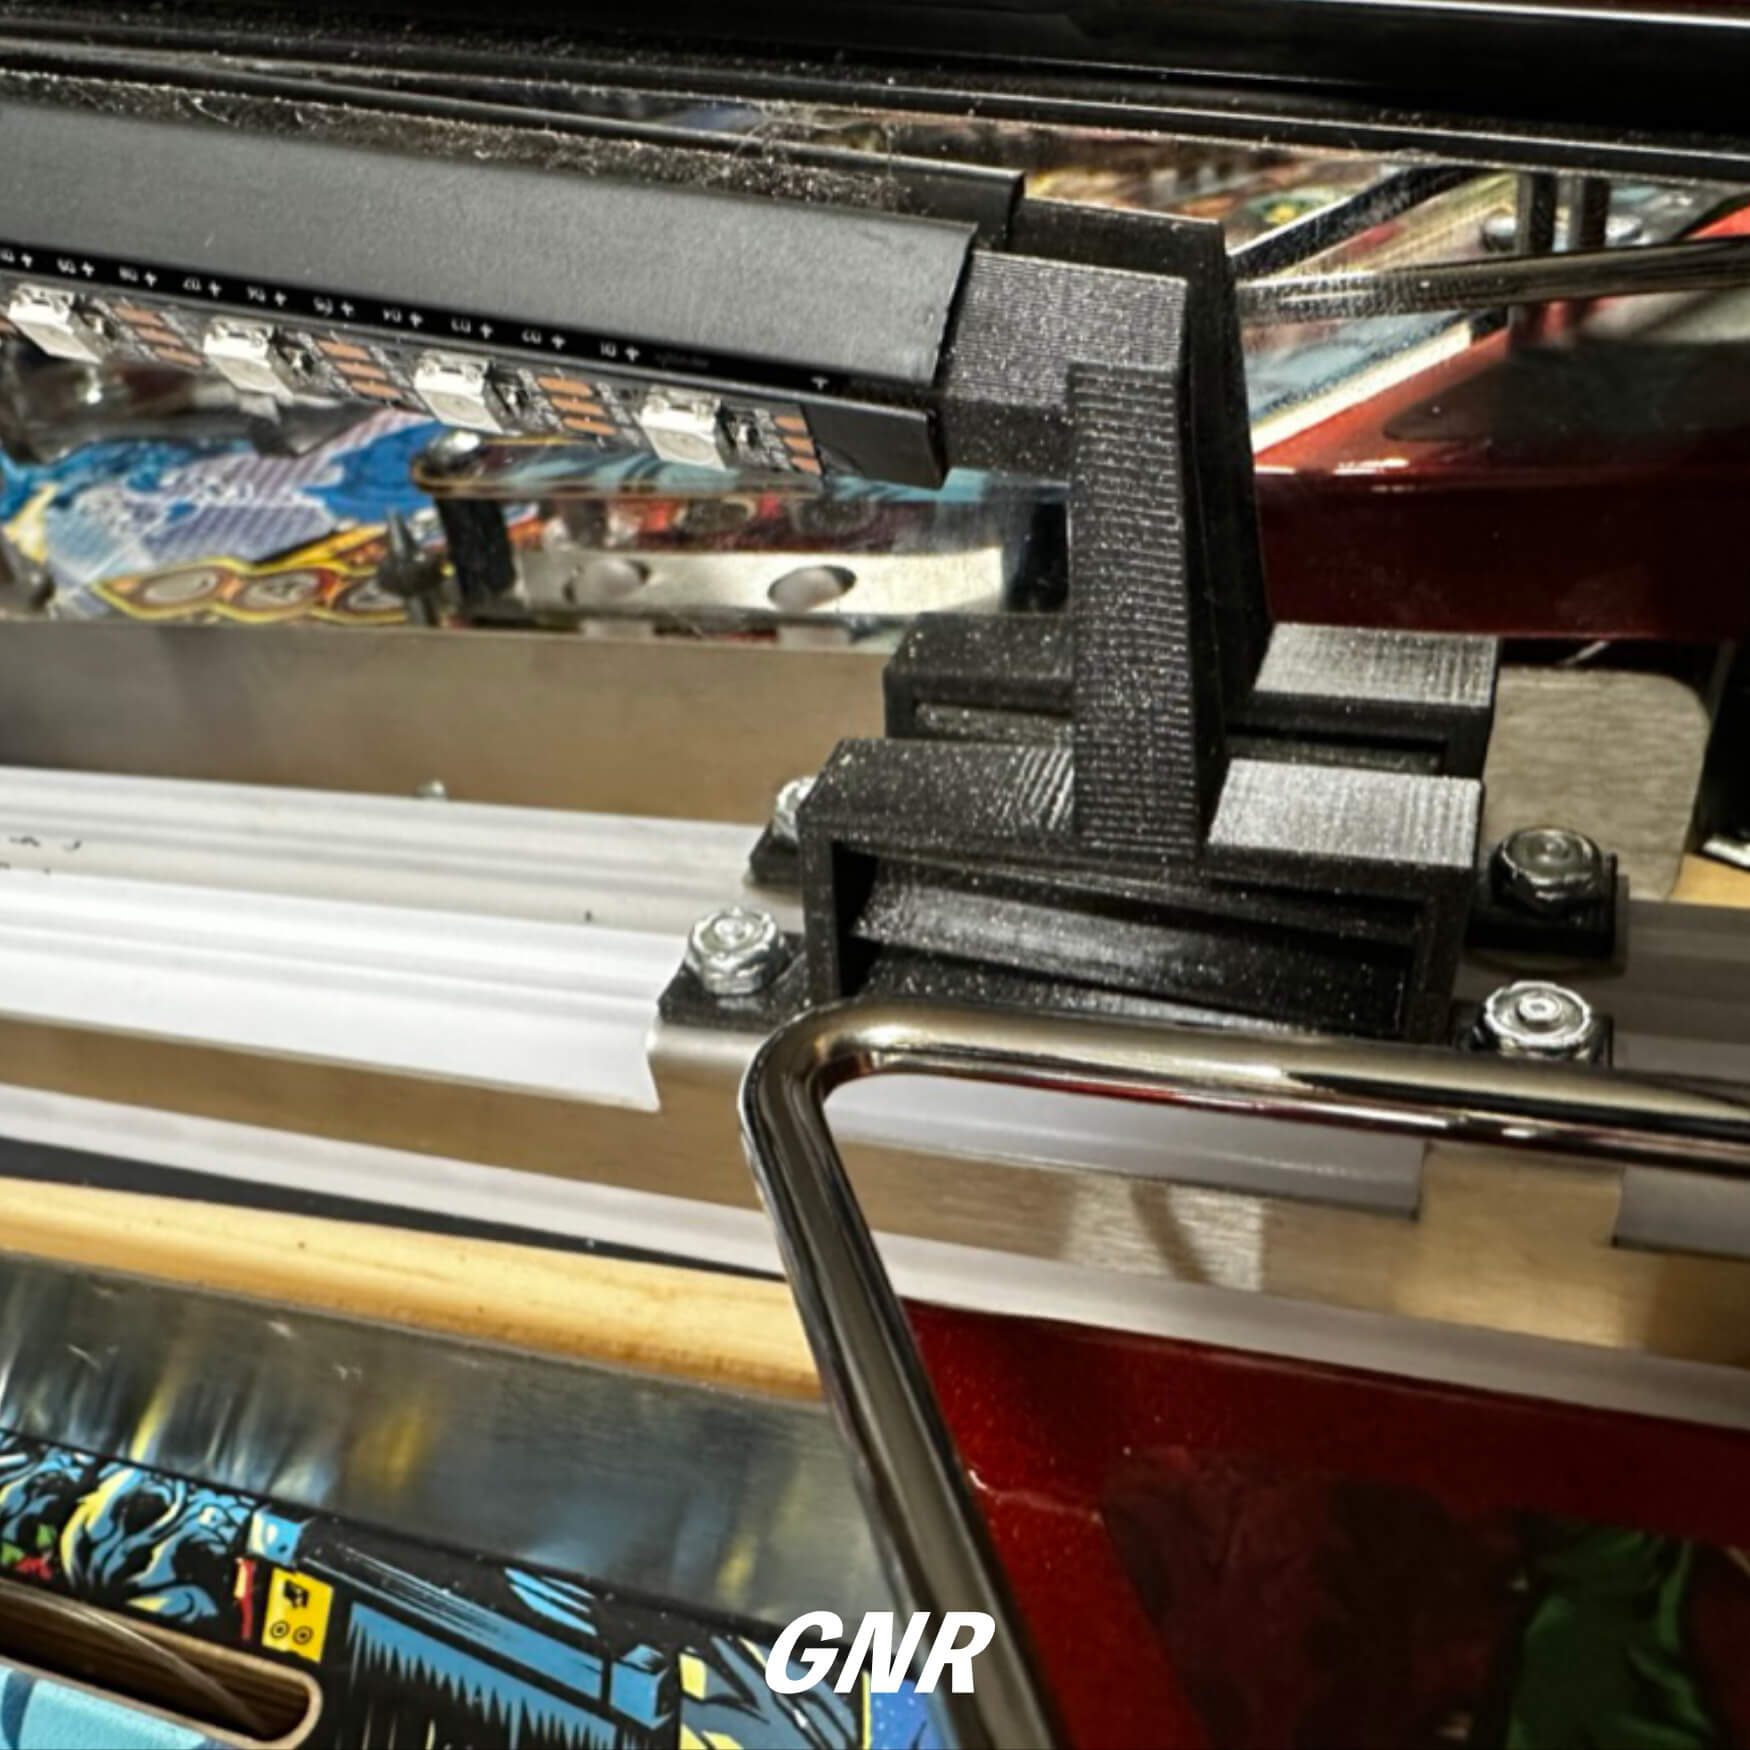
**Note: If you have a Collector’s Edition(CE) you will have a different style mount that will simply adhere to the side of the Coma Lock as show below:
Front Left Xeno:
For GNR: Now on the opposite side of the playfield (left), remove the factory screw holding the metal rail on the apron. Install as shown in the example below. Replace the screw through the hole of the Xeno Mount and make sure the factory apron wire form is back into place. It’s important to hold it (wire form) in place and do not force anything or you will break the Xeno Mount. Tighten it snug, BUT not too firm as it will break/warp the mount for sure. Just make sure it’s nice and snug, easy does it.
GNR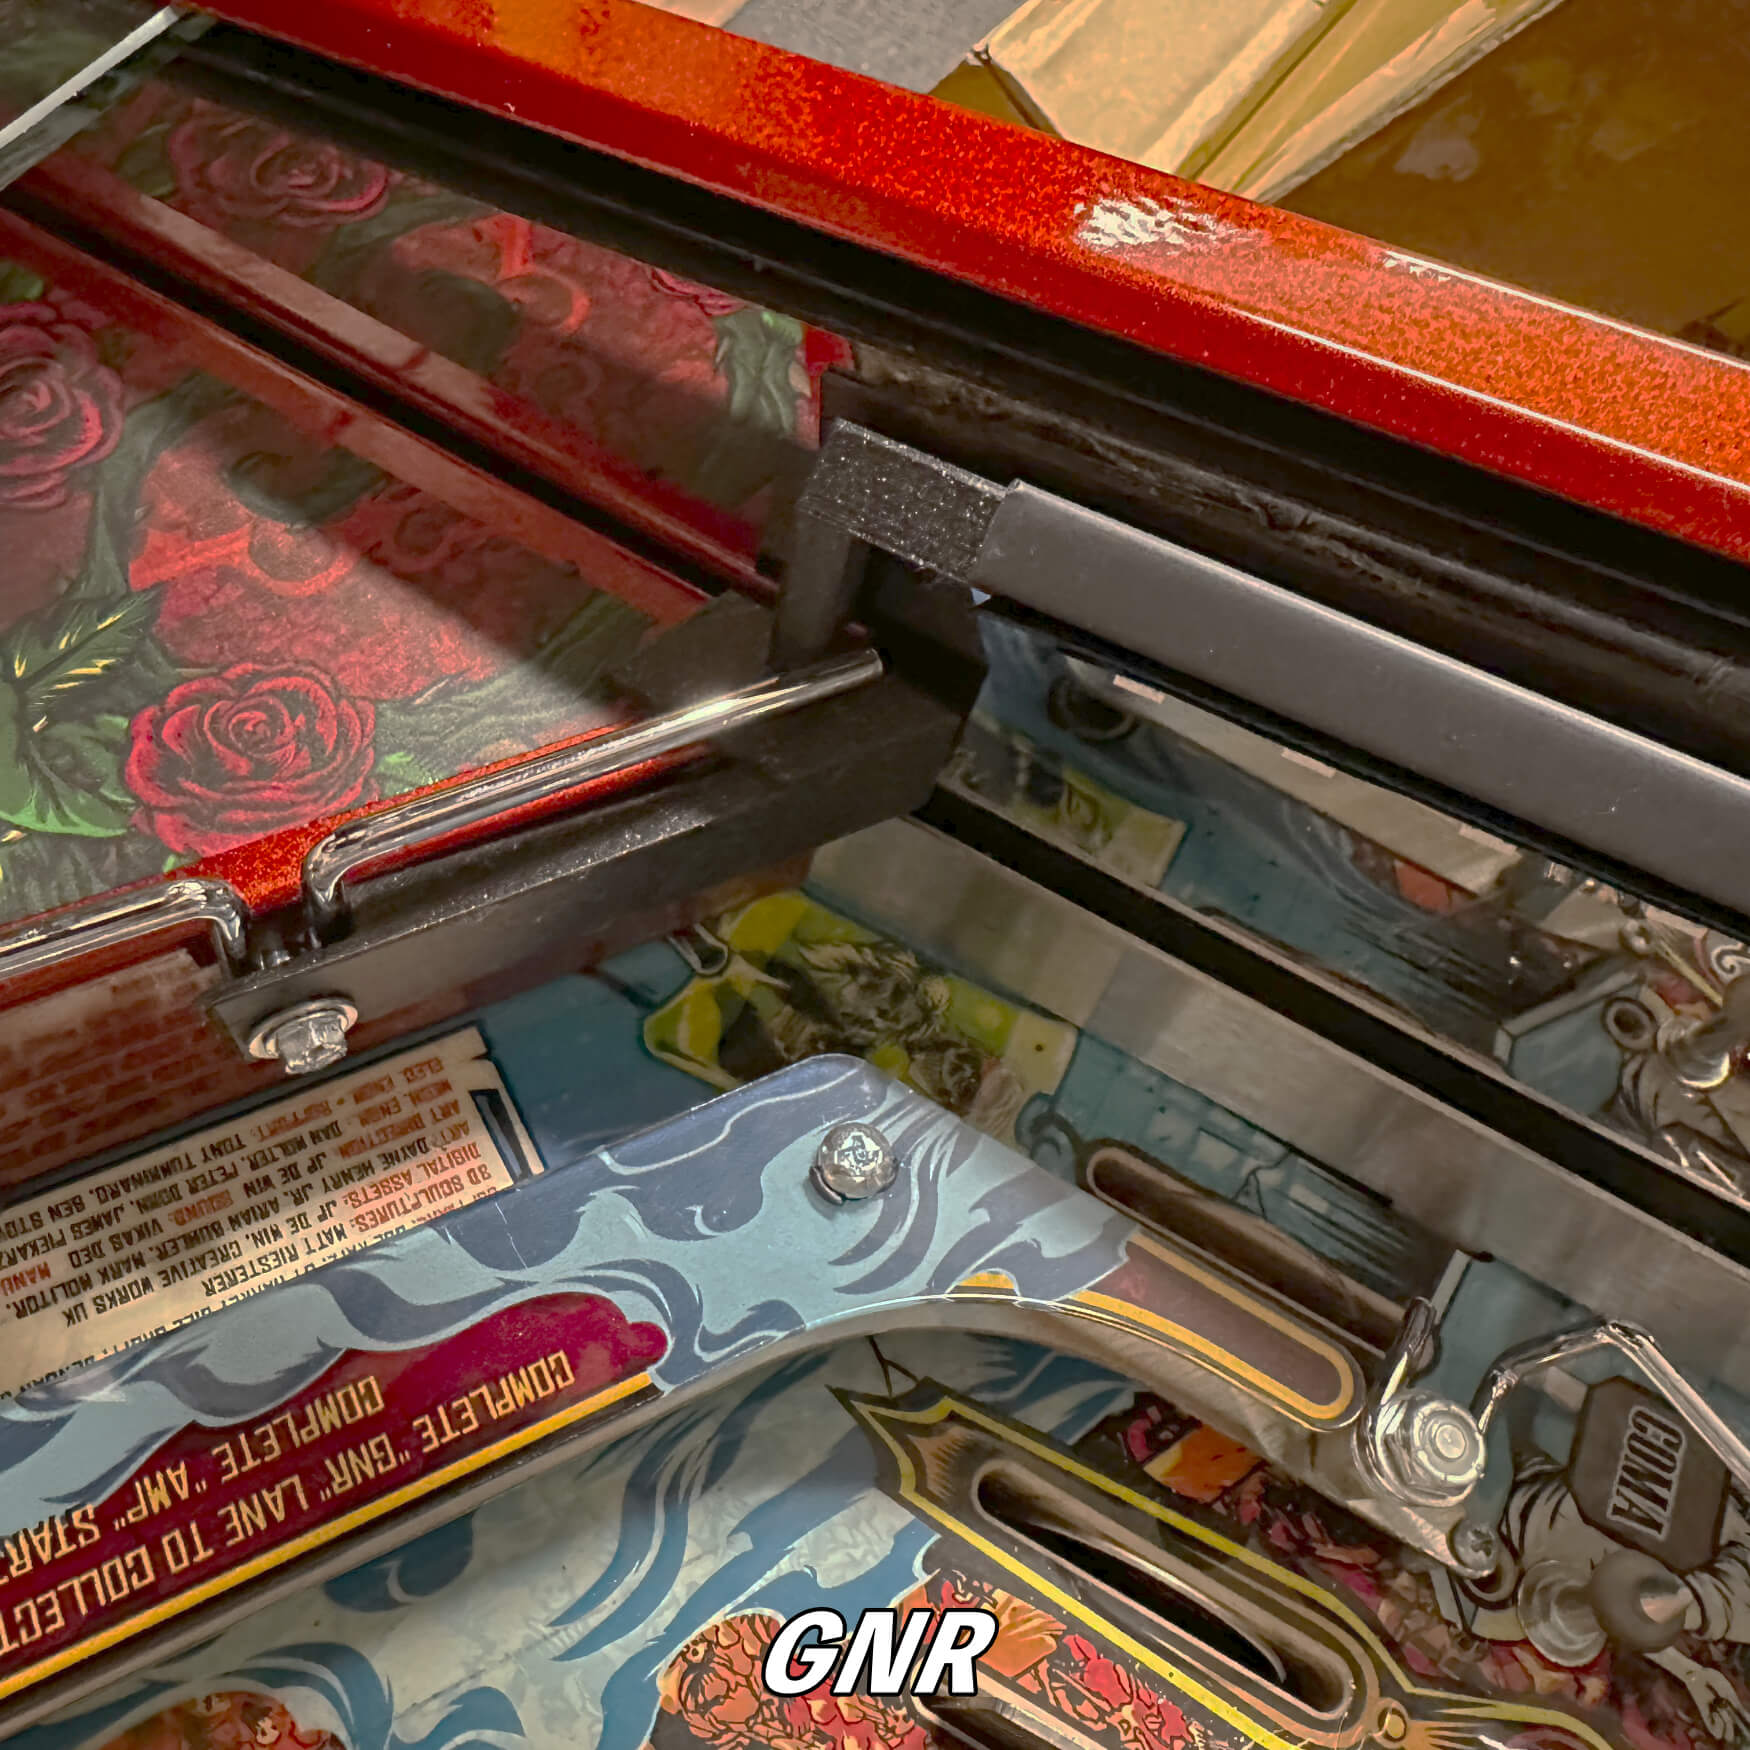
For Toy Story: Now on the opposite side of the playfield (left), remove the factory screw holding located on the white plastic lighting rail. Install as shown in the example below. Replace the screw through the hole of the Xeno Mount and tighten it snug, BUT not too firm as it will break/warp the mount for sure. Just make sure it’s nice and snug, easy does it.
Toy Story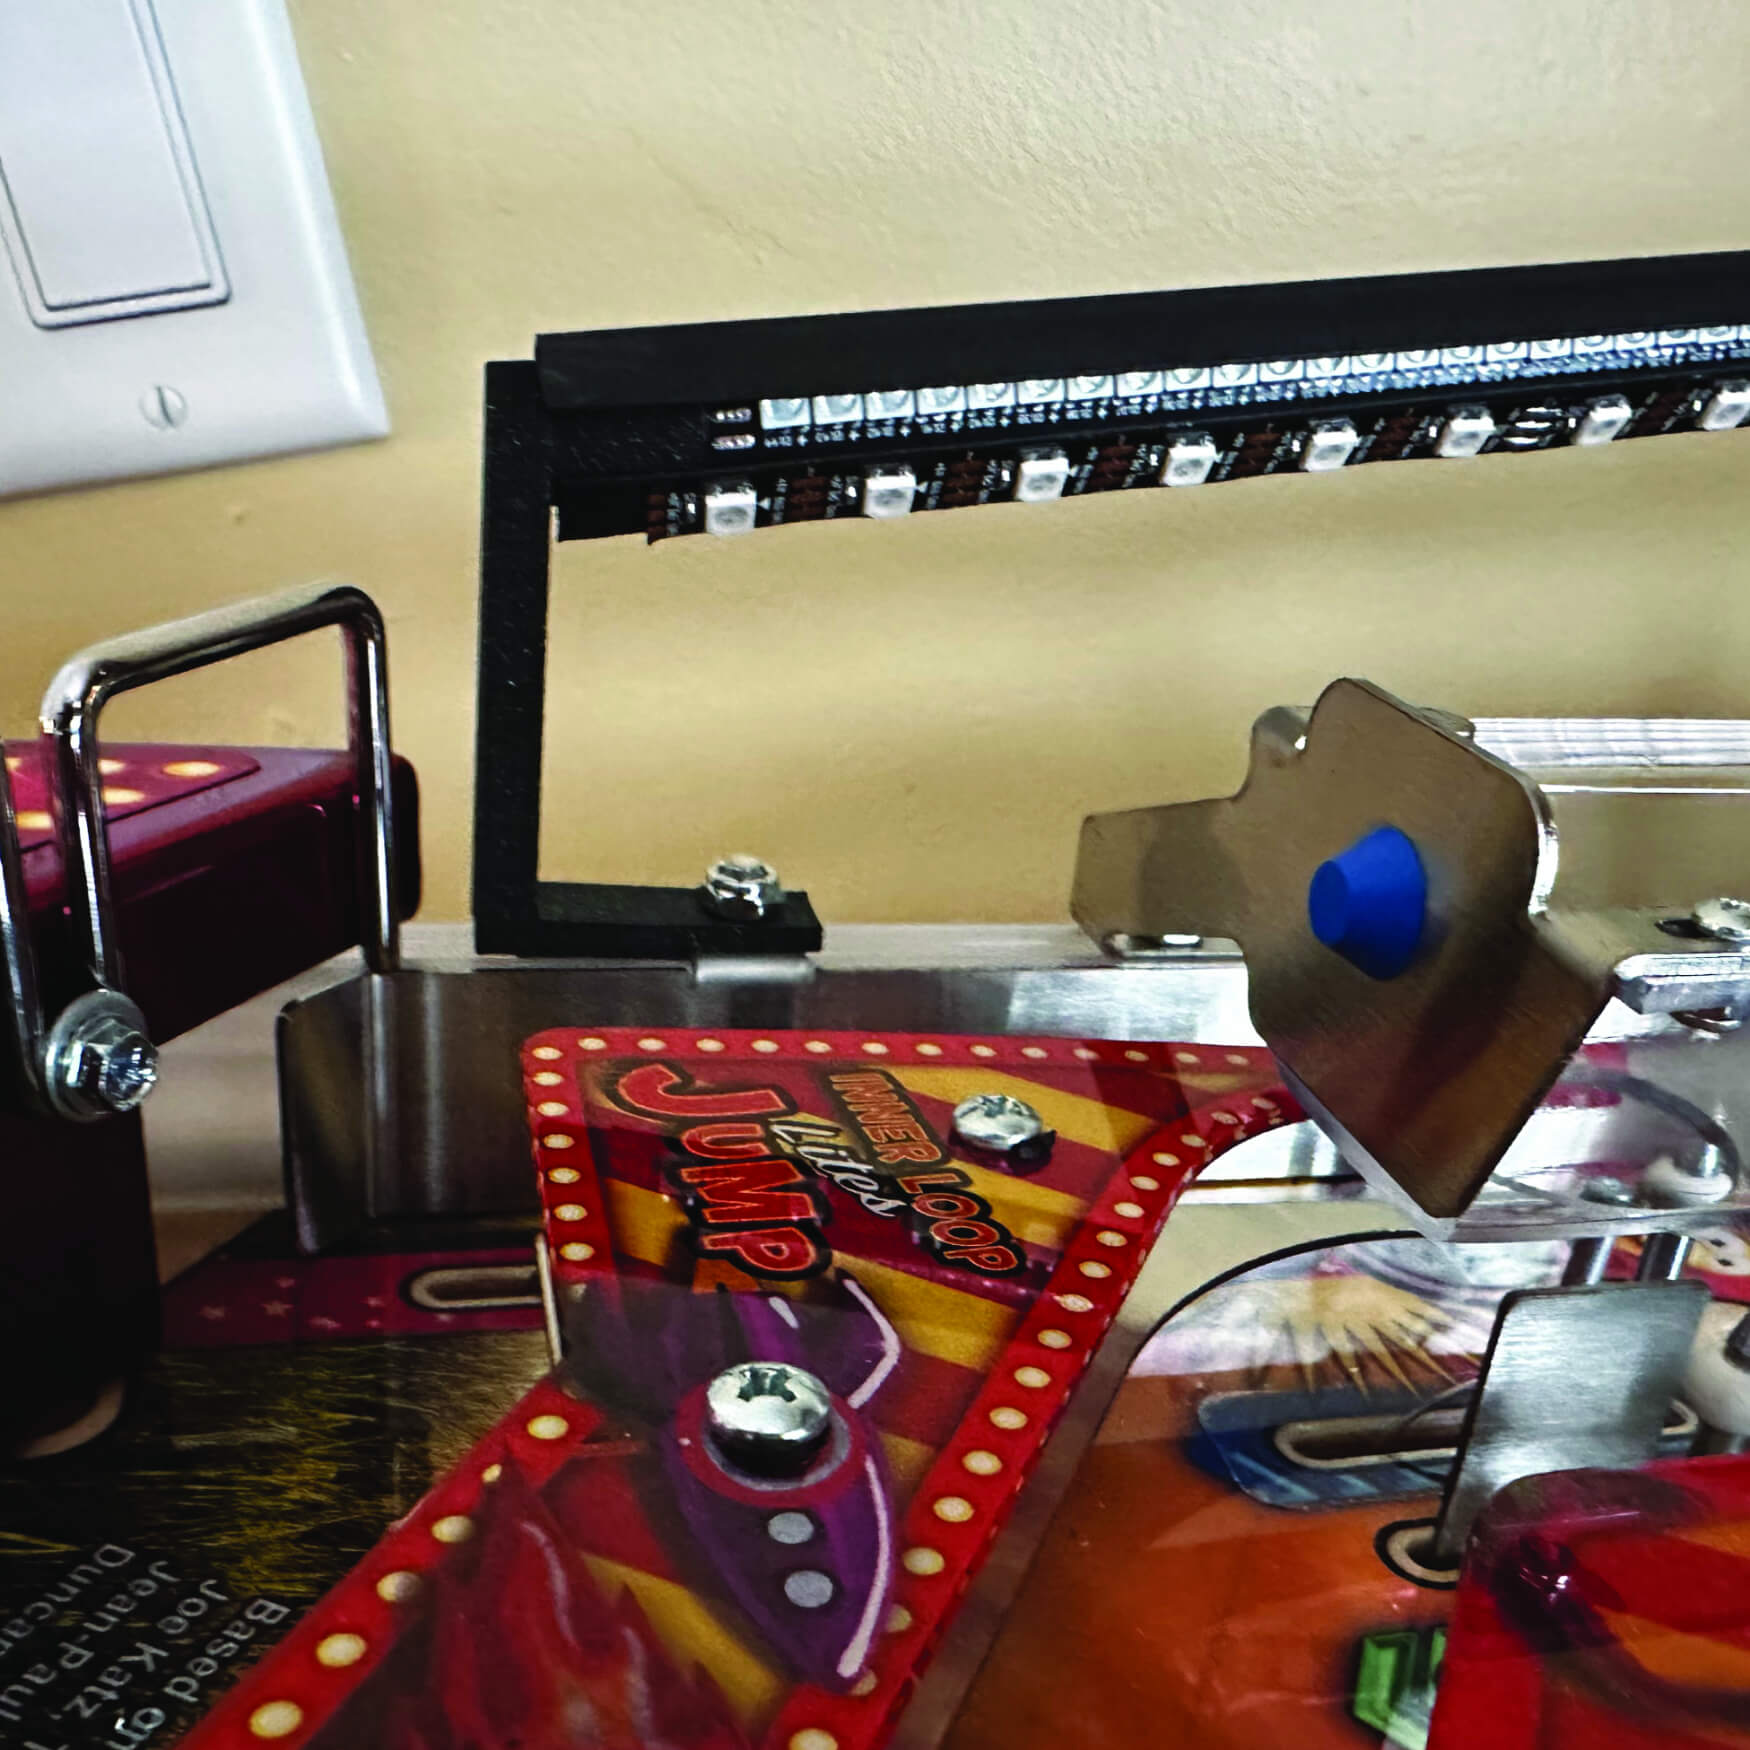
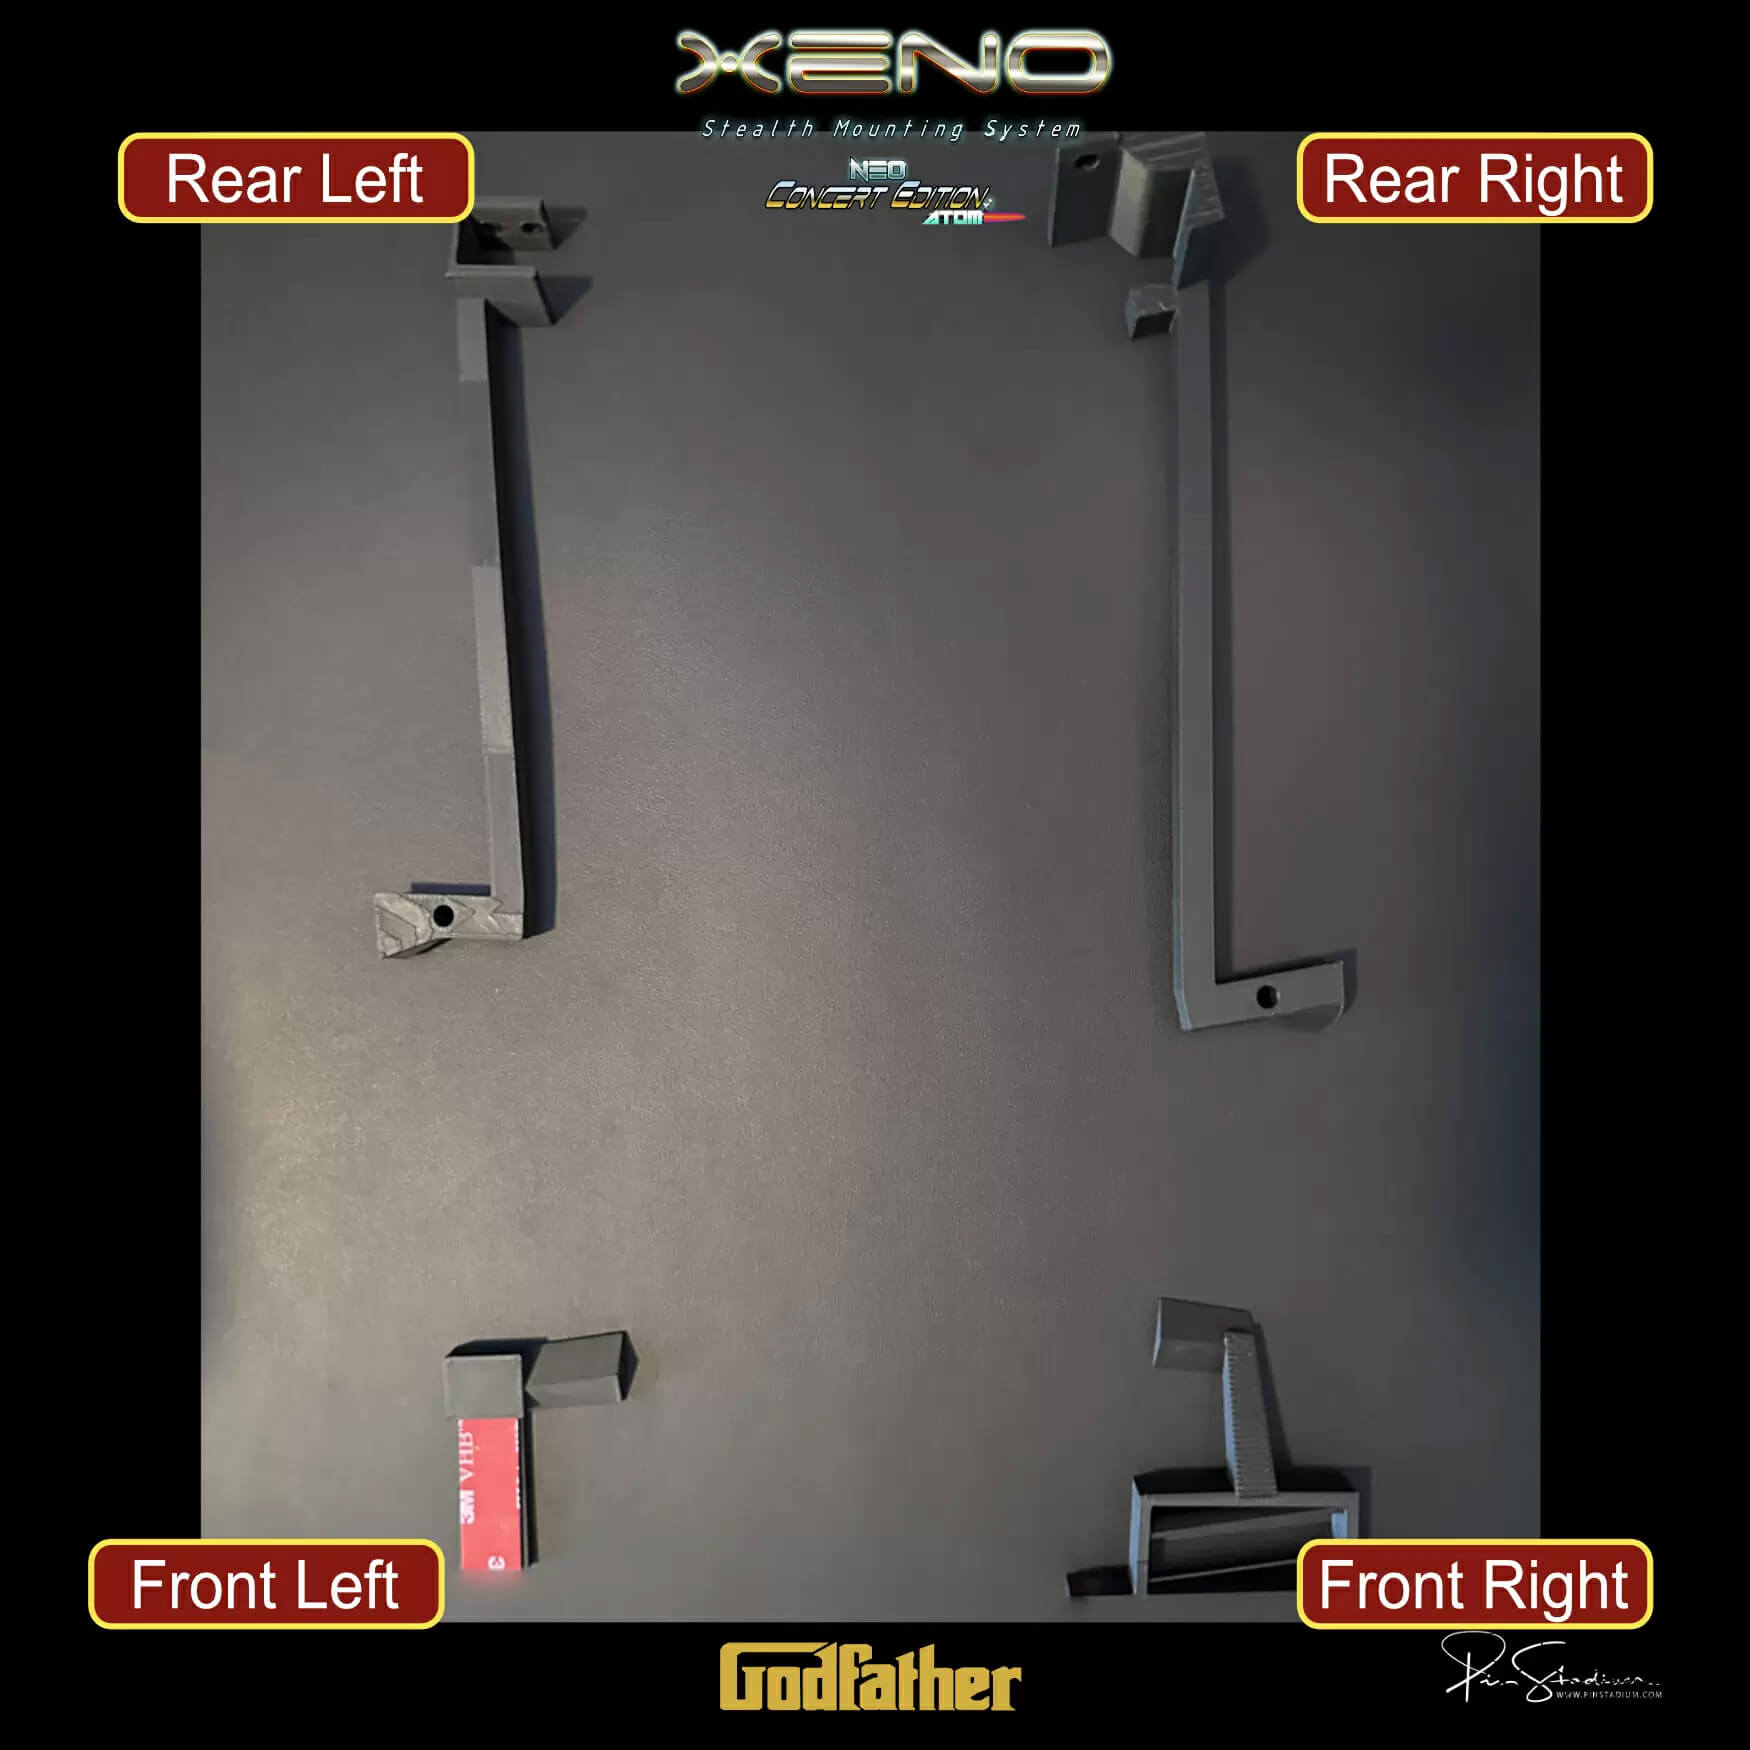
For Godfather/Elton John: Peel off the red adhesive covering and place that side on the apron as shown in the example below. Make sure the edges of the mount line up with the vertical line of the apron(Back Side View) and also note that the head of the mount will rest flush on the apron(shown in larger background pic).
Godfather: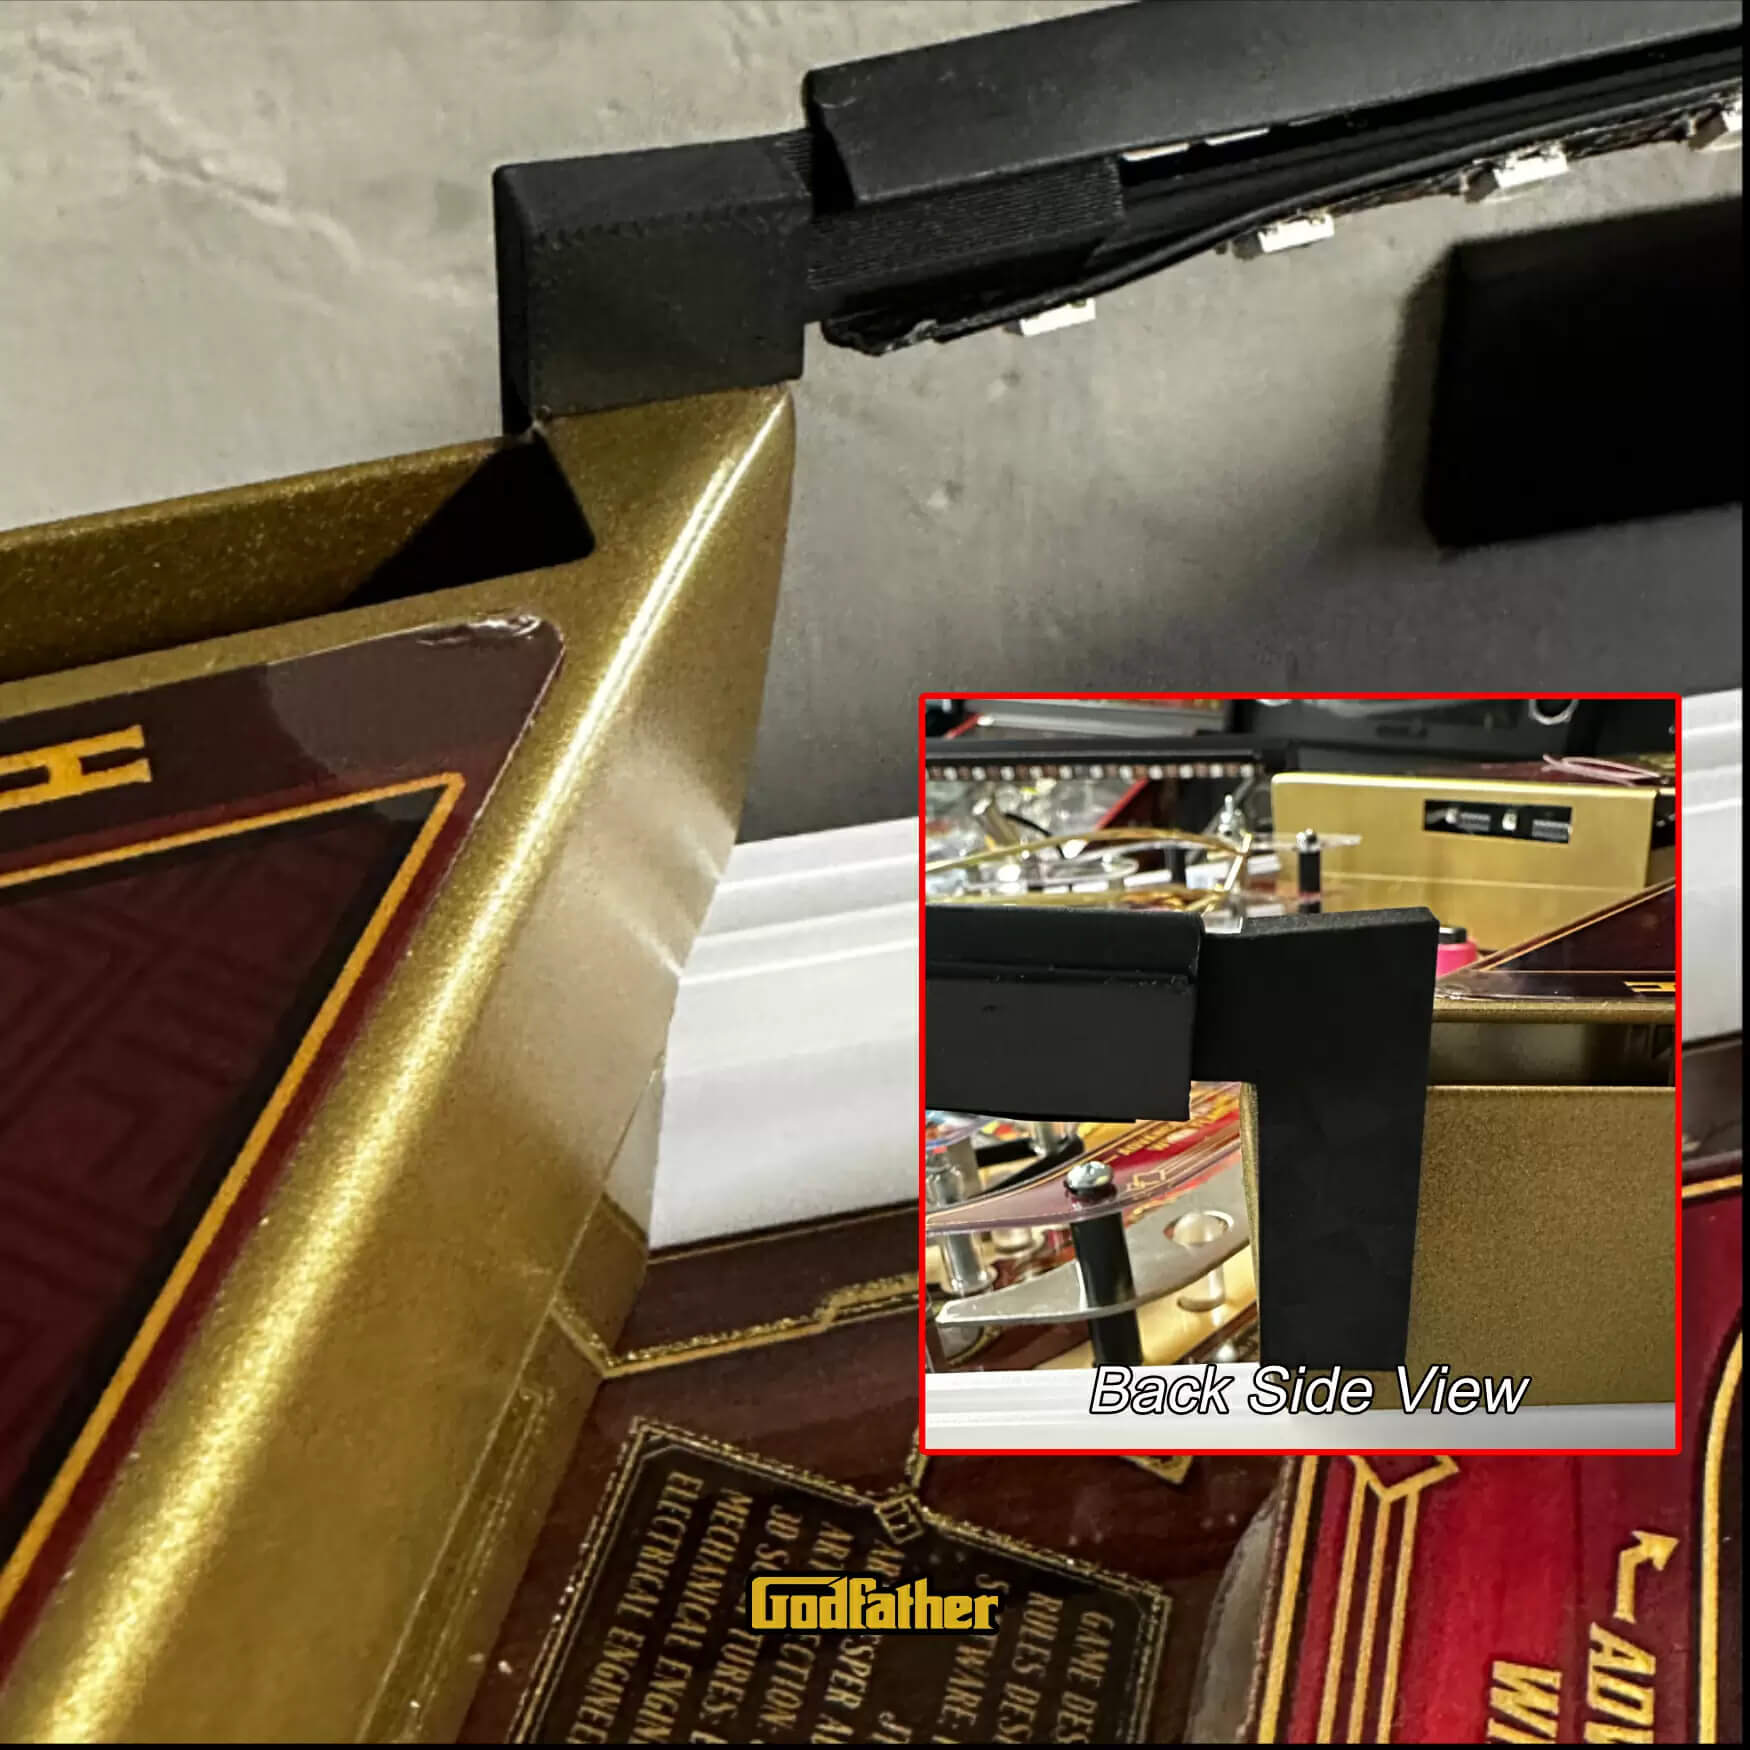
Rear Left Xeno:
For GNR: Place it one the left edge of backboard located at the rear of the playfield as shown in the pic below. Make sure it is flush with the very top of the backboard and on the side of the backboard. There should be no gaps as this pieces is design to fit firmed around the top an side edges!! Hold it in place as such and insert 2 screws as shown to secure it.
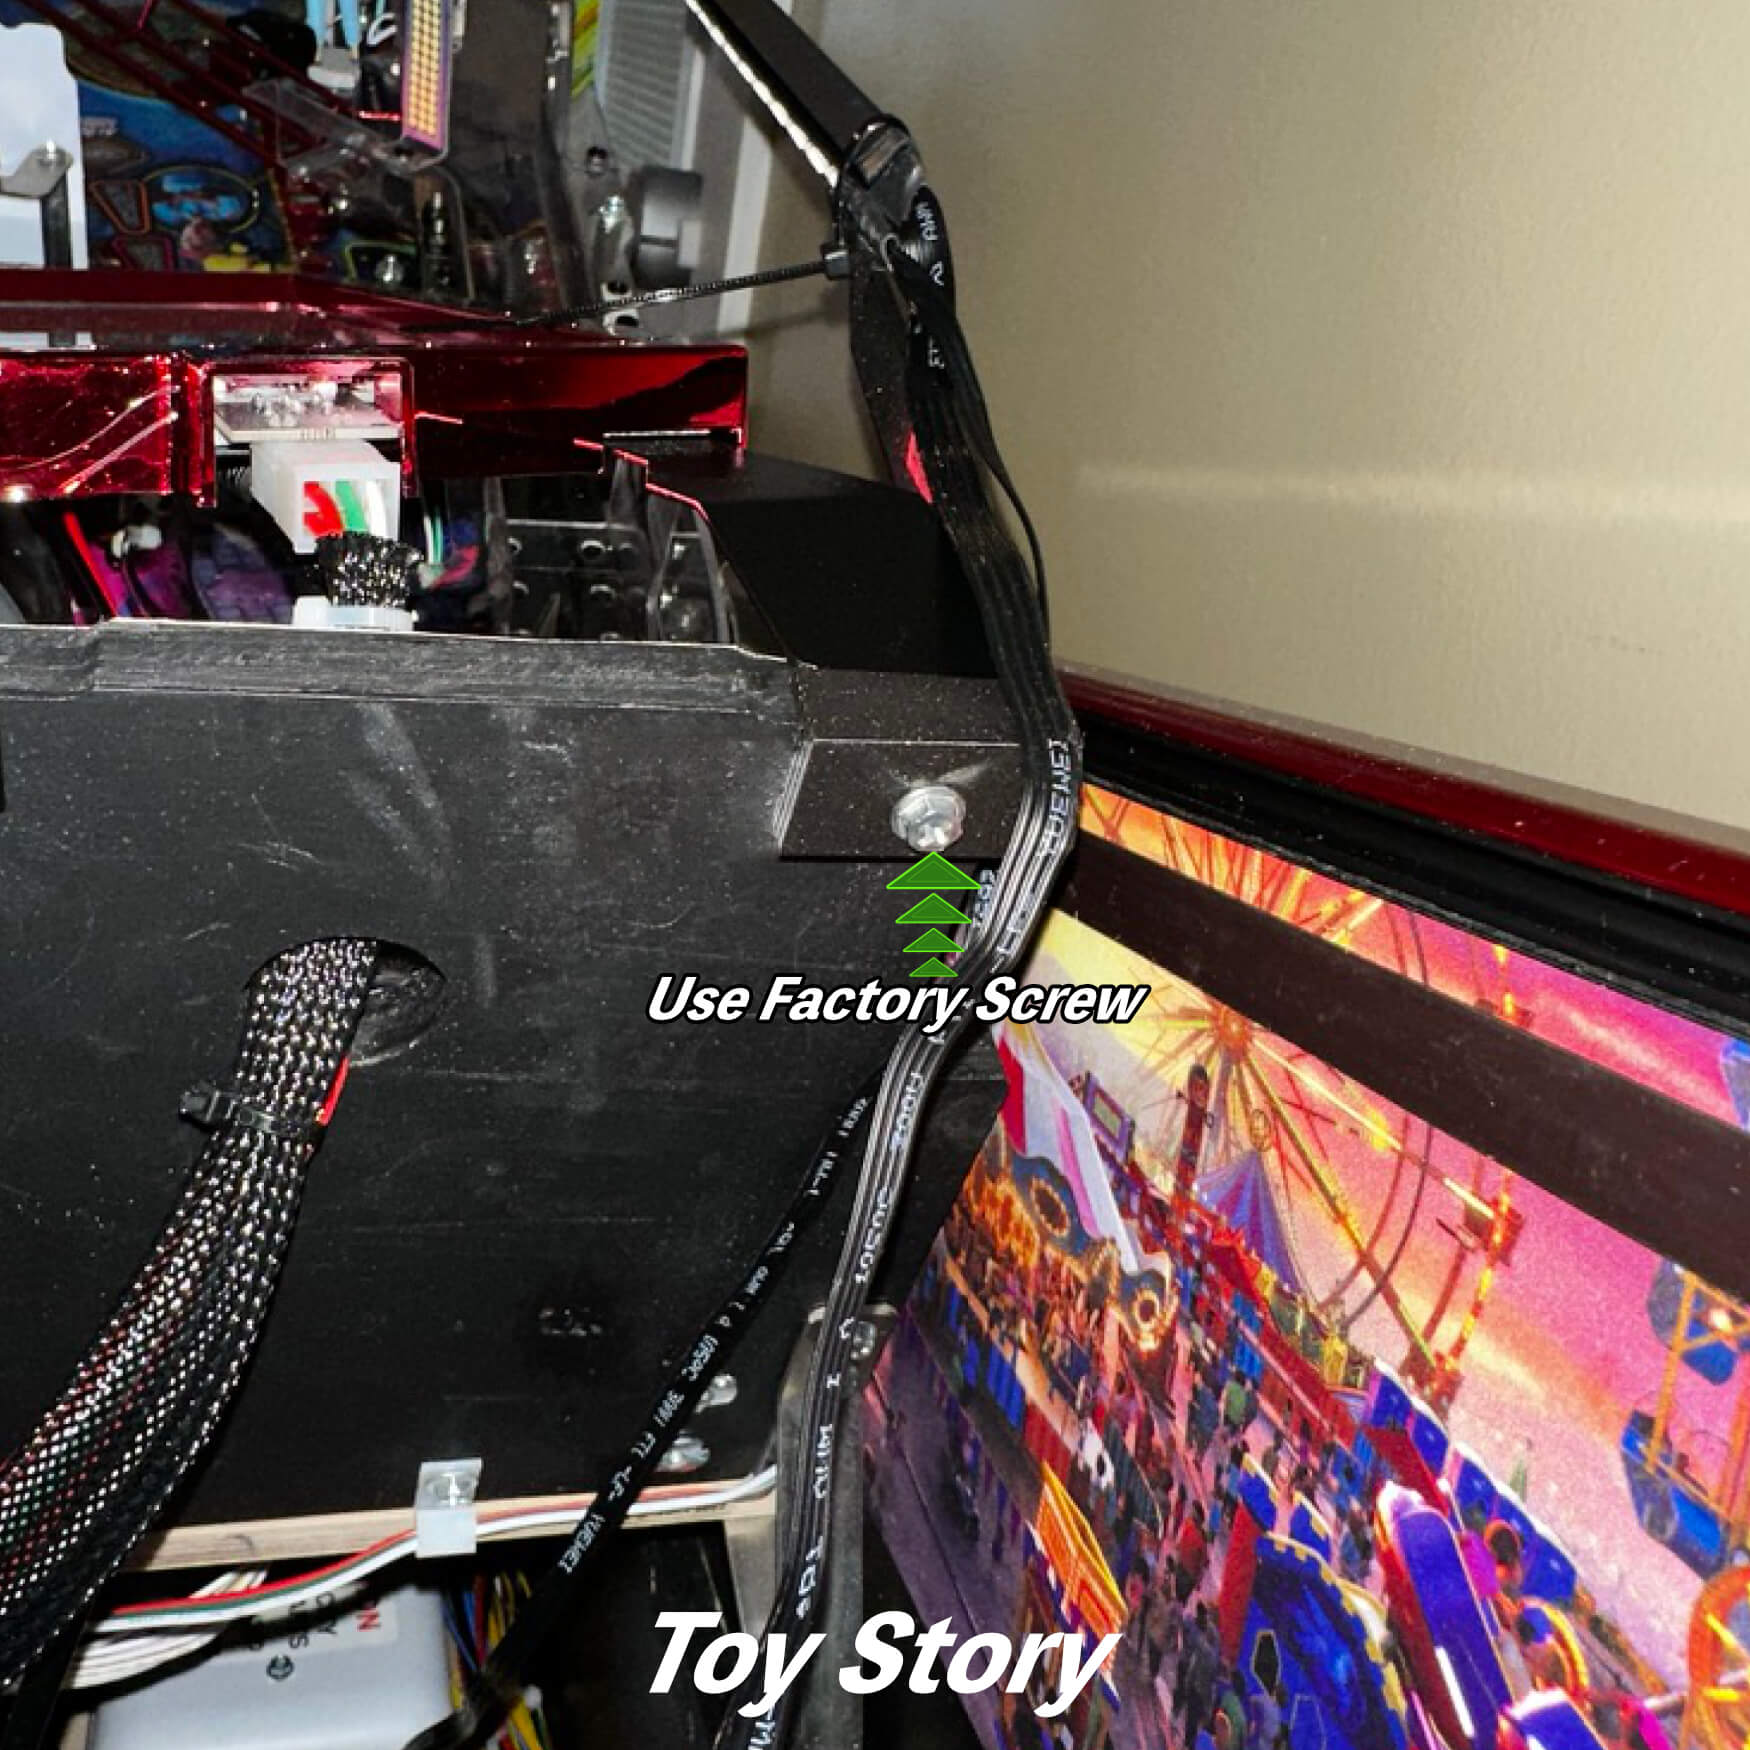
For Toy Story: Place it one the left edge of backboard located at the rear of the playfield as shown in the pic below. Make sure it is flush with the very top of the backboard and on the side of the backboard. There should be no gaps as this pieces is design to fit firmed around the top a side edges!! You will remove the factory screw from the left screen mount. Then align the hole on the Xeno Mounts with the hole where you removed the favored screw. Then put the factory screw back in to secure it, done!!
For Godfather: Place it one the left edge of backboard located at the rear of the playfield as shown in the pic below. You “MUST” slide the it under the factory LED strip heat shrink as shown in the “SLIDE UNDER” section in the thumbnail pic. Make sure it is flush with the very top of the backboard and front edge of the backboard. There should be no gaps as this pieces is design to fit firmed around the top a side edges!! Then put the 2x screws that are located in your accessory packet into the holes on the rear of the mount. They are self tapping screws and they will need to be screw in firmly at first to start to grab into the background on the machine.
It will take a little time and some force to get it started. You will feel like you are not making any progress and then with enough pressure it will start to screw in. Tighten the screw snugly but not too hard or you will crack the Xeno Mount.
Godfather: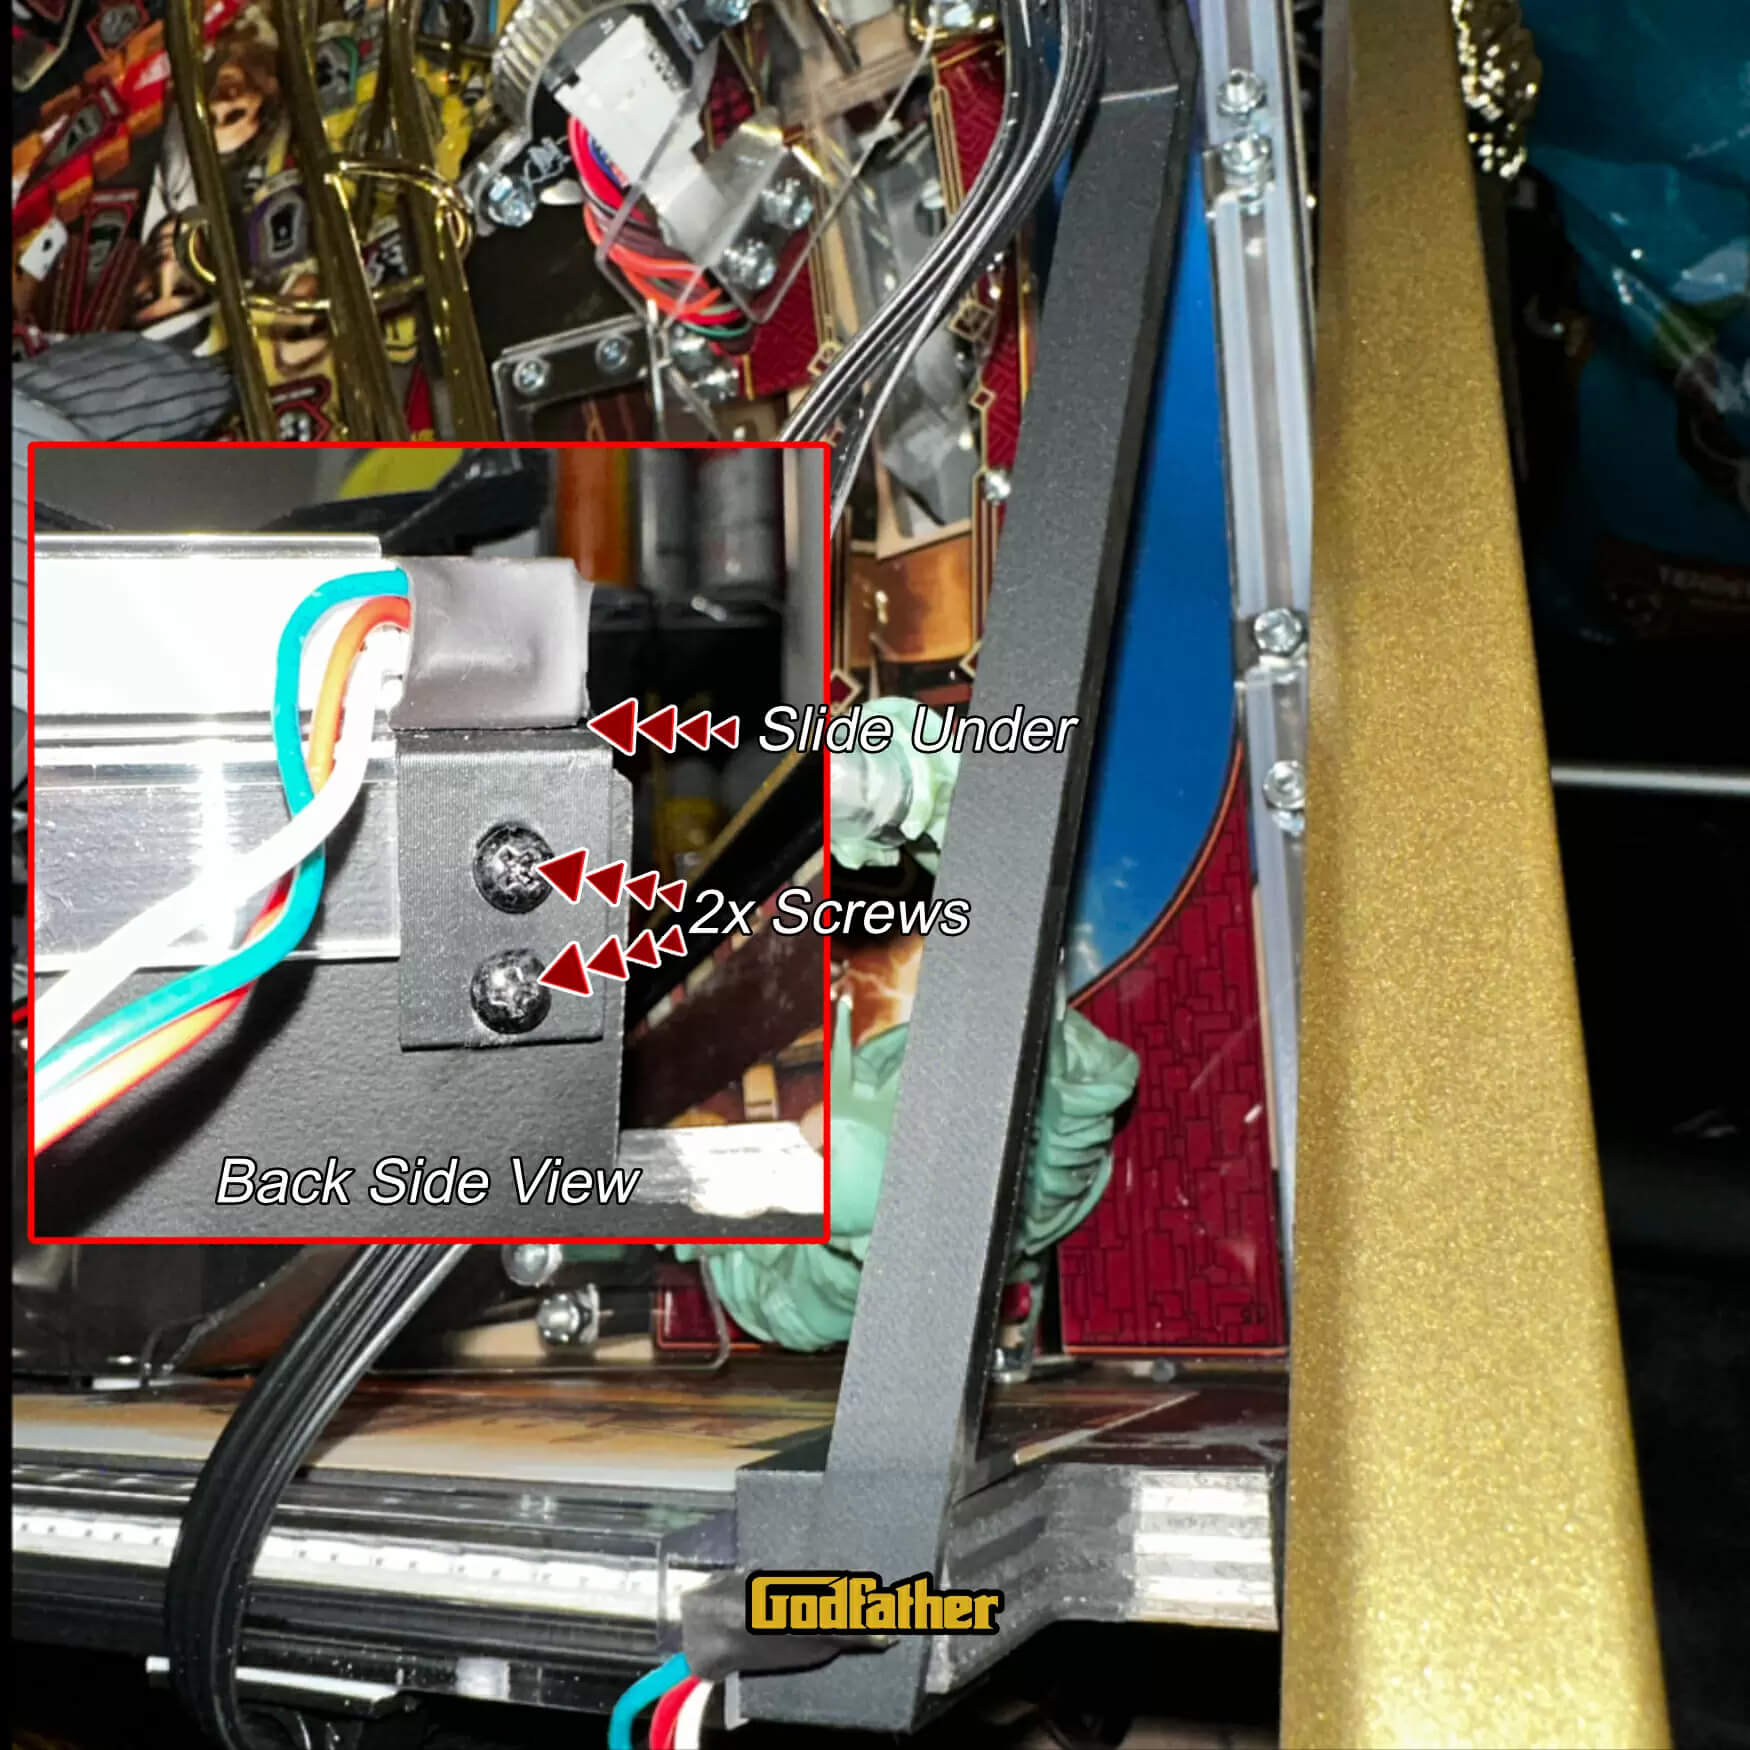
Rear Right Xeno:
For GNR: Remove the factory screw in this area and place it as shown in the pic below. Re-insert the factory screw through the Xeno Mount base as such to secure it.

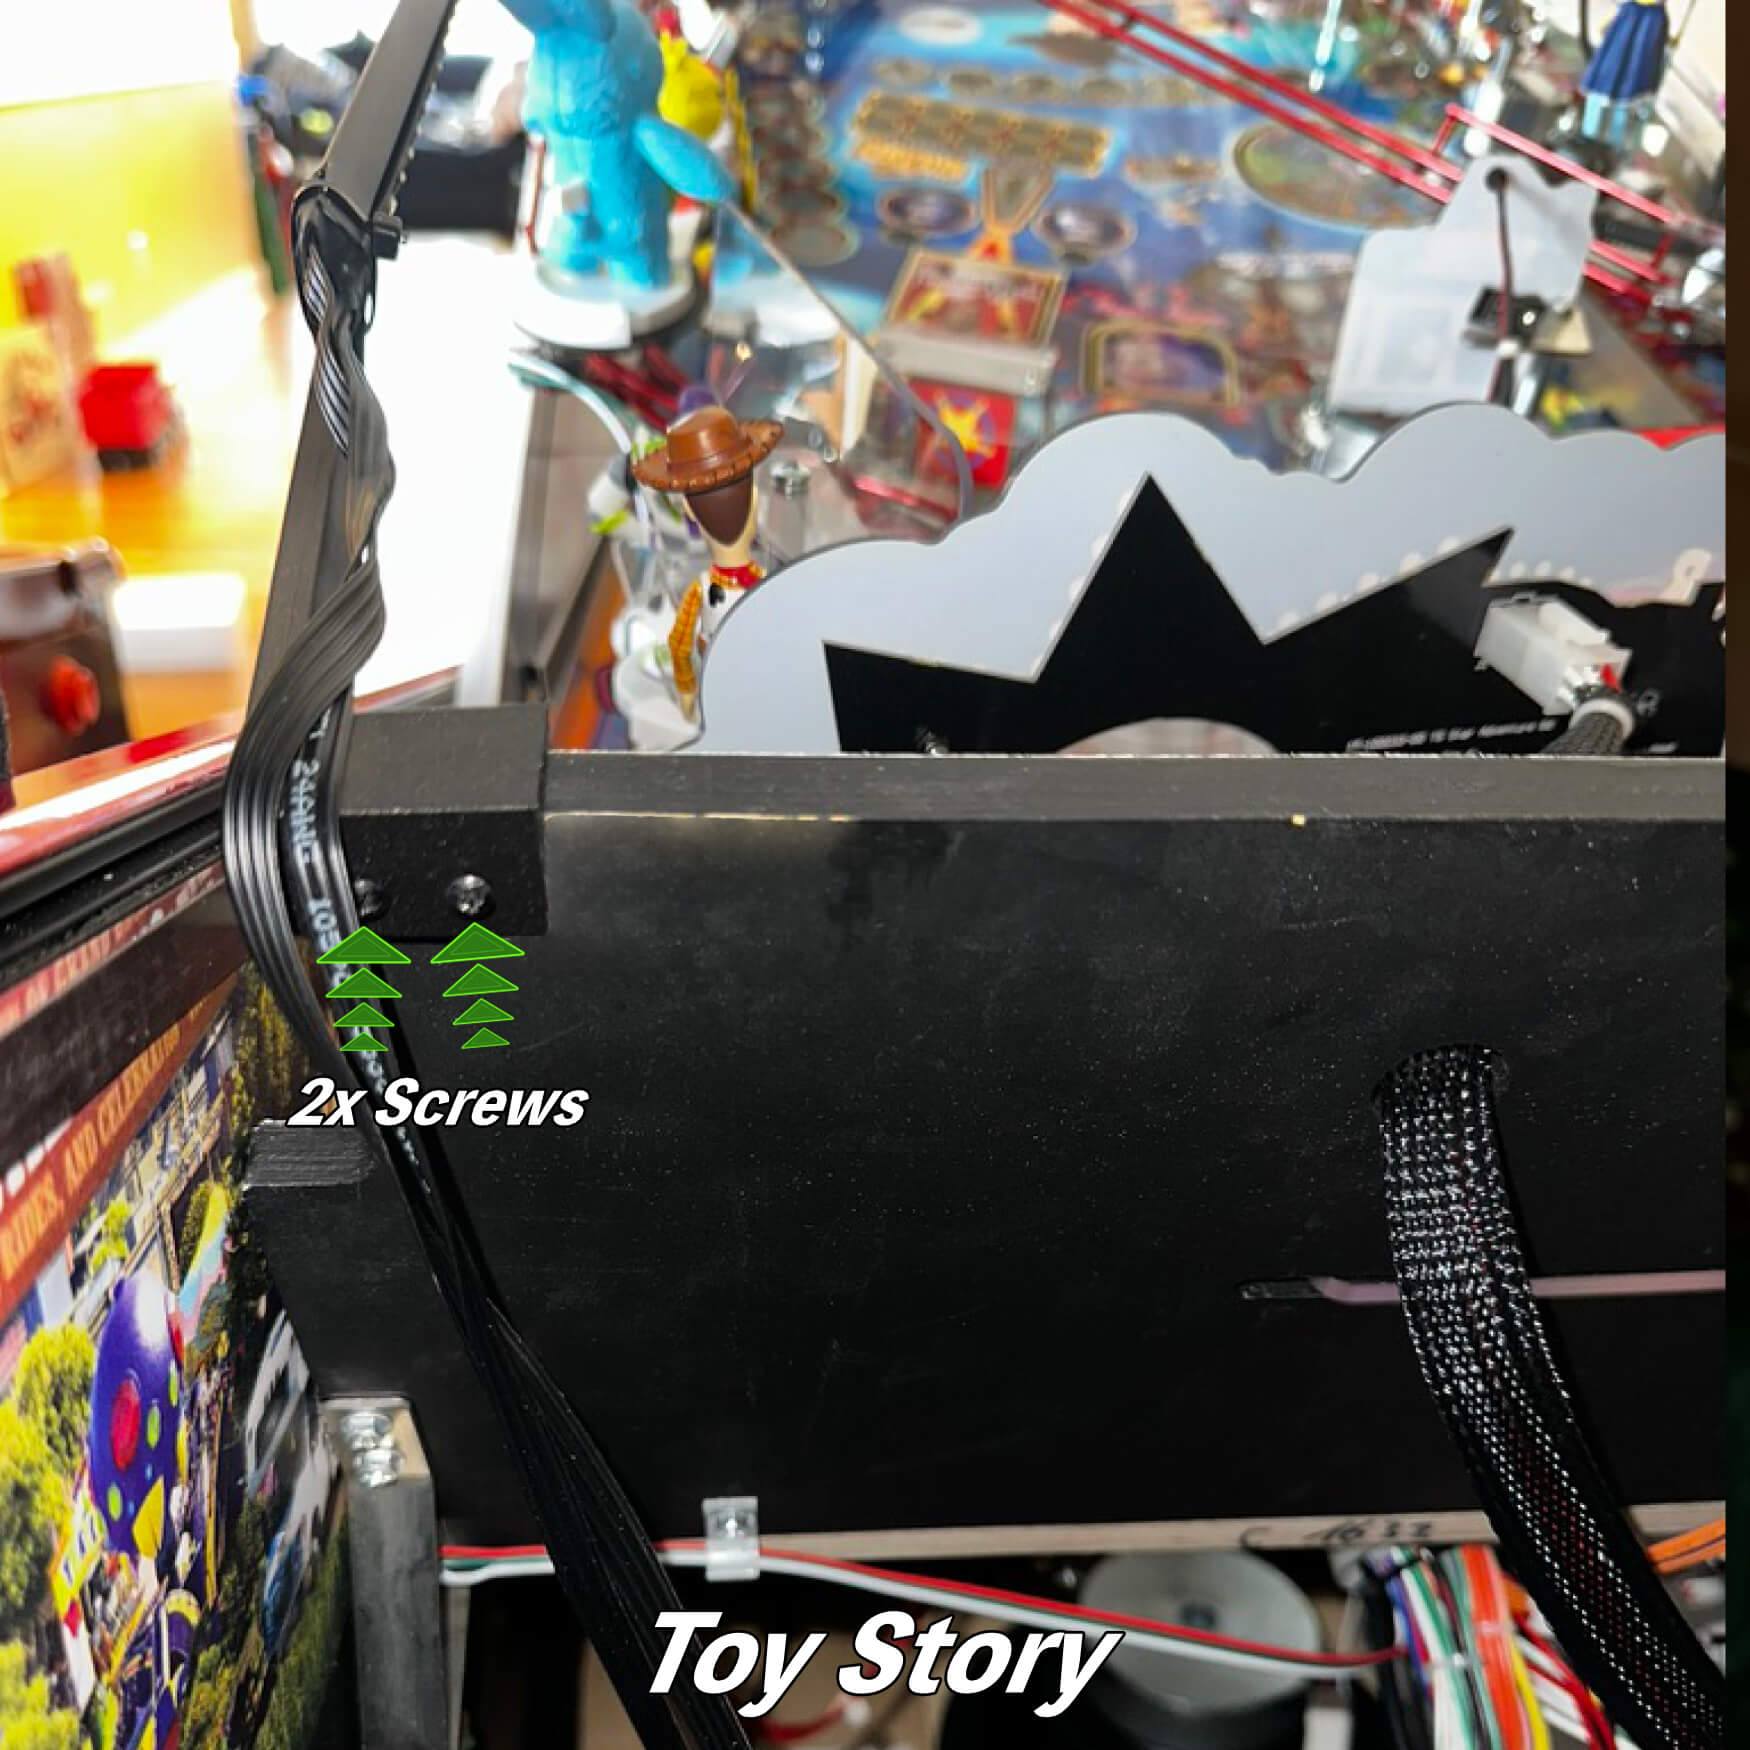
For Toy Story: Place it one the right right top edge of backboard located at the rear of the playfield as shown in the pic below. Make sure it is flush with the very top of the backboard and on the side of the backboard. There should be no gaps as this pieces is design to fit firmed around the top an side edges!! Hold it in place as such and insert 2 screws as shown to secure it.
For Godfather: Remove the far right factory screw holding the rear LED factory lights. Place it one the right right top edge of backboard located at the rear of the playfield as shown in the pic below. Make sure it is flush with the very top of the backboard and on the side of the backboard. There should be no gaps as this pieces is design to fit firmed around the top and side edges!! Hold it in place and replace the factory screw you removed into the hole located on the back side of the Xeno Mount. This hold will align the mount where it needs to be and tighten it snug, but not too hard.
Godfather: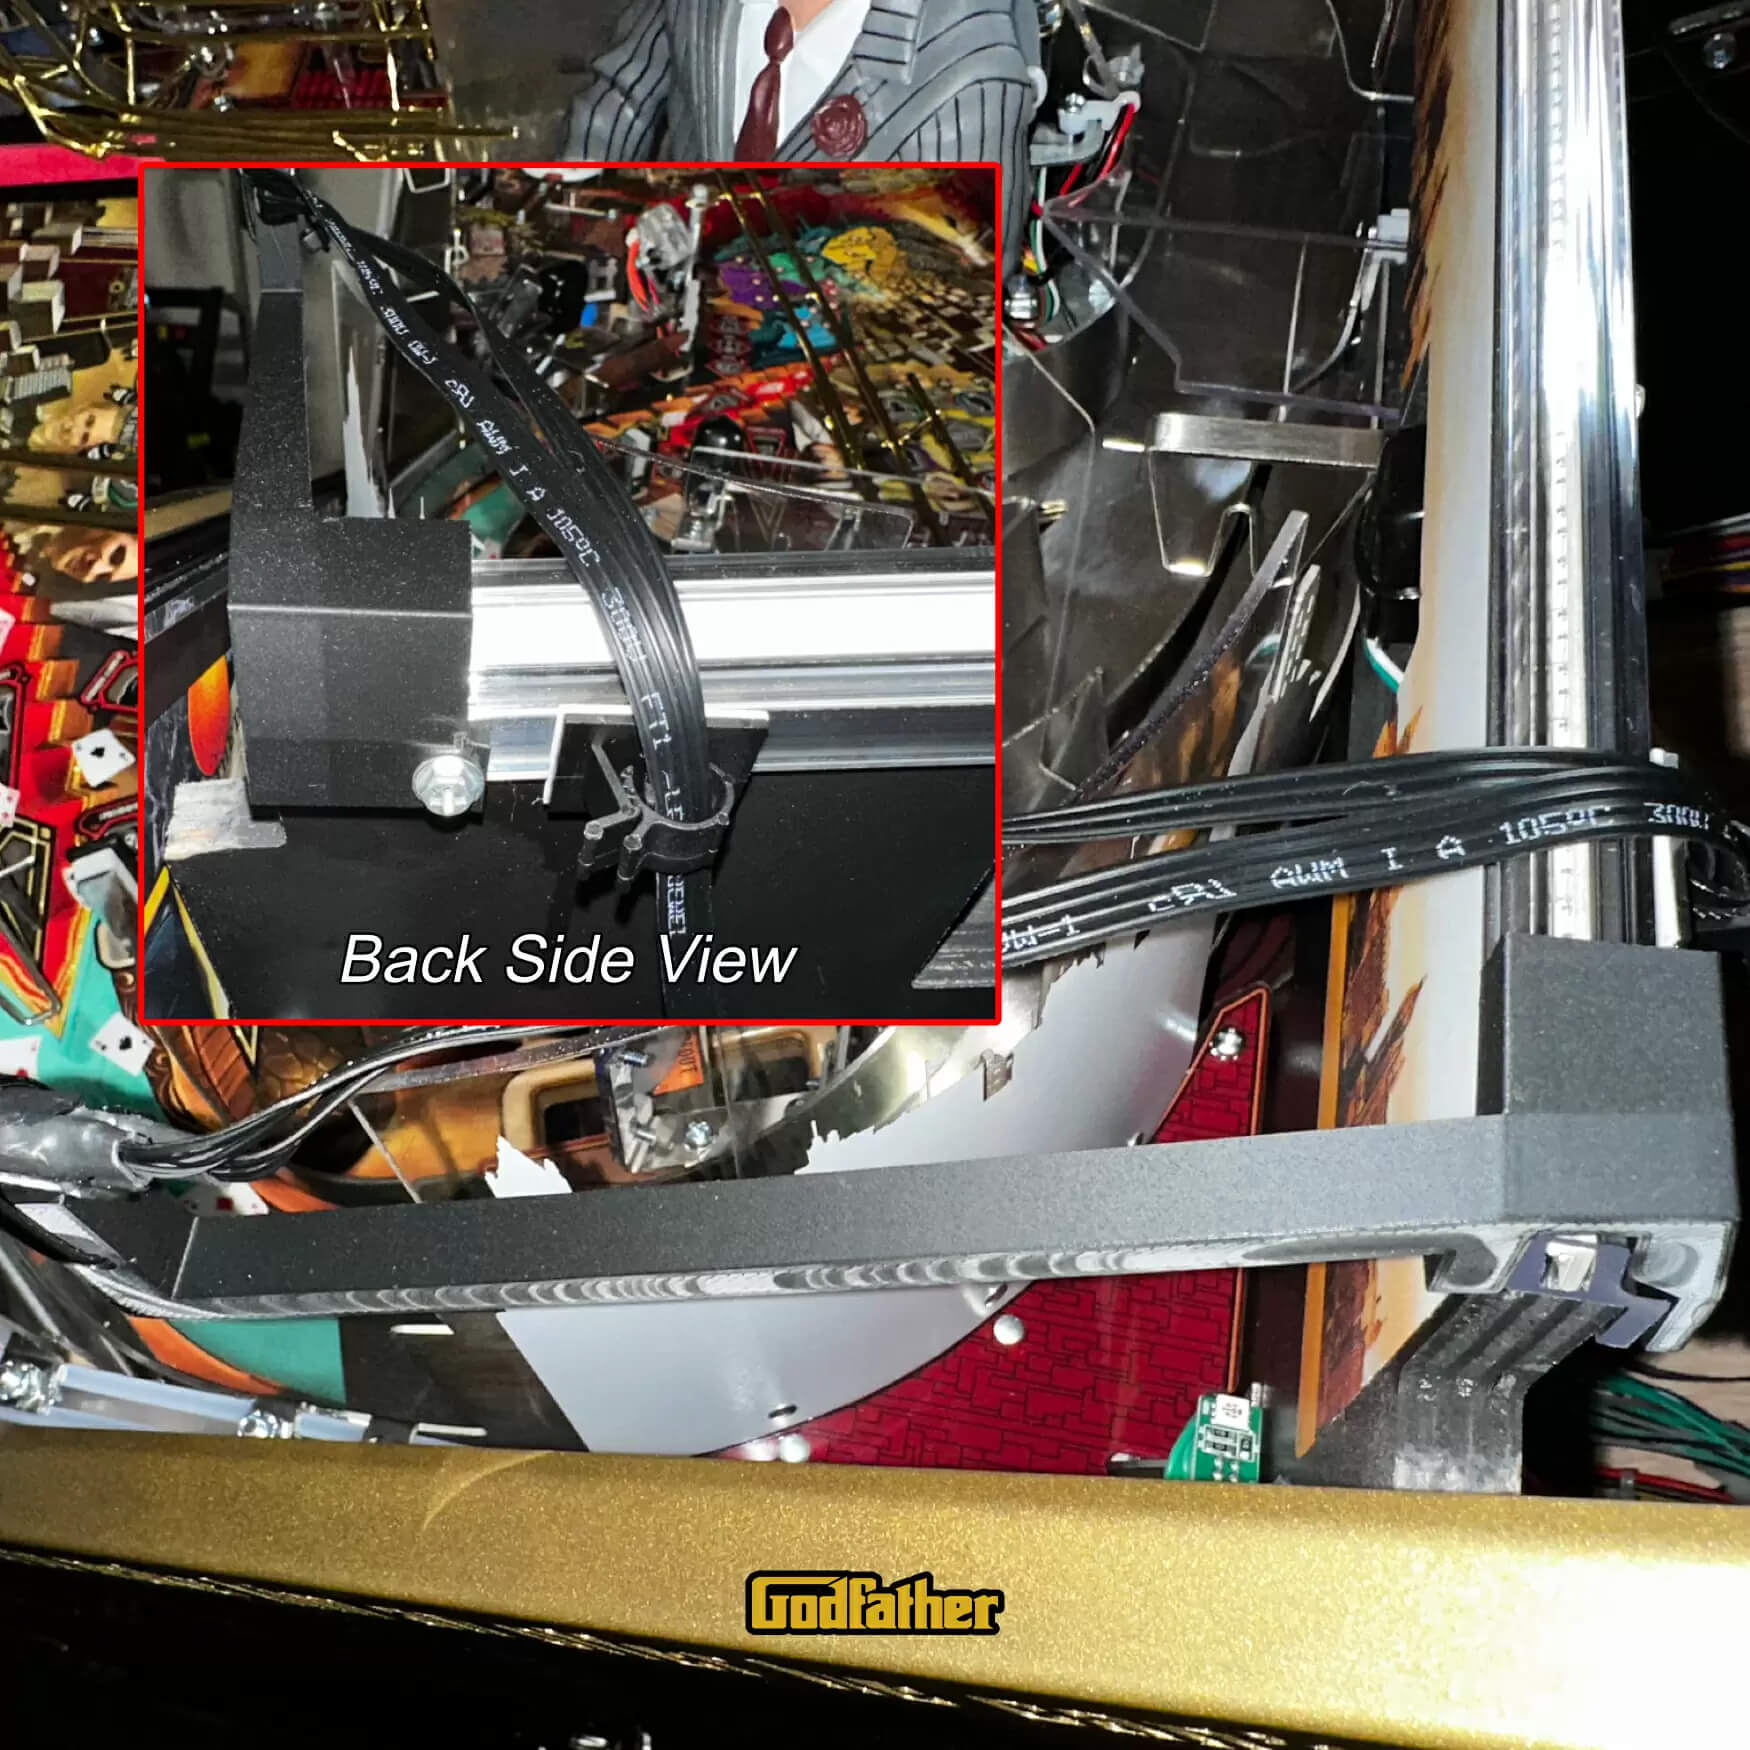
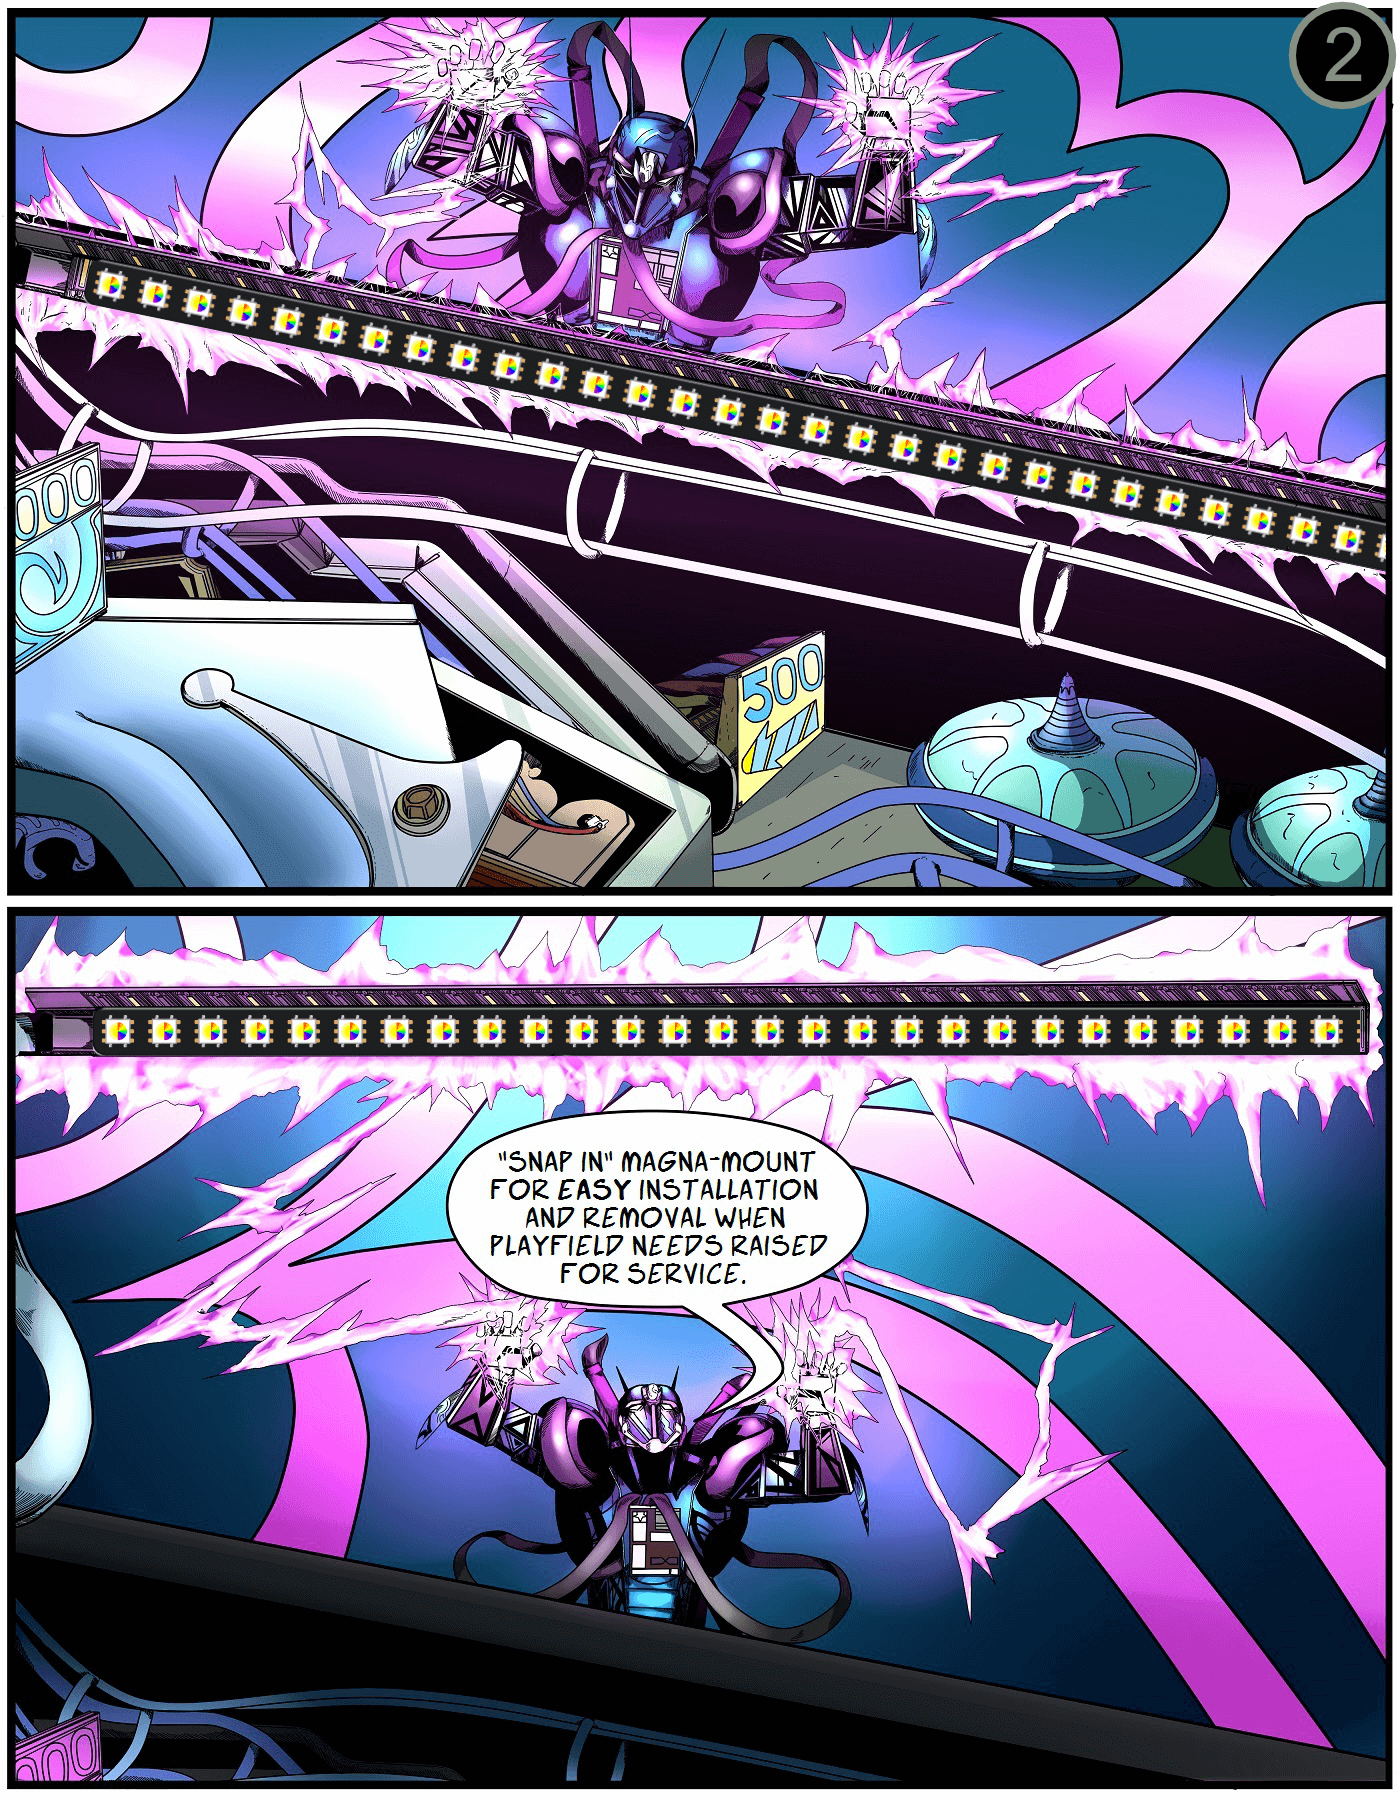
Mount the Light Bars into the Xeno Mounts:
a. Slide the ends of the front of the light bars onto the Xeno Mounts so that the triangle end is pressure fitted into the end of the light bar.
b. Now go to the rear of the lights bars and rest bottom of them onto the angled “V” shaped base. Grab a zip tie and wrap it around the light bar insert it around the Xeno Mount ONLY if the Xeno Mount DOES NOT have a hole for the zip tie to pass through. Picture below shows one that does not have the hole. If yours has a hole then put the zip tie through that. Don’t tighten it complete yet as you want to leave it loose so you can rotate it properly) and the Xeno Mount. MAKE SURE the clasp portion of the zip tie is on the inside (playfield side and NOT the cabinet wall side) and it is facing downward away from the where the glass will slide in. This is very important or the glass will not clear this.

c. Now you will slightly push the light bar forward towards the front mount. Don’t push too hard as you will break the front mount, just make sure there is some good press on it (just before the light bar starts to bow) and then tighten(snug only as you don’t want to damage the LEDs on the light bar, just make it firm) up the zip tie while making sure the light bar is vertical. If it is not then the light bar WILL NOT LINE UP with the Magna-Mount when you lower the playfield.
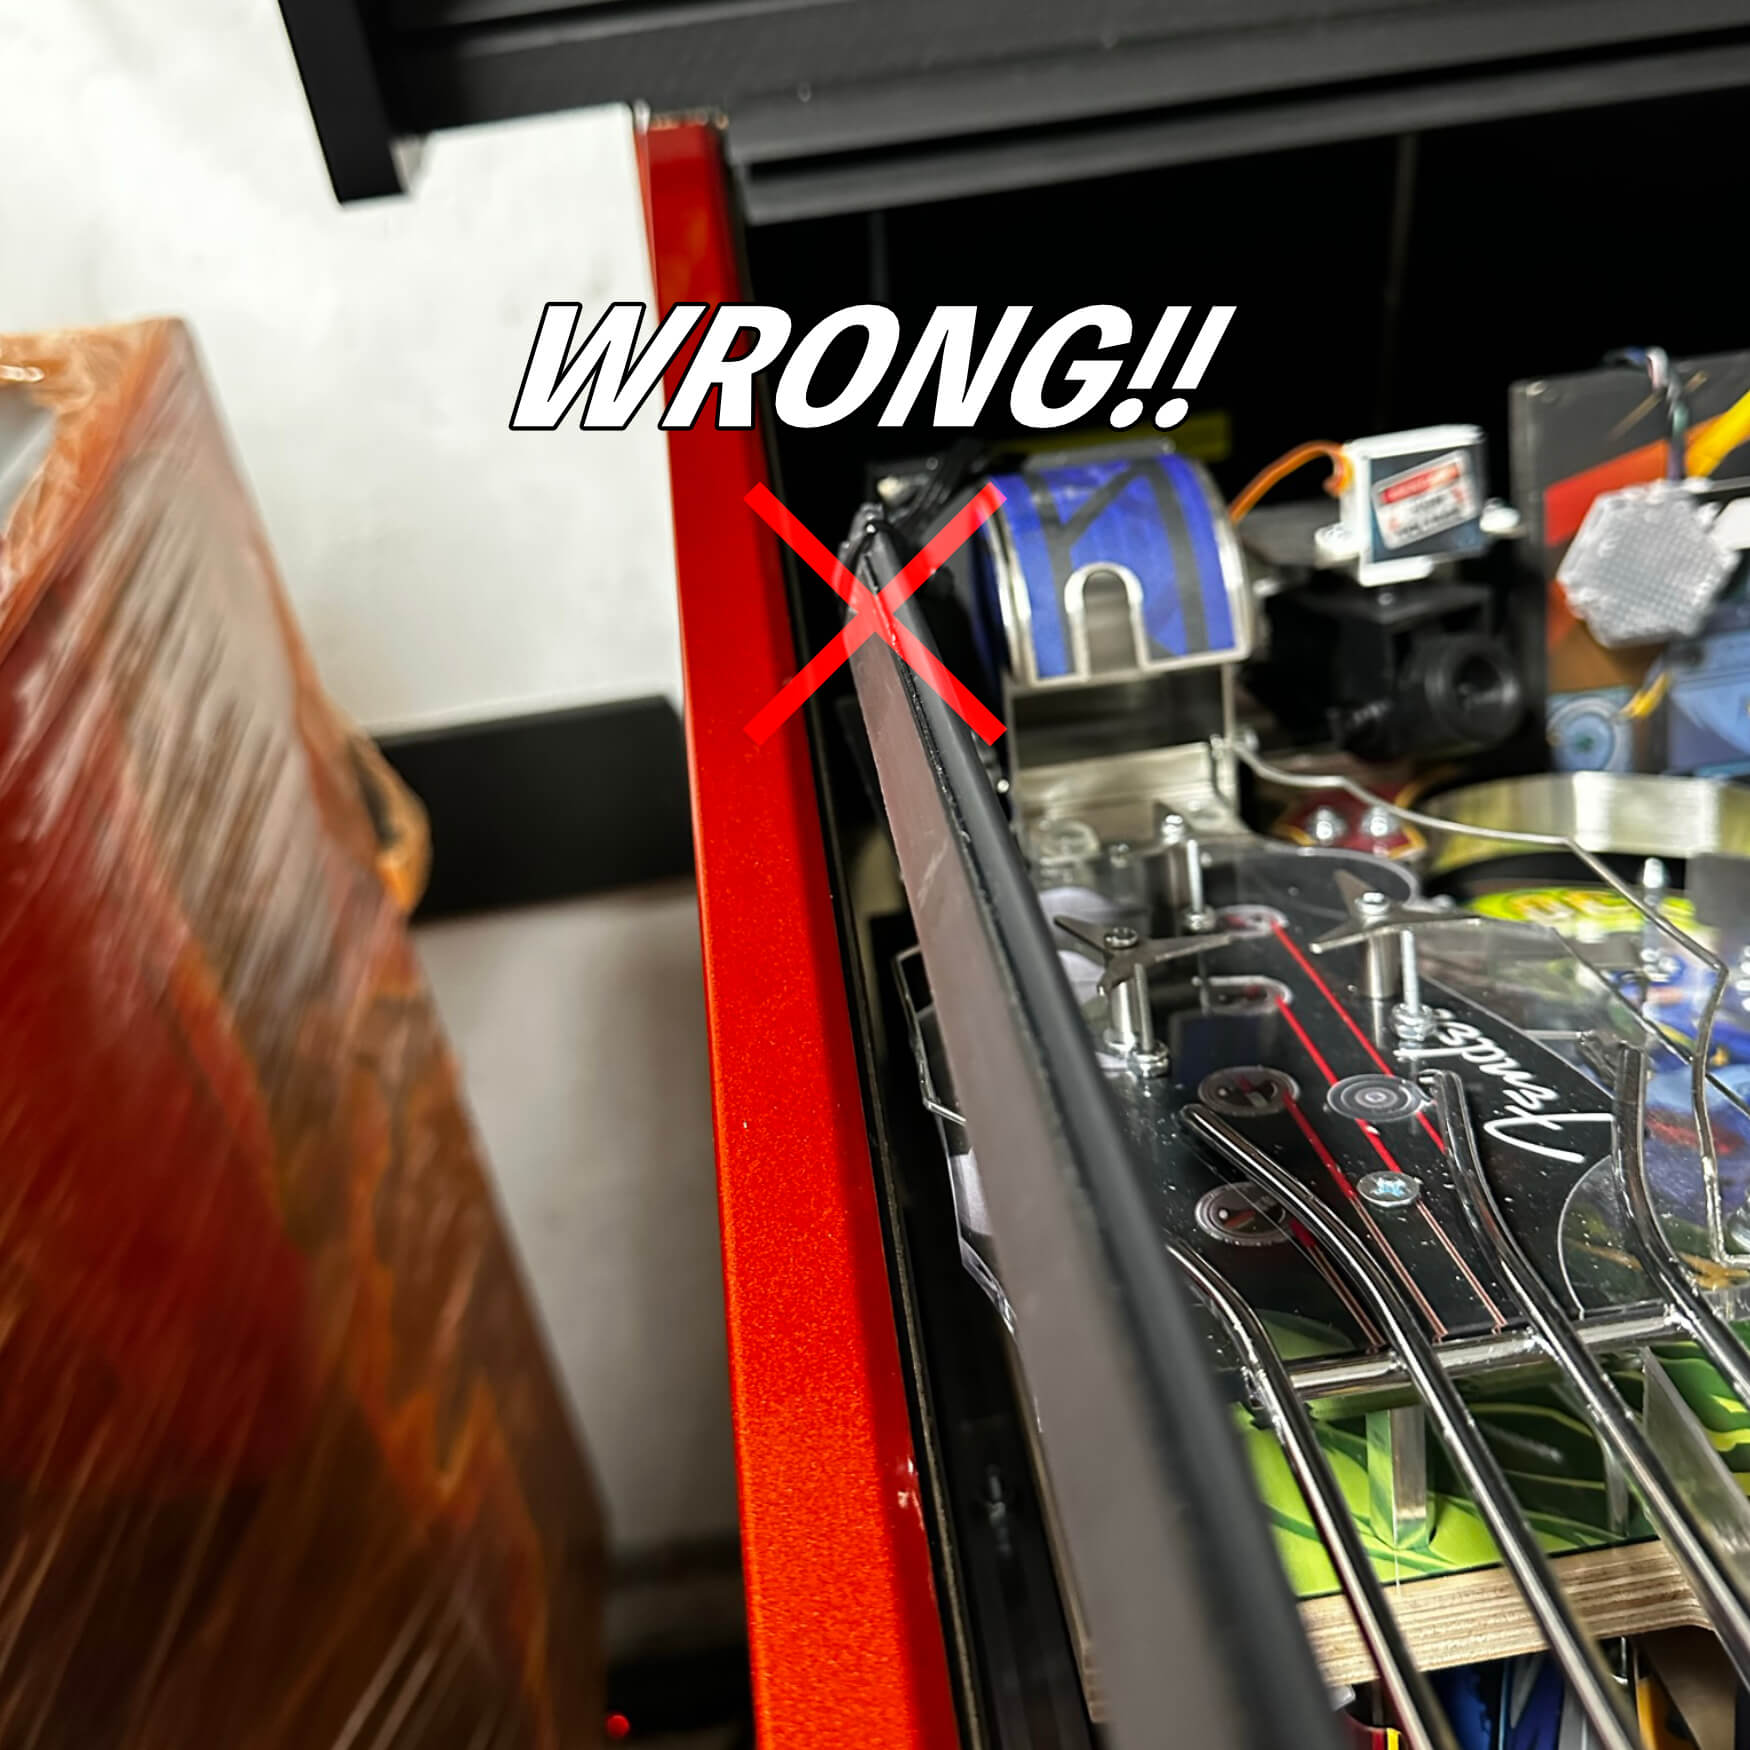

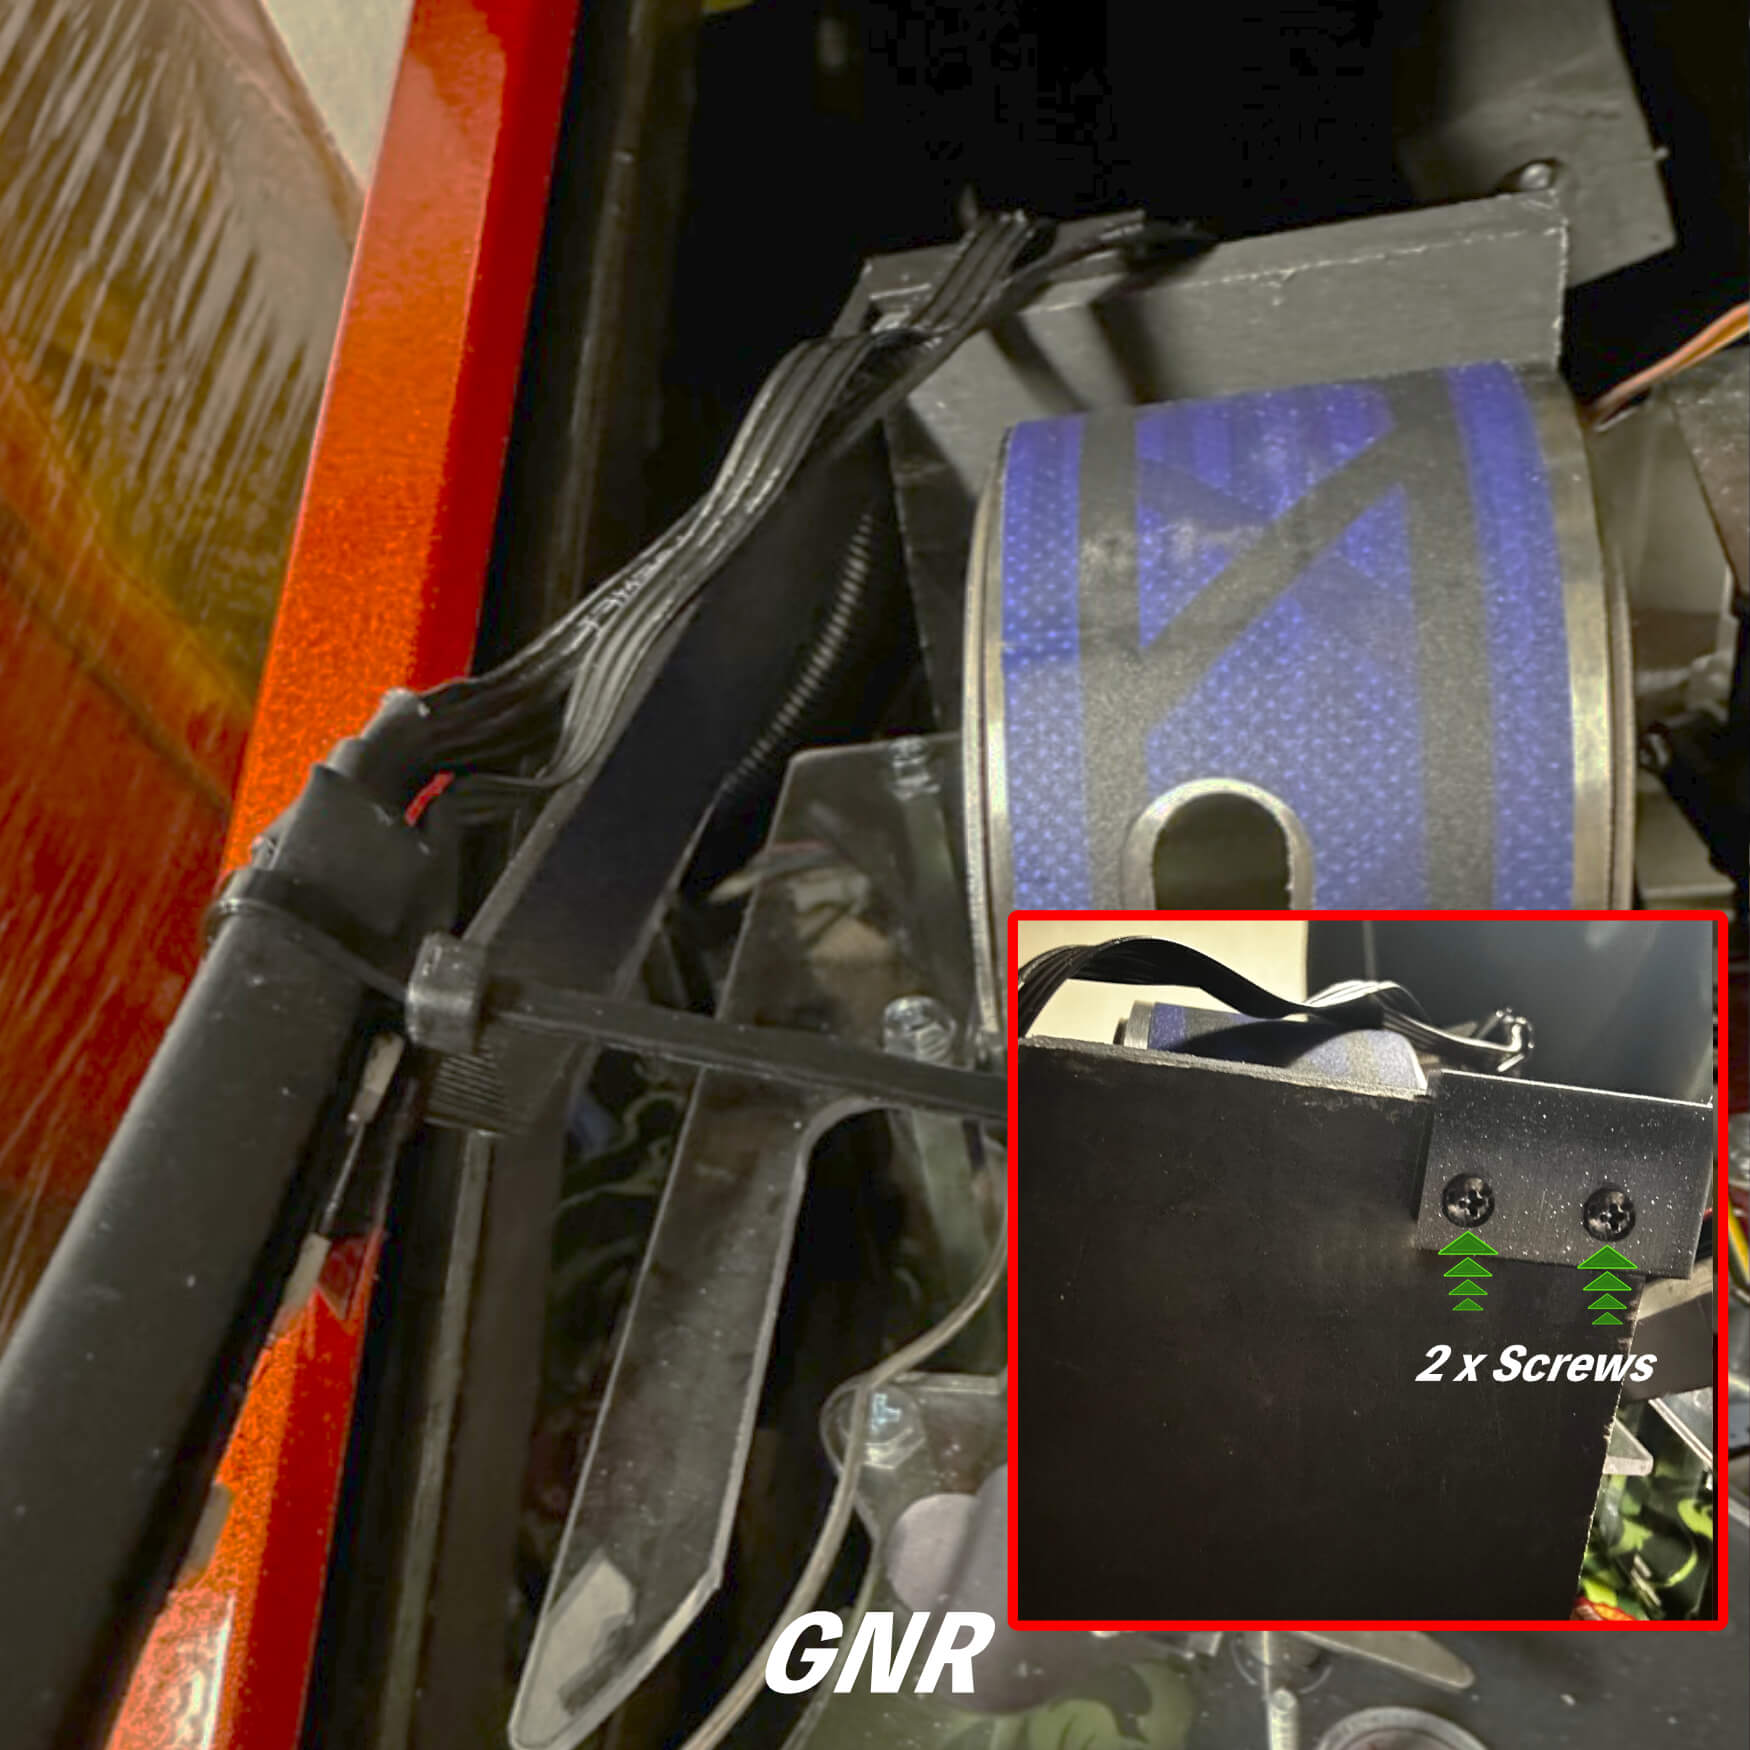
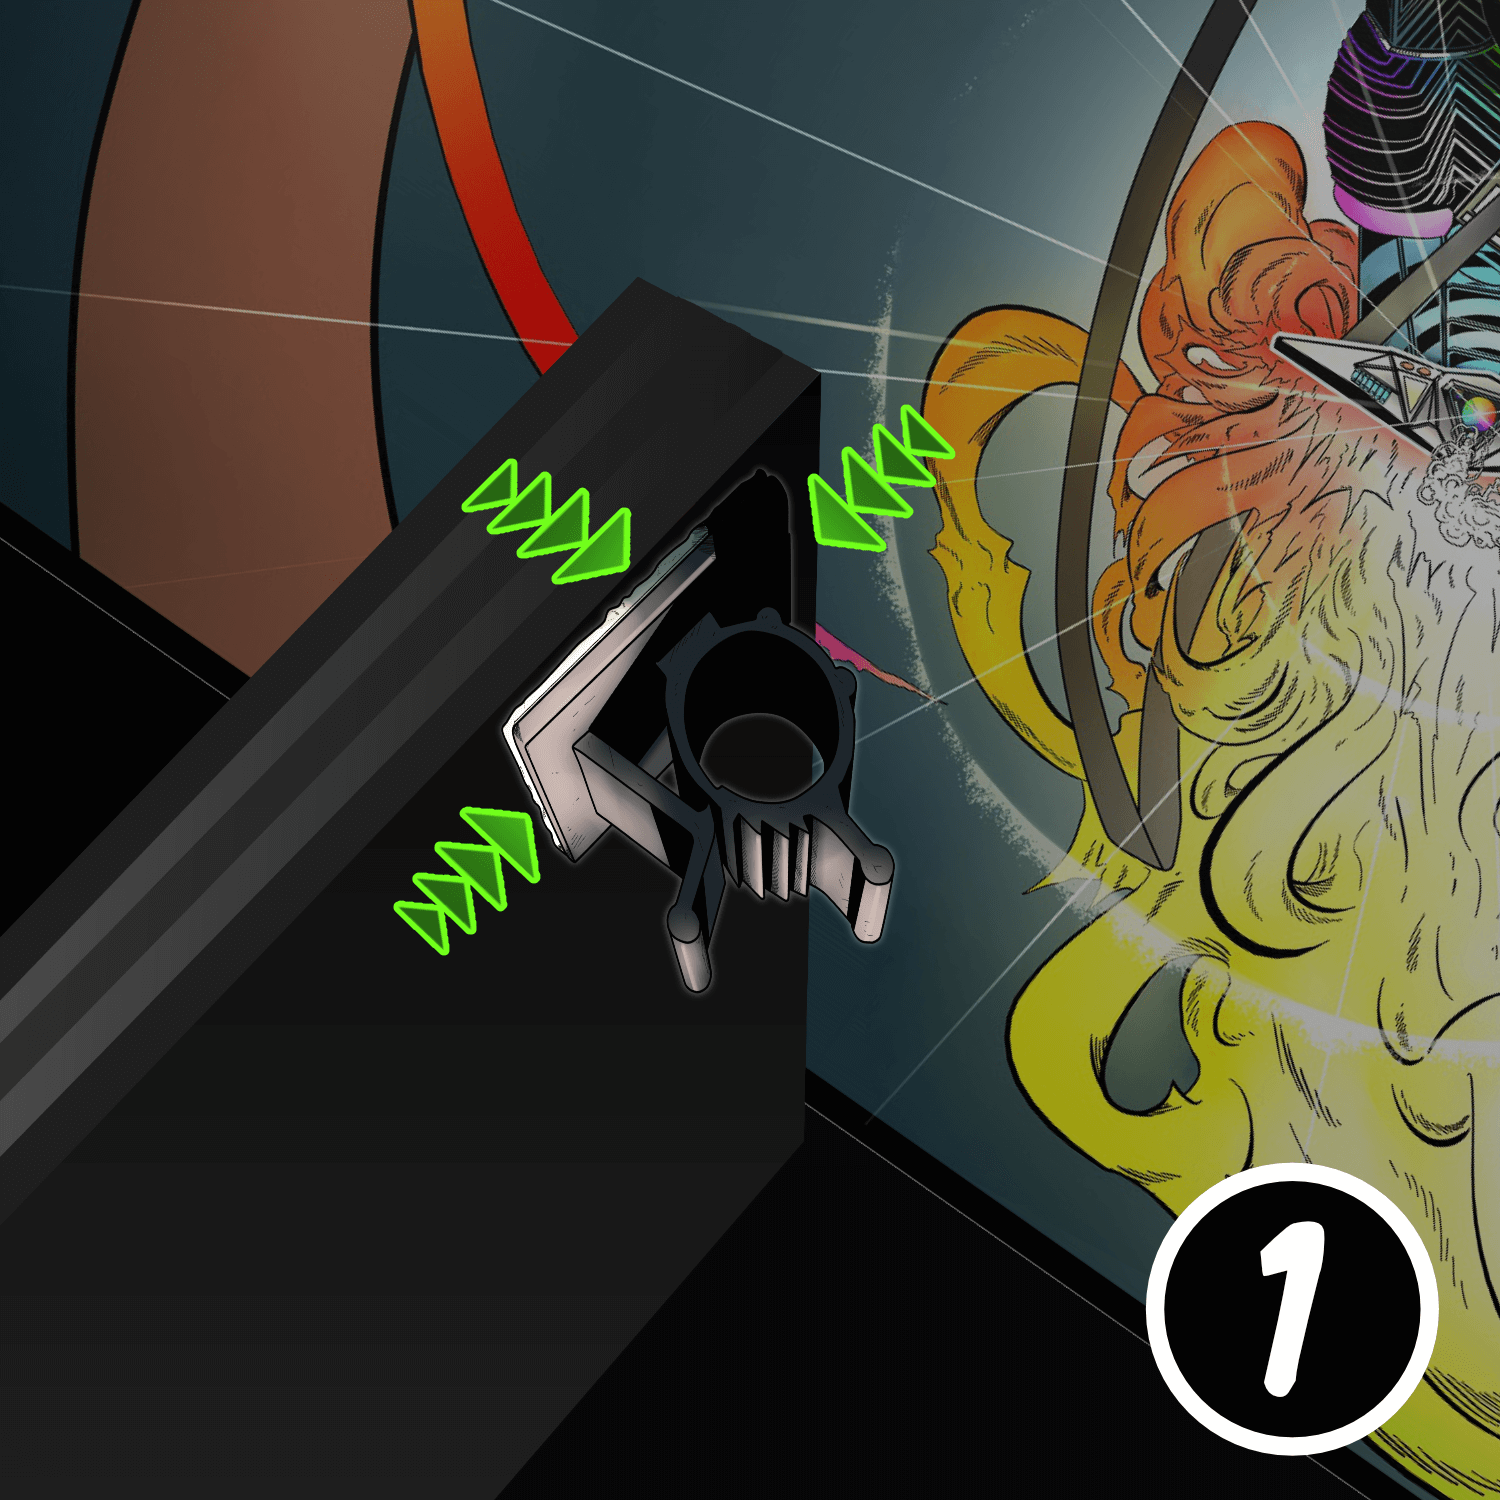
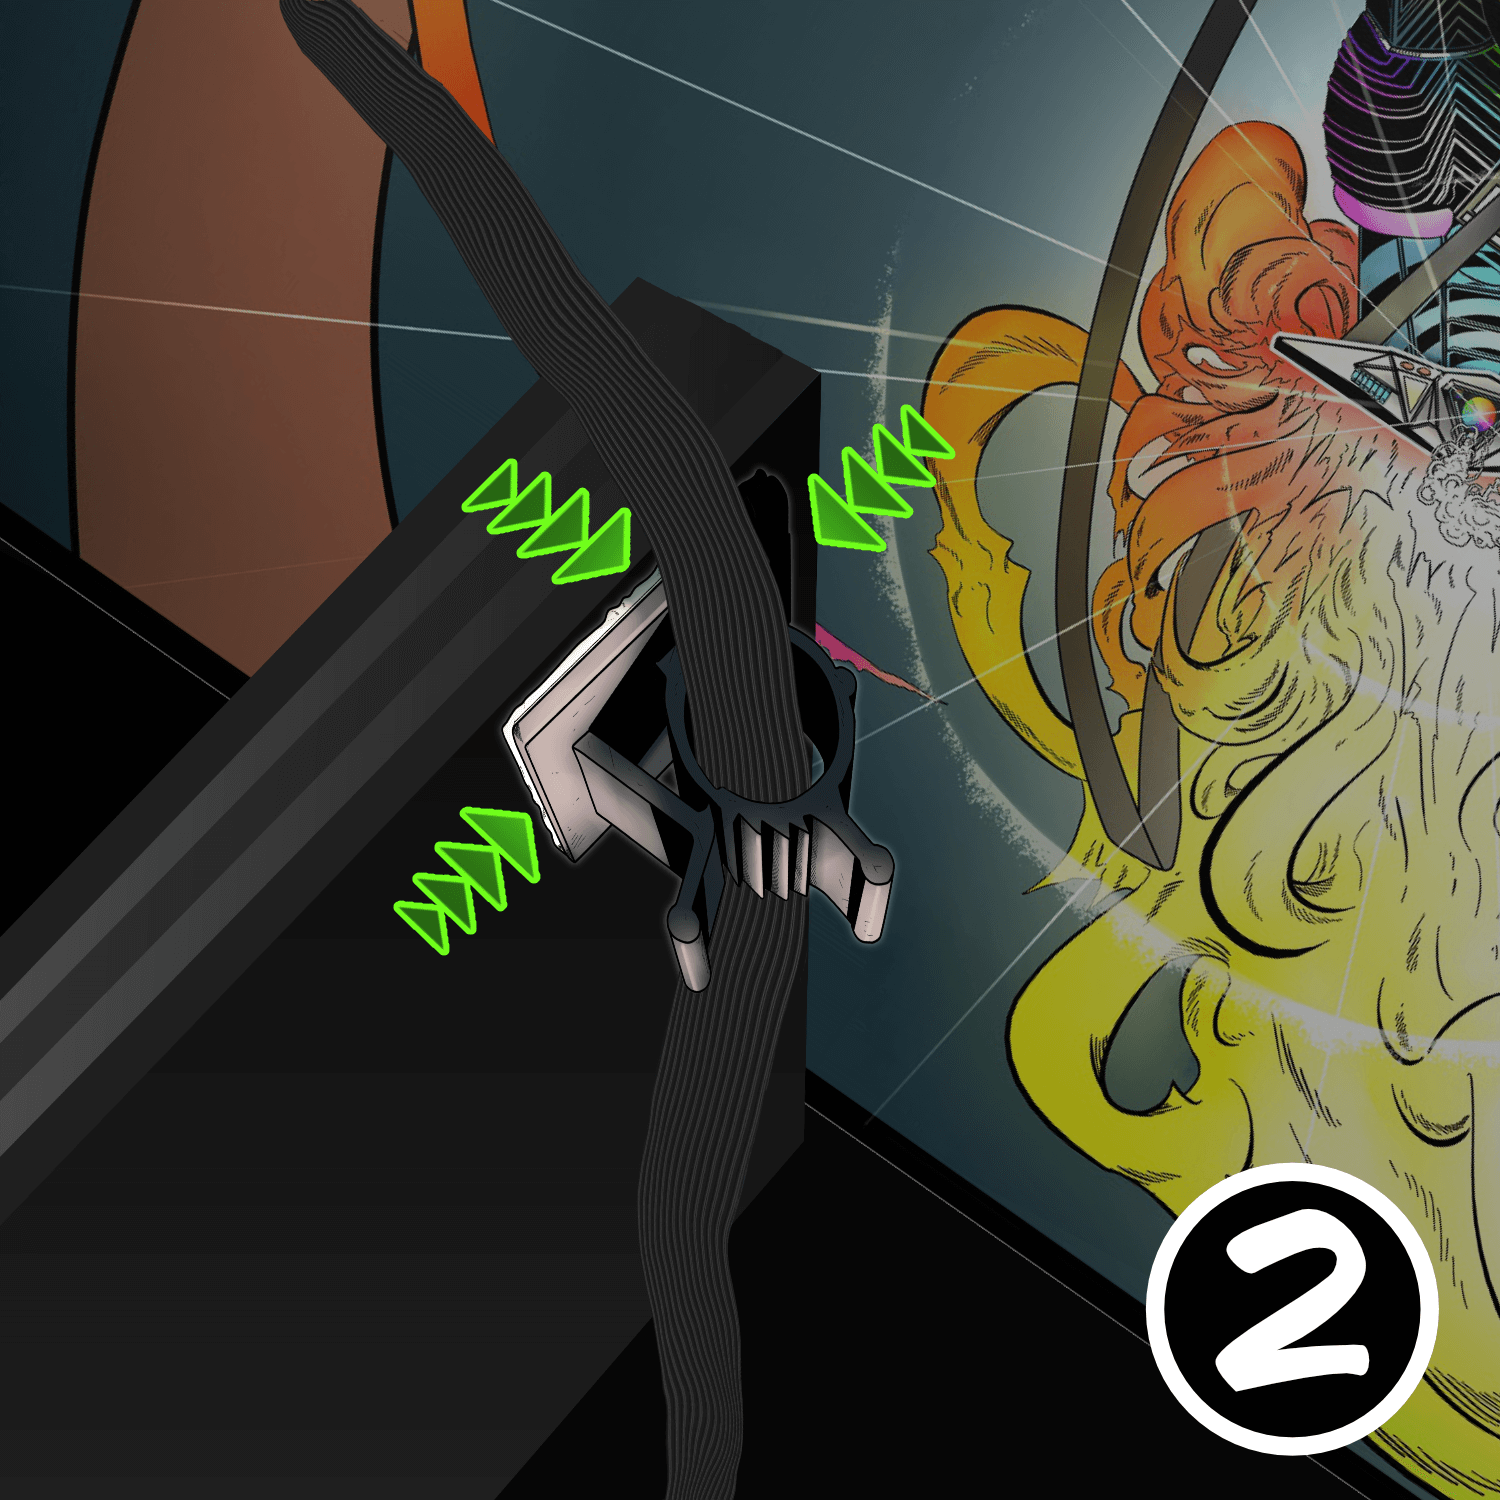
VERY IMPORTANT!!! If you don’t do this next step properly and/or don’t use the black ribbon cable clamps YOU WILL cause damage to your Neo Concert Edition wires when raising and lowering the playfield. They will get pinched in the back and cause “permanent” damage to them. Do not put the clamps at and angle in an attempt to route them to the side, the black ribbon cable MUST go over the of the Xeno Mount and down into the cable clamp that is pointing straight Up and Down like the pics below. ALSO if you don’t raise and lower your playfield straight up and down, the playfield can shift left to right if you don’t open it properly, so take your time. Otherwise the mounts can get caught in the back and either stop the playfield from going all the way back to rest on the on the head, and it can break the Xeno Mounts. If you feel it get stuck, lower the playfield and center it on the sliding rails, then rail straight and slowly. You will be good to go then!
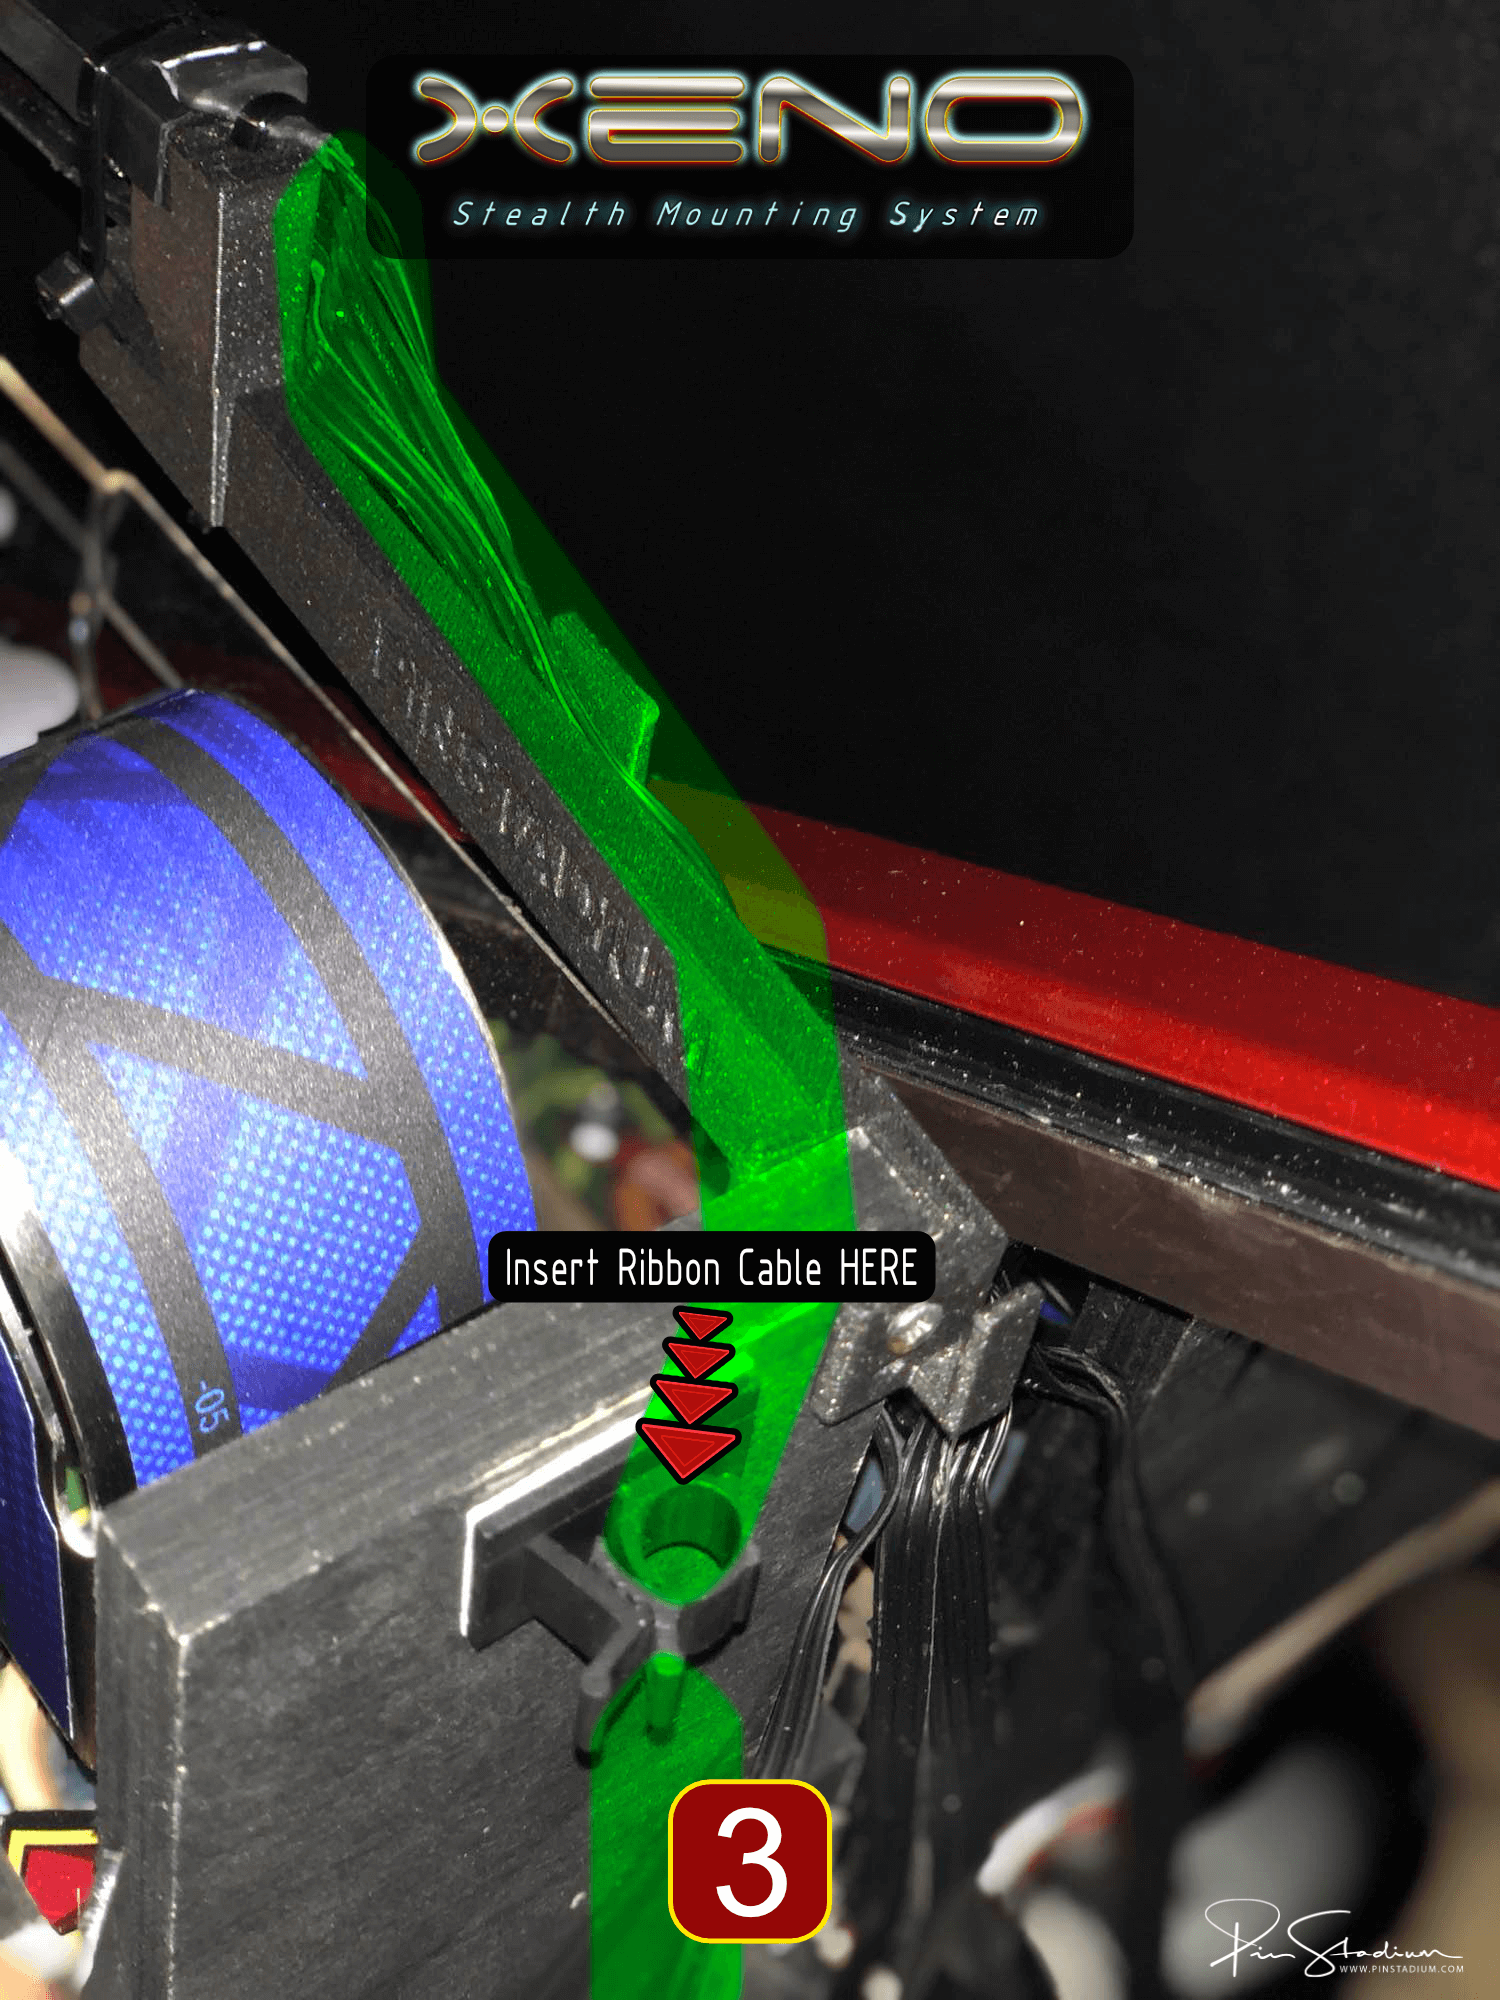
Locate the accessory packet and inside of it are small adhesive ribbon cable clamps included to use to attach to the back of the playfield to help guide the ribbon cables. They are to be attached to the furthest upper left corner(see pic for exact location) of the backside of the playfield backboard. It must be mount a couple inches from that corner in order to clear lower playfield slide track on the JJP machine. This is vital as it will act as a guide to keep the cables clear of pinching and allow as a memory for your cable length to help keep the cable tucked away and hidden.
Tip: Bend the ribbon cable in half (as shown below) so that it slides easier in the cable clamp. This allow for easier adjustment for slack and helps when you go to tuck it out of sight once the playfield is down. You will eventually find a sweet spot that works with each machine. The ribbon cable is designed to be bendable so that you can further tuck it up and out of the way for a nice stealth look.
Step 3
Mount the Magna-Mounts (the critical last step)
Like every Pin Stadium product, the Magna-Mounts seal the light bars to the cabinet wall. Watch the Magna-Mount portion of the video if you’ve never installed these before.
Carefully peel off the white protective backing on the Magna-Mount. Align the lights 1/16″ below the glass channel, far enough back to hide the ribbon cable and clear the backbox hinge.
Press firmly along the entire length of the light channel for maximum adhesion. Repeat for the opposite side. Take your time — this is what holds the lights up long-term.
Question: “Do I still need Magna-Mounts if I’m using Xeno Mounts?”
Answer: YES. The Magna-Mounts seal the light bars to the cabinet wall to eliminate gaps and light leakage. Xenos hold them in place; Magna-Mounts seal them.
Mount the ribbon-cable clamps
From the accessory packet, stick the adhesive ribbon-cable clamps to the upper-left and upper-right corners of the back of the playfield. These keep the cables clear of pinching and tucked out of sight.
Tip: fold the ribbon cable in half lengthwise — it slides into the clamp easier and tucks away cleaner.
You’re done! Concert Editions are tightly sync’d — no app config needed.
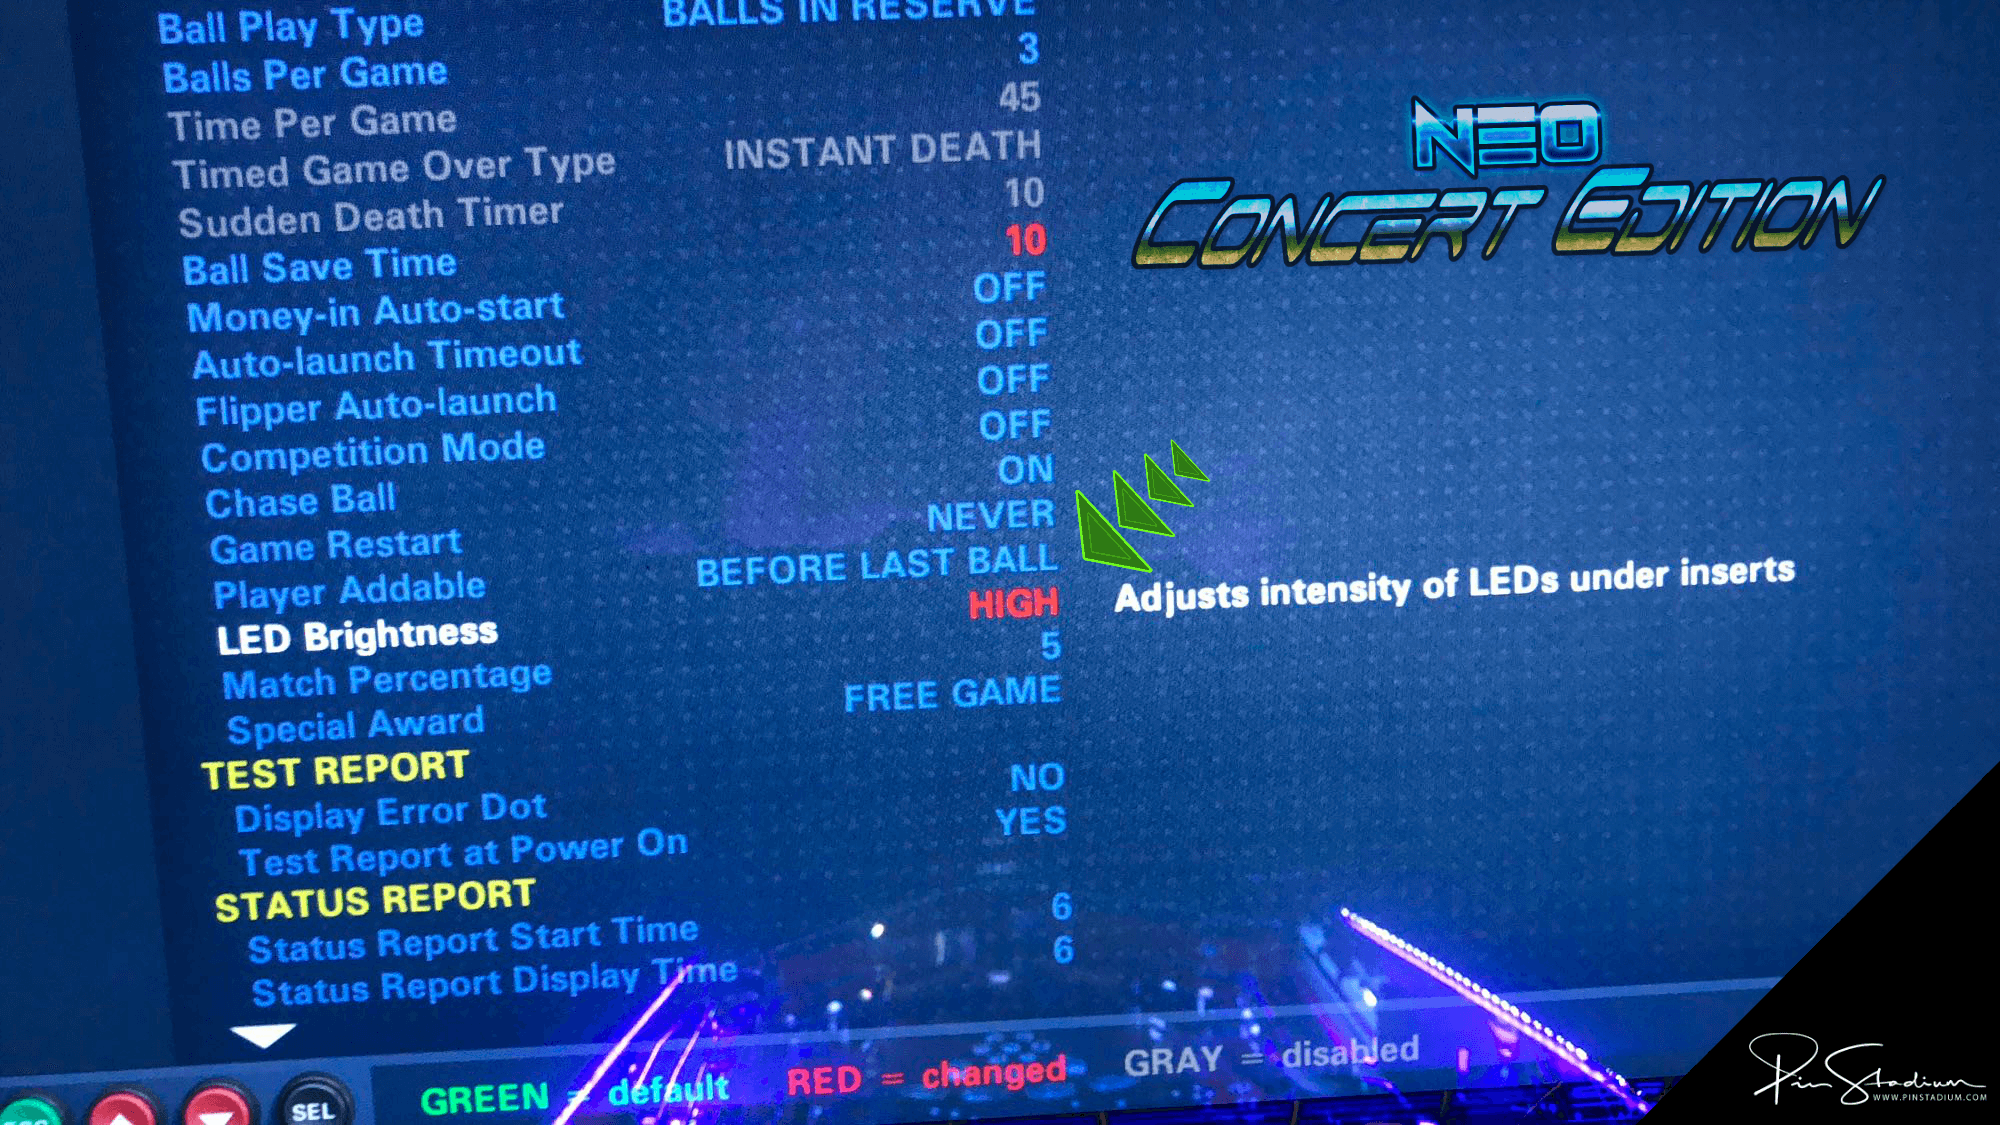
One last setting (recommended): open your coin door, navigate to Settings → System Settings → General → LED Brightness, and turn the GI Brightness to HIGH for the full effect. Watch how
EMAIL US for help please and you will get an instant response. Always happy to help!!
