Estimated install time is 10-15 minutes
Please note that we are not responsible for any damages done to your pinball machine. Install at your own risk! We suggest that if you are not familiar with working on your pinball machine that you take your time or have someone help you. Always consult your manual for detailed information or have a knowledgeable buddy/technician to help you. If you are installing Invisi-Shields only and already have your Pin Stadium light bars installed you can skip to the final “Step 7” below.
Step 1
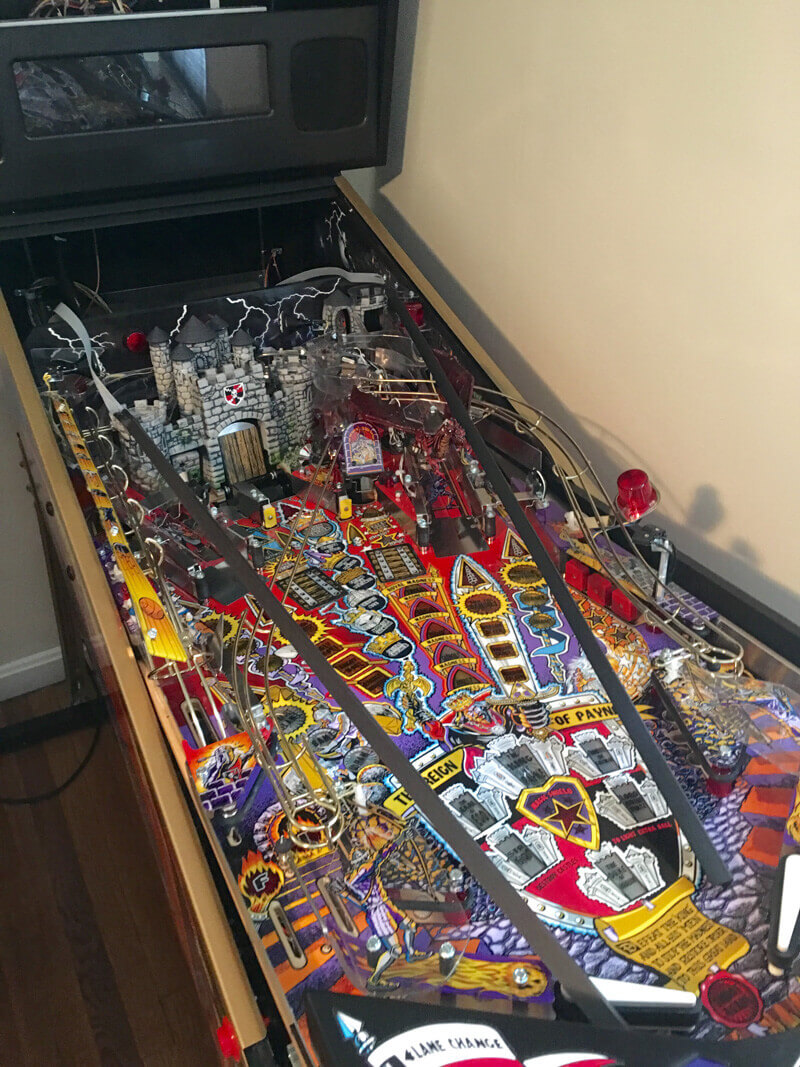
Remove the playfield glass and balls from the machine, then raise the playfield vertical.
The “Standard” tab applies for most all pinball machines. Otherwise click on the appropriate tab if you see the manufacturer of your machine listed.
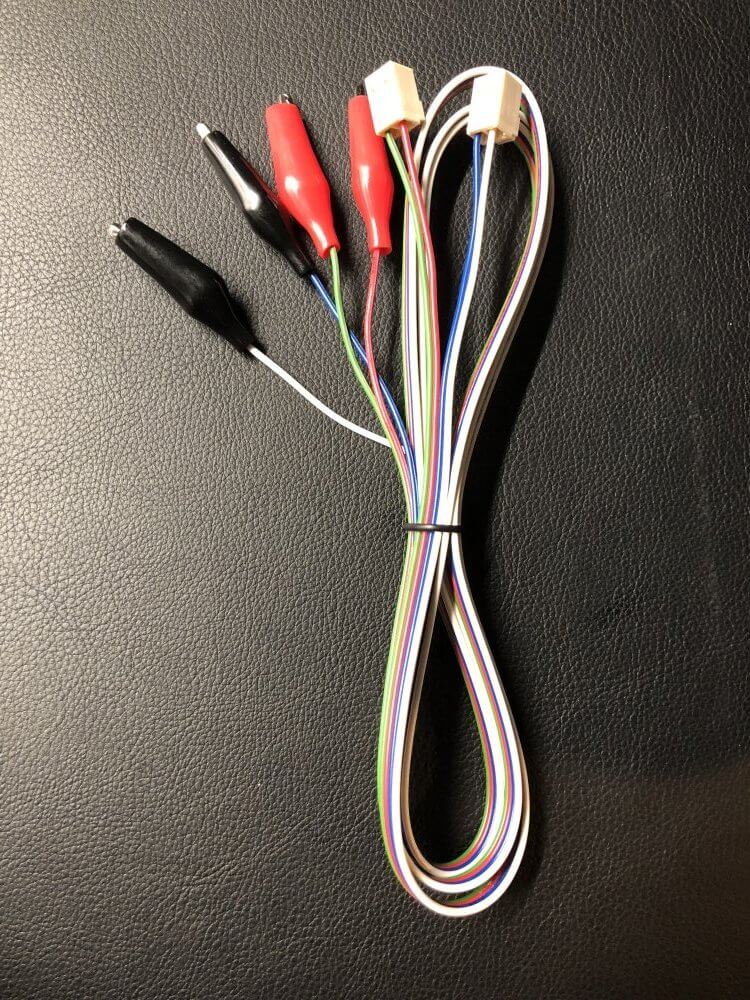
GI: Connect the BLUE/WHITE cable’s alligator clips to a GI Bulb (polarity is not important so it doesn’t matter which side you connect them to).
Flasher: Connect the RED/GREEN cable’s alligator clips (polarity does not matter here either)
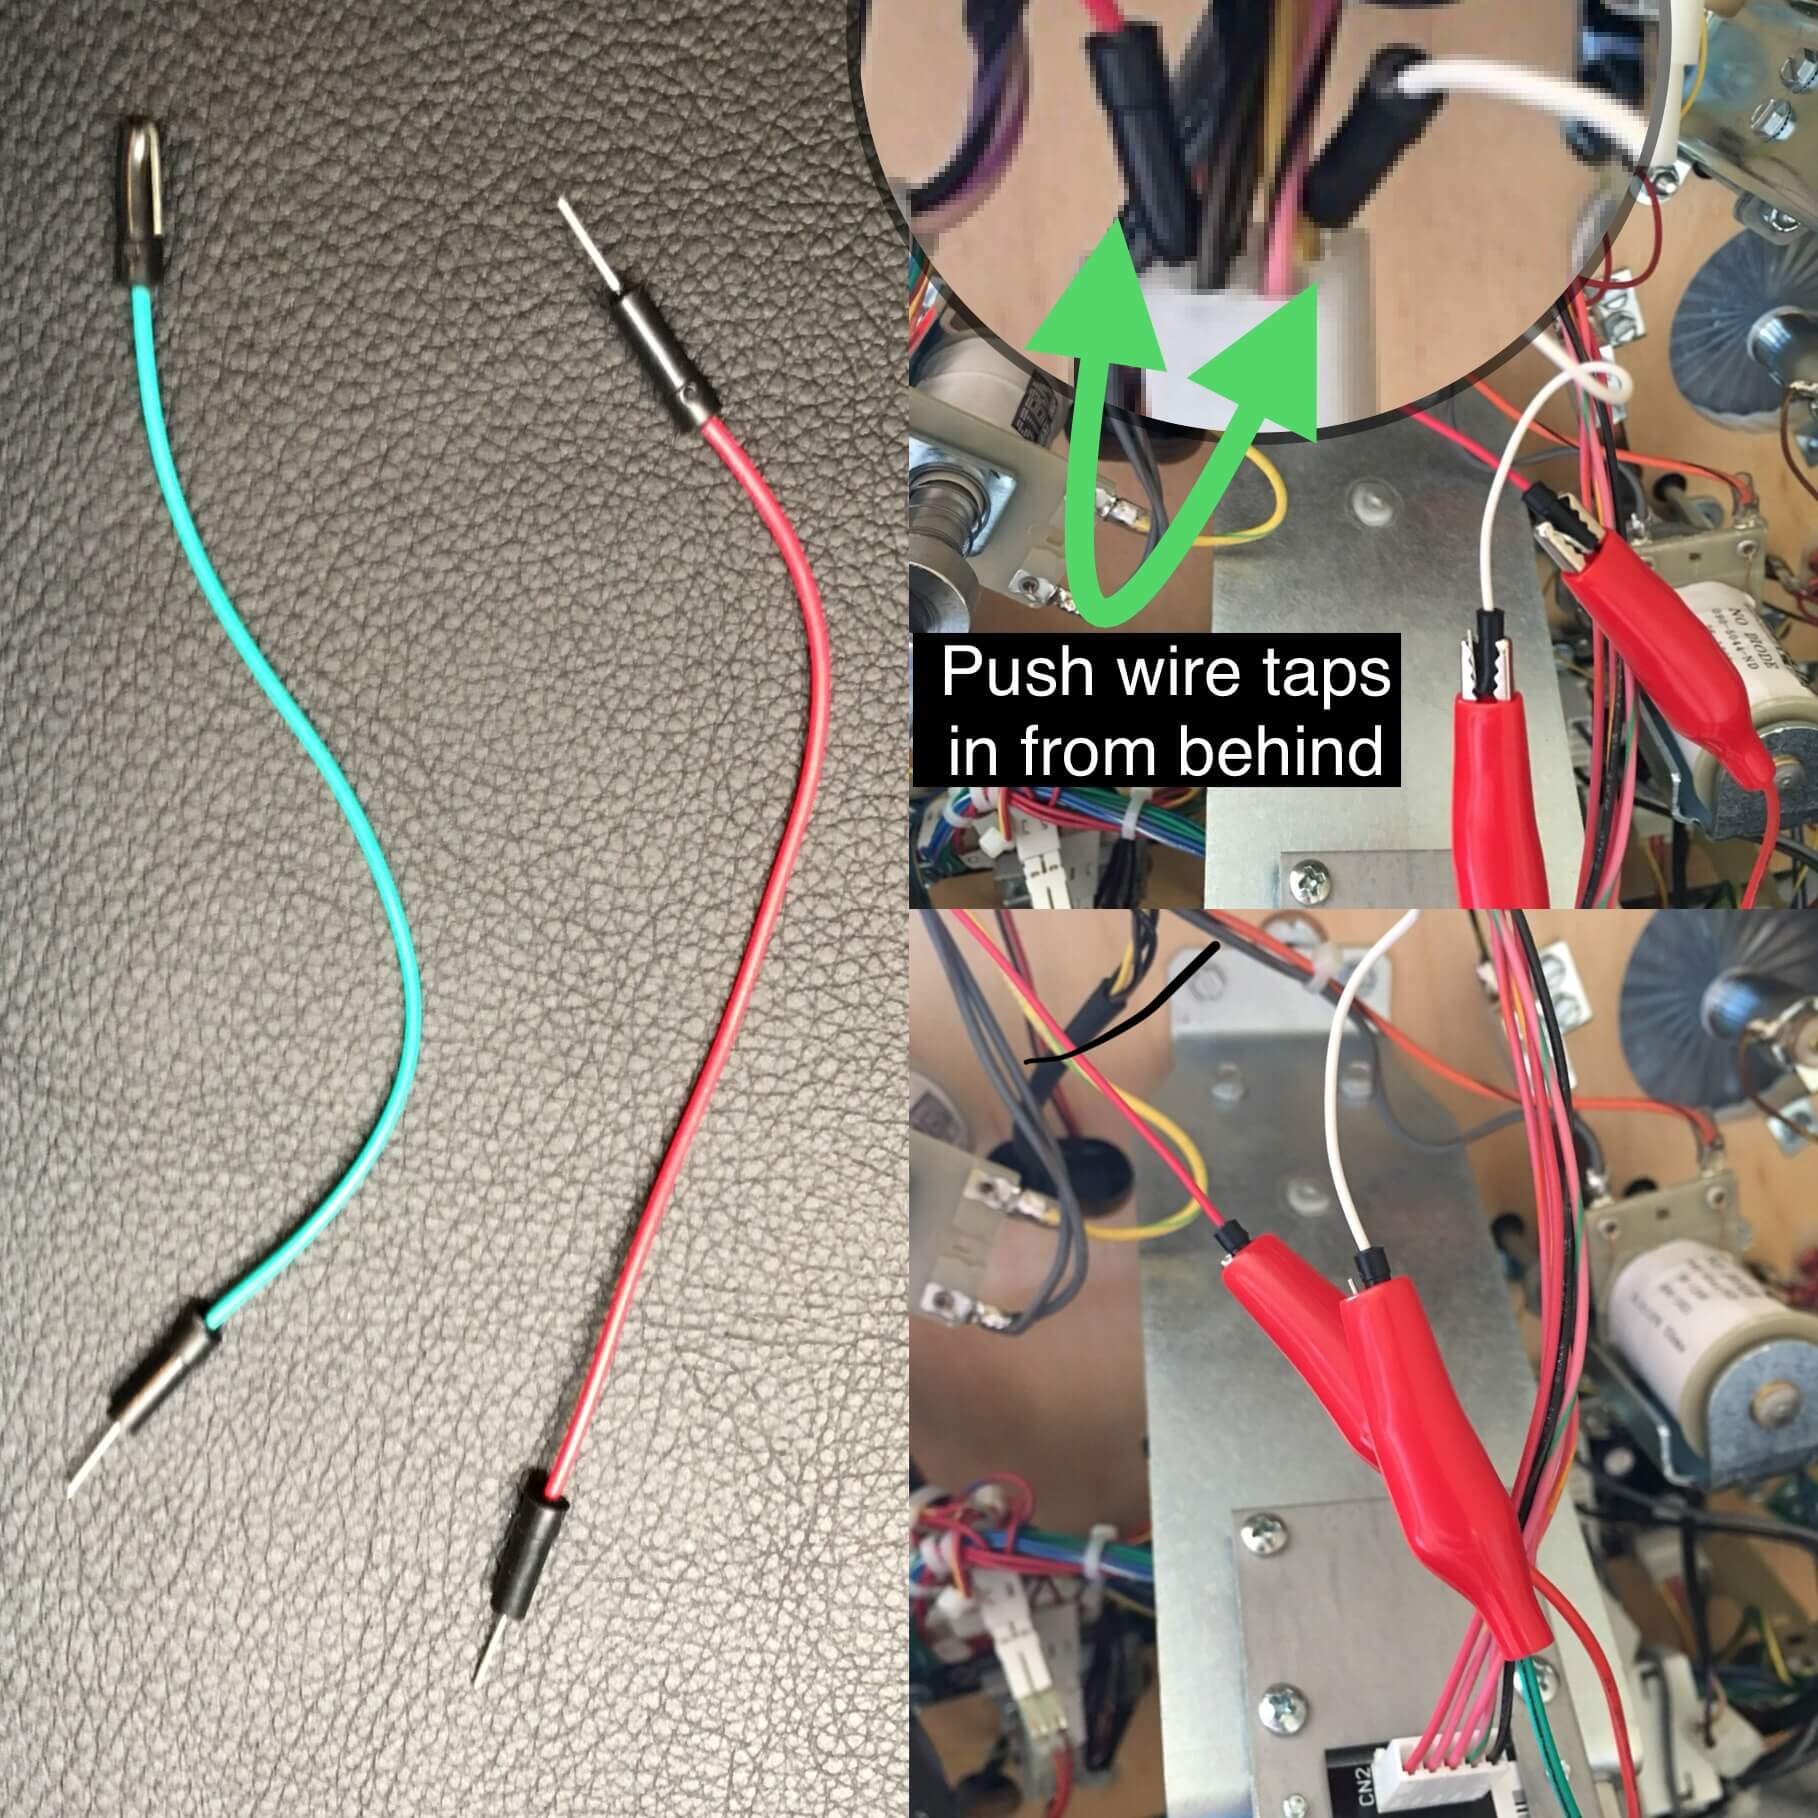
Note: In some cases the alligator clips may not be able to reach into your desired location. If you are trying to connect to unreachable terminals then please use the wire tap leads lead (small colored stiff wires with black barrel ends). These are great for tapping in the back of a connector terminal. On the opposite end that you plan to clip to, simply fold it over the black barrel so that it has enough width to connect the clip over it. These methods of connection are generally used and can be semi-permanent solutions if done correctly. Optionally if you want a permanent installation then you can solder or wire splice into where you determine is the best location.
Wire tap method shown here:
- Power for ALL JJP Machines: Plug the black power adapter into the service port of your machine located in the bottom of the cabinet inside to the right by the coin door. Due to the tight fit of the playfield support rails on JJP games you will need a small one foot extension cable so that the playfield can be lowered completely. We offer them on our website if you need one or any hardware store etc
-
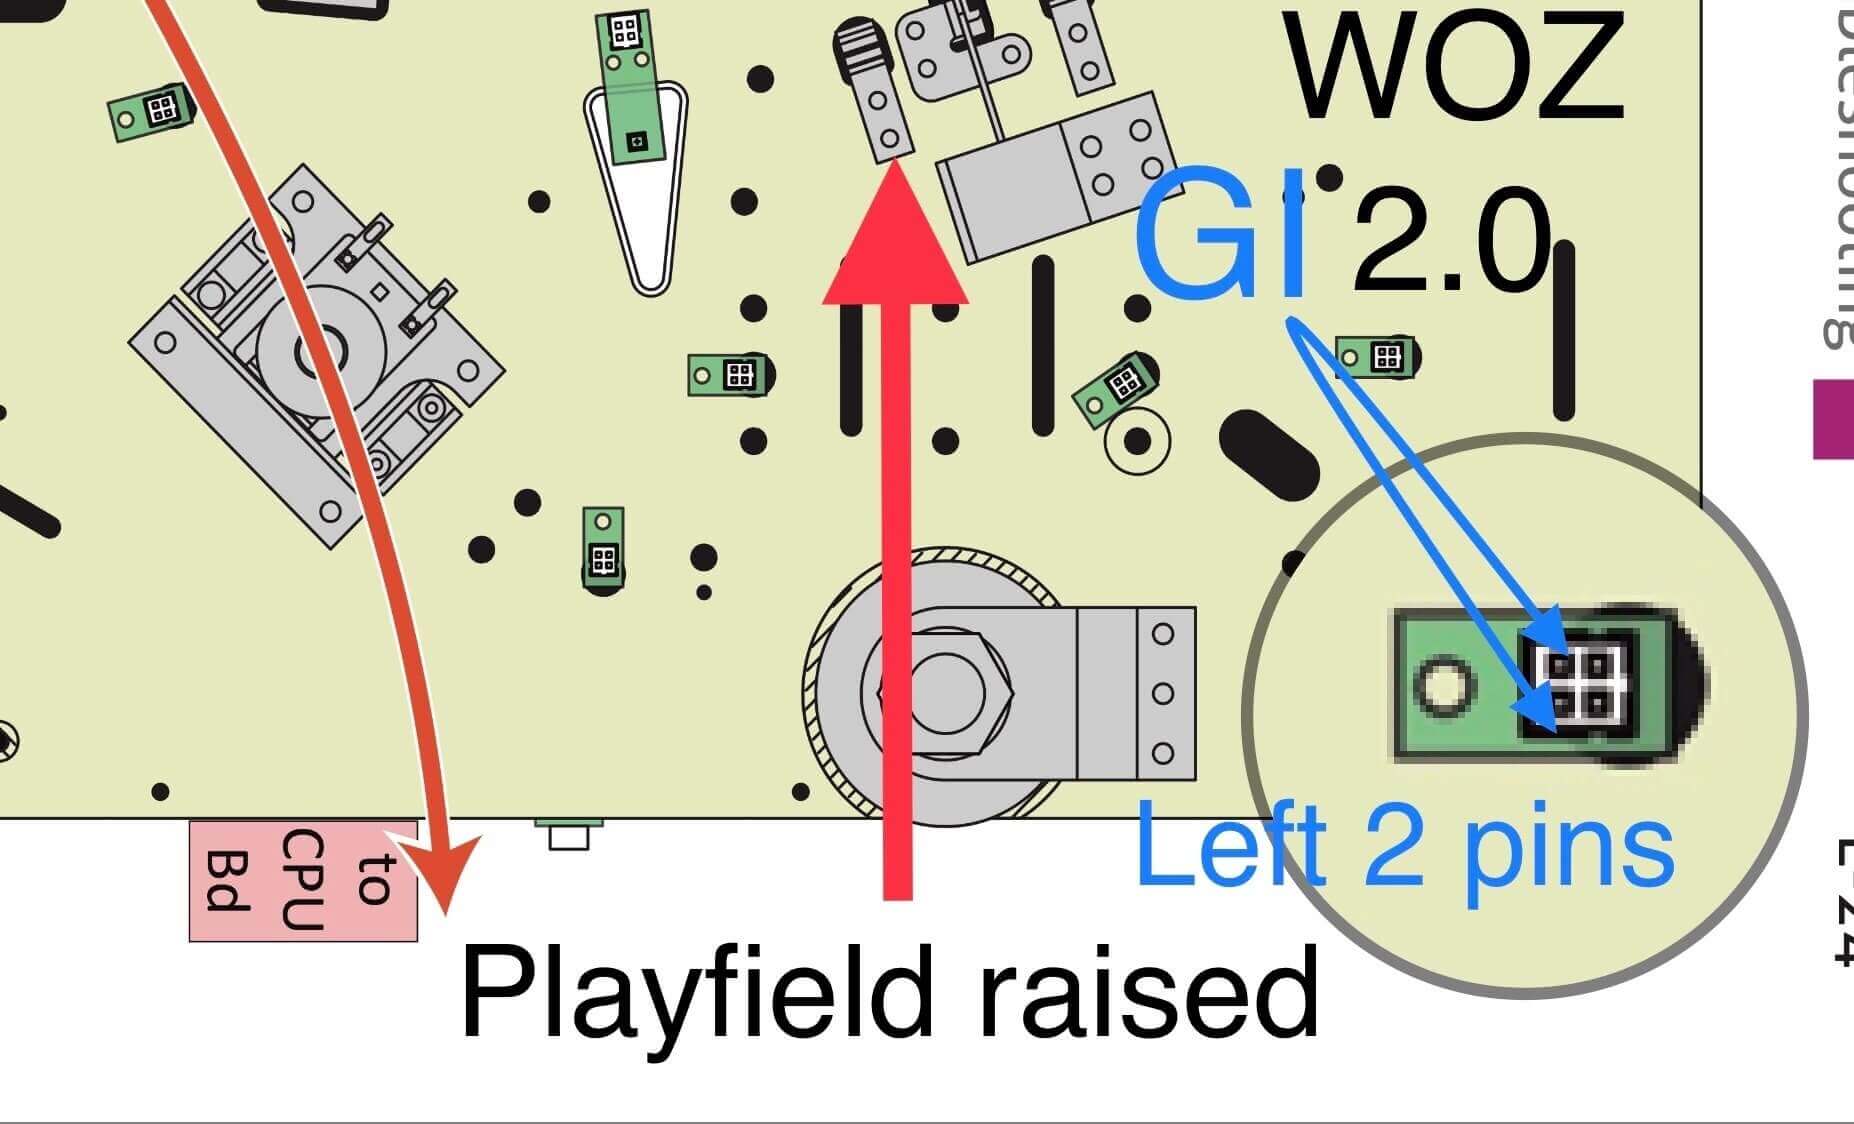
WOZ
- ECLE(Emerald City LE): Click Here
- Non 2.0 GI/Flashers: Click Here
- 2.0 GI/Flashers: Click Here for the flasher and for the GI you need to connect to Click Here
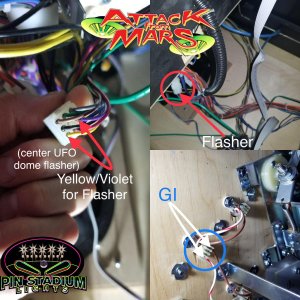
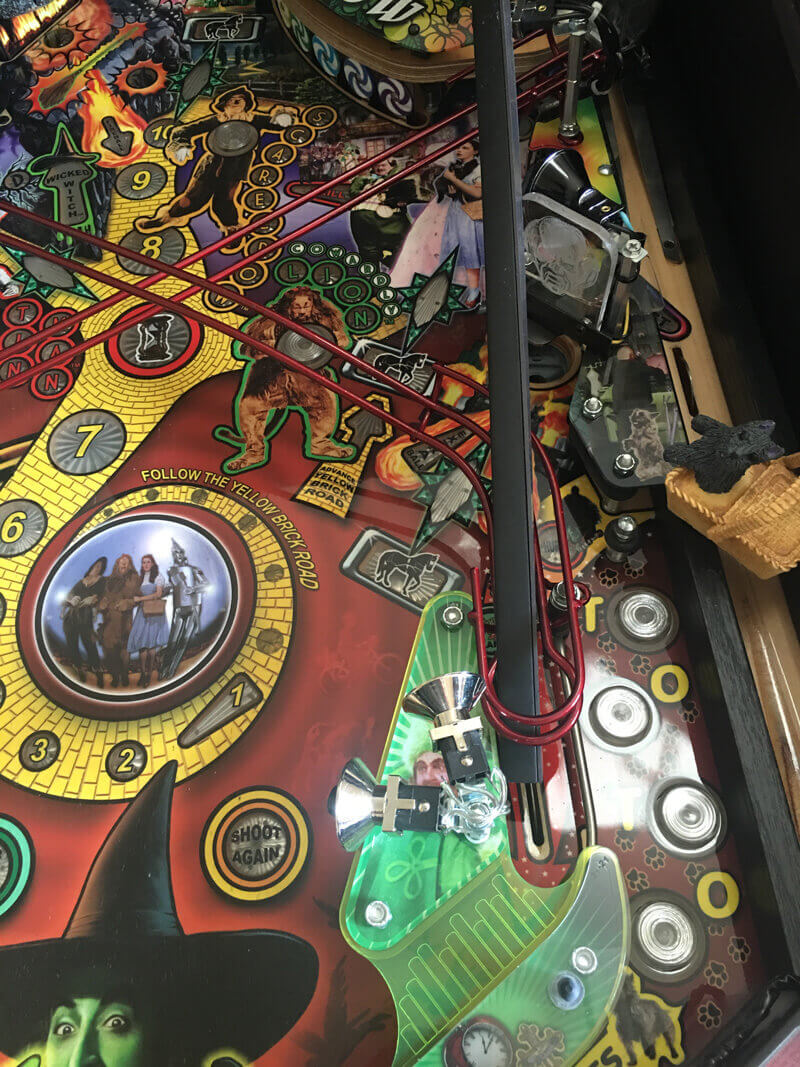
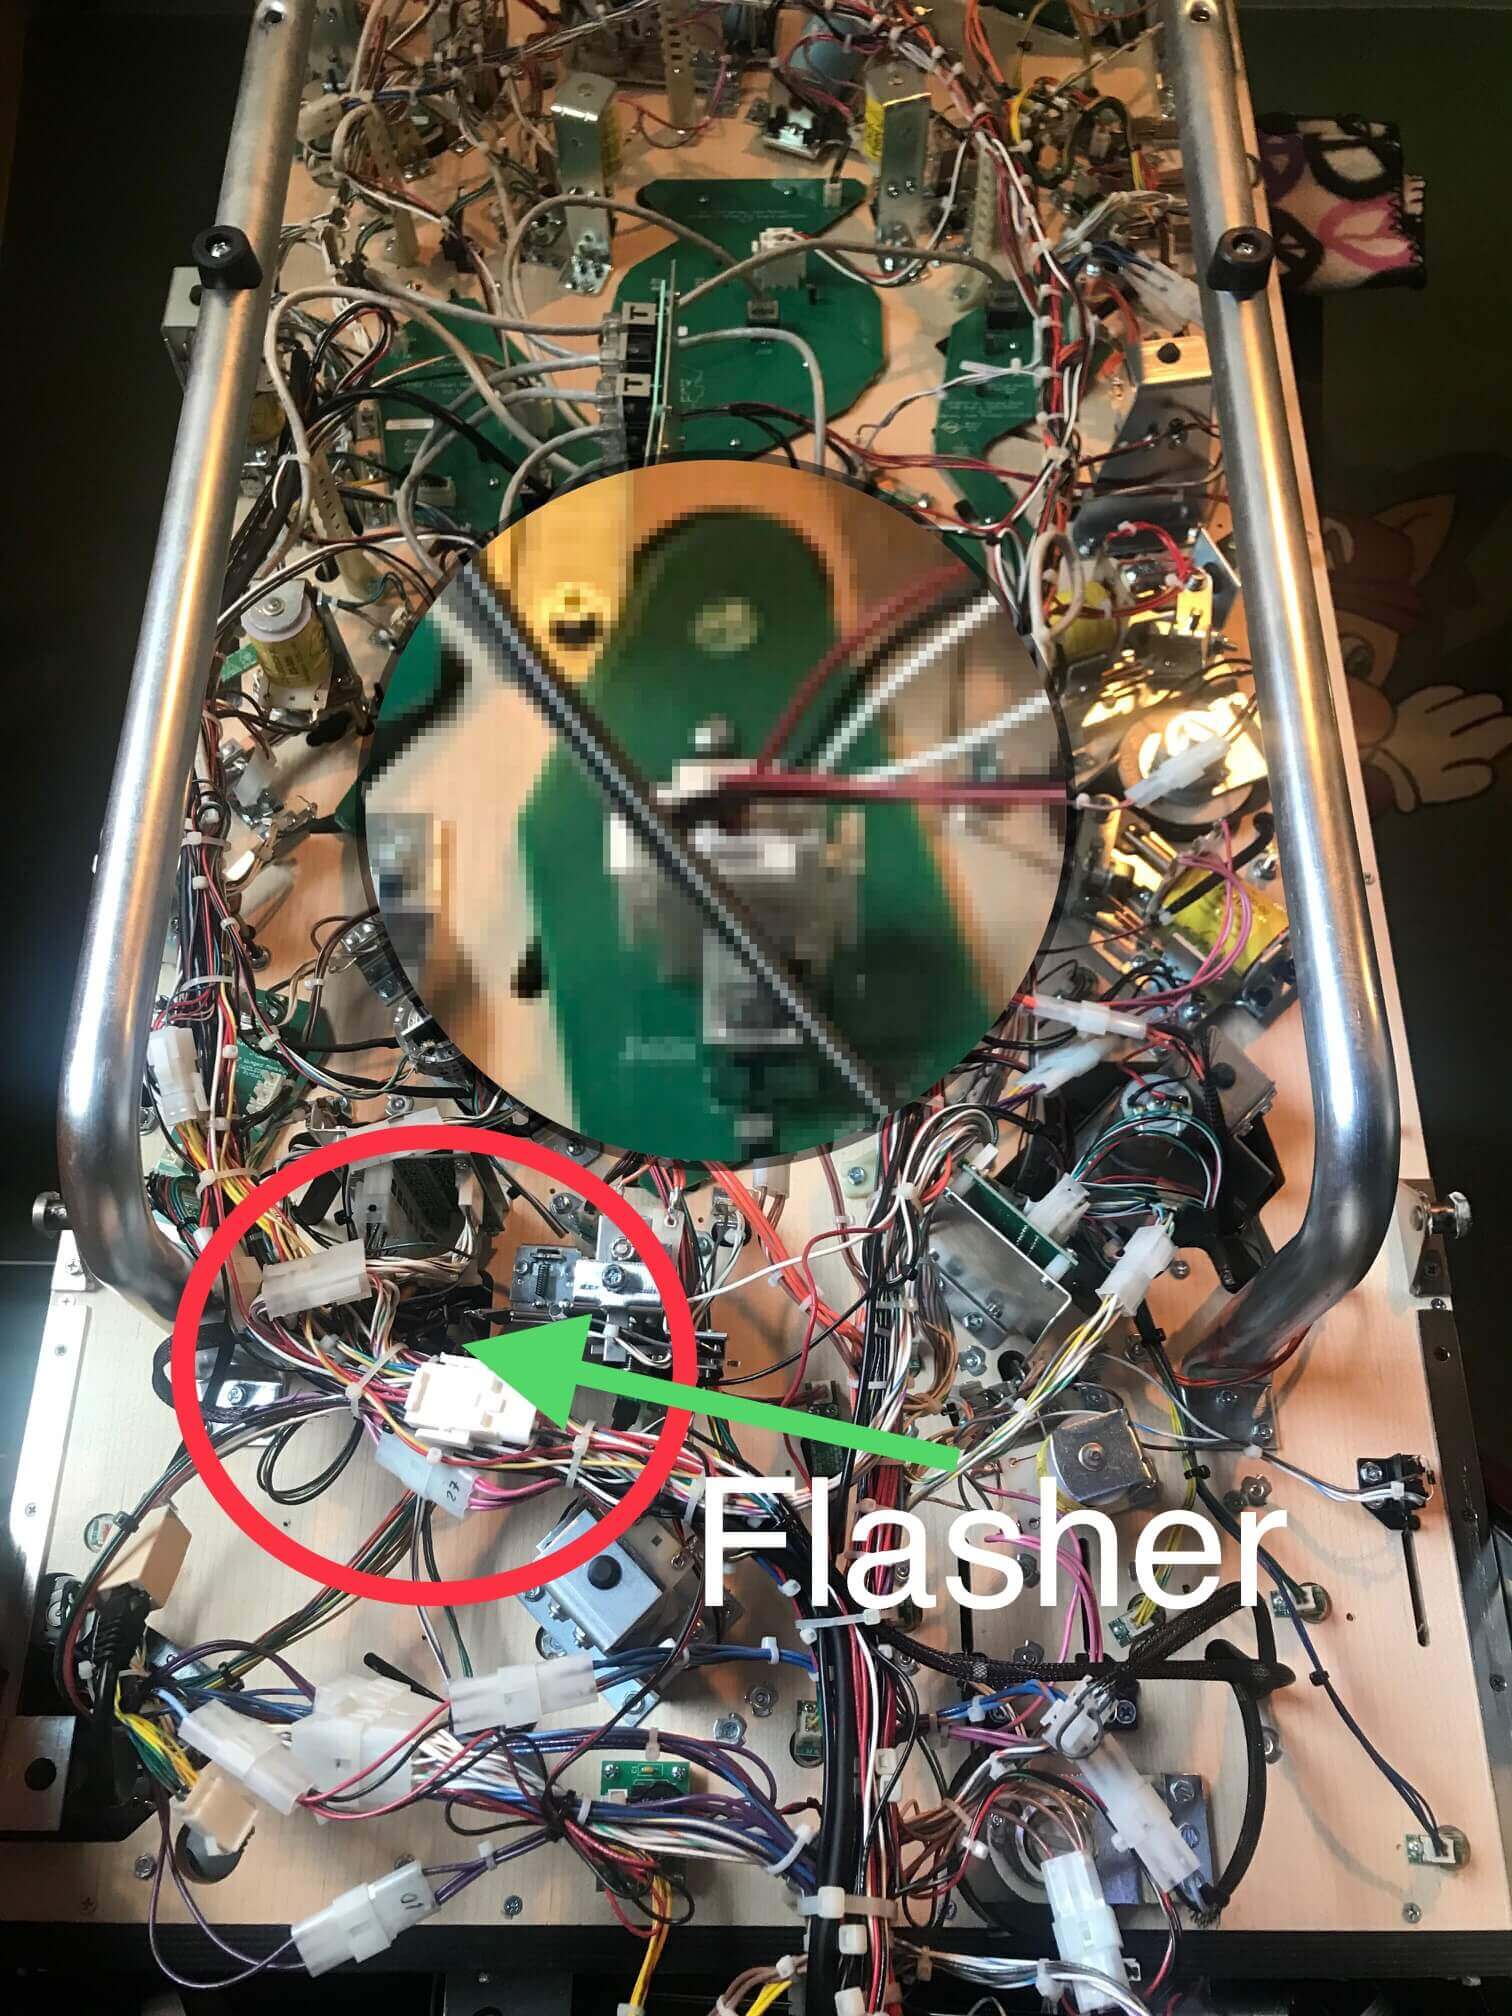
Location of flashers for all versions of WOZ
Trace the red LED witch flasher wires (it the LED to the right if you are looking down on her from above) to the flat ribbon cable that connects to them. This ribbon cable looks like a 1/4” wide camera film that then goes under the playfield and turns into a red and red/black wire which terminates into a a white 3 pin Molex connectors with blue wires coming out.
Hobbit
- GI/Flashers: Click Here
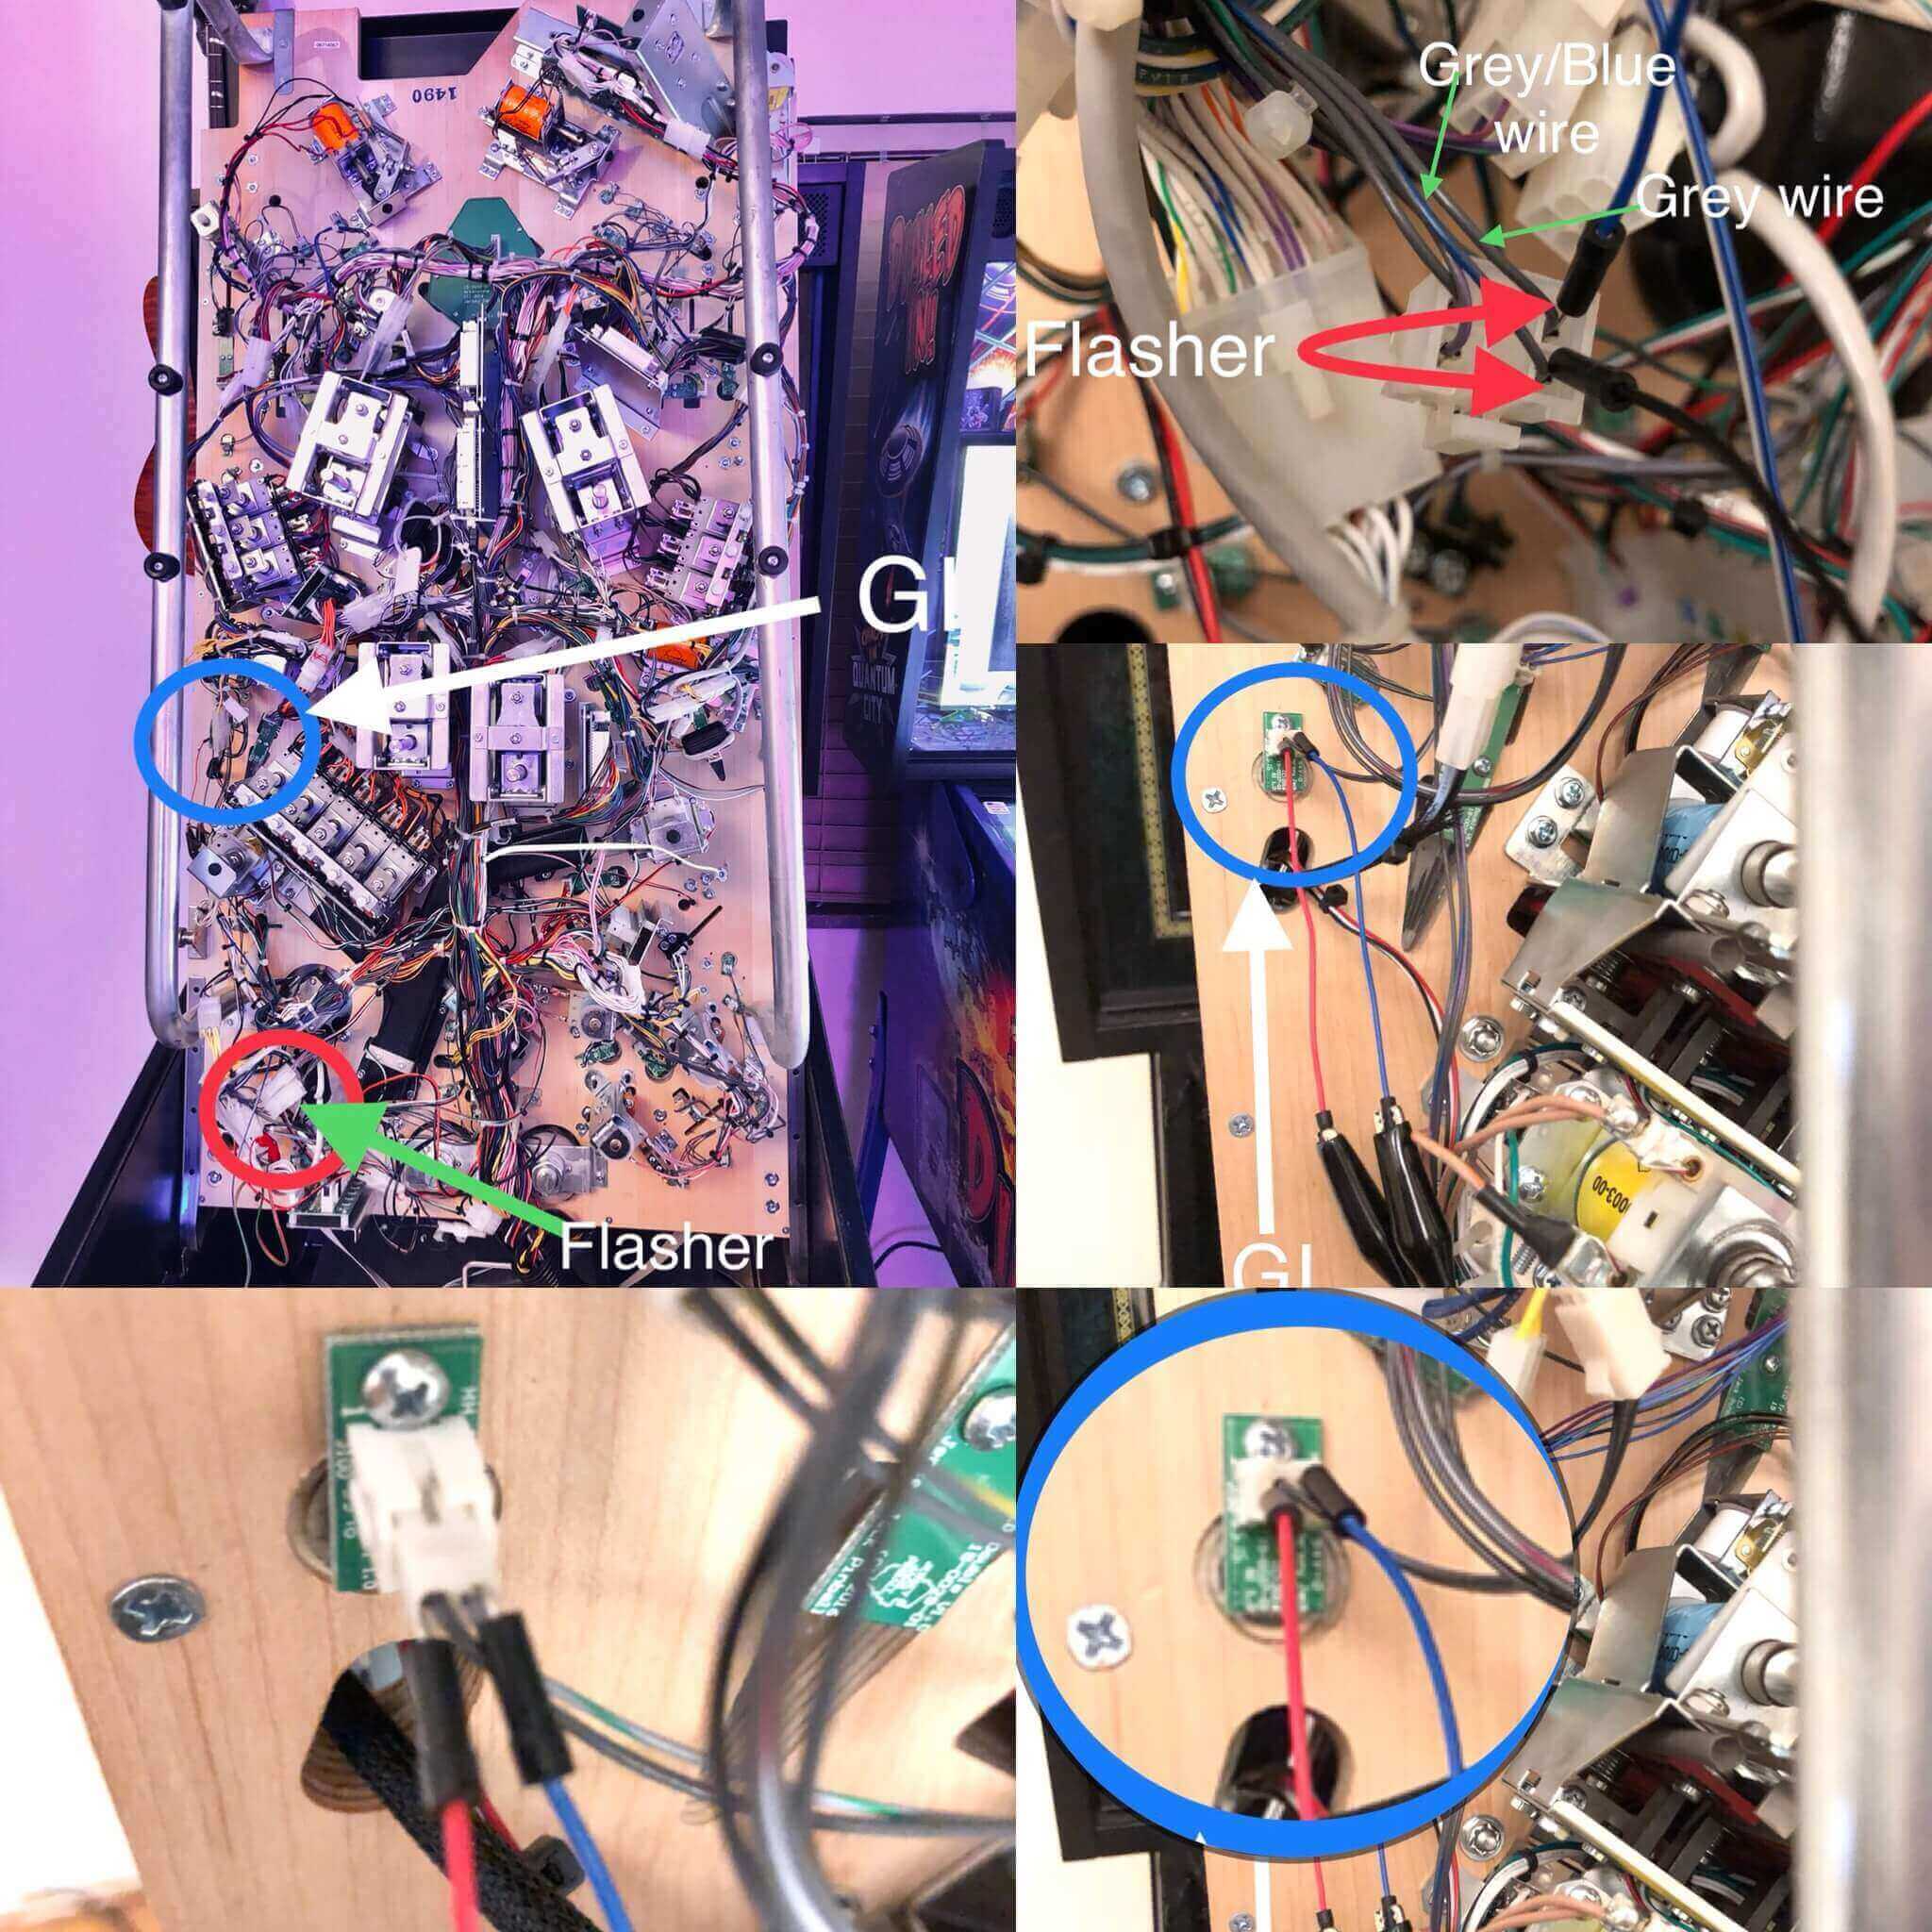
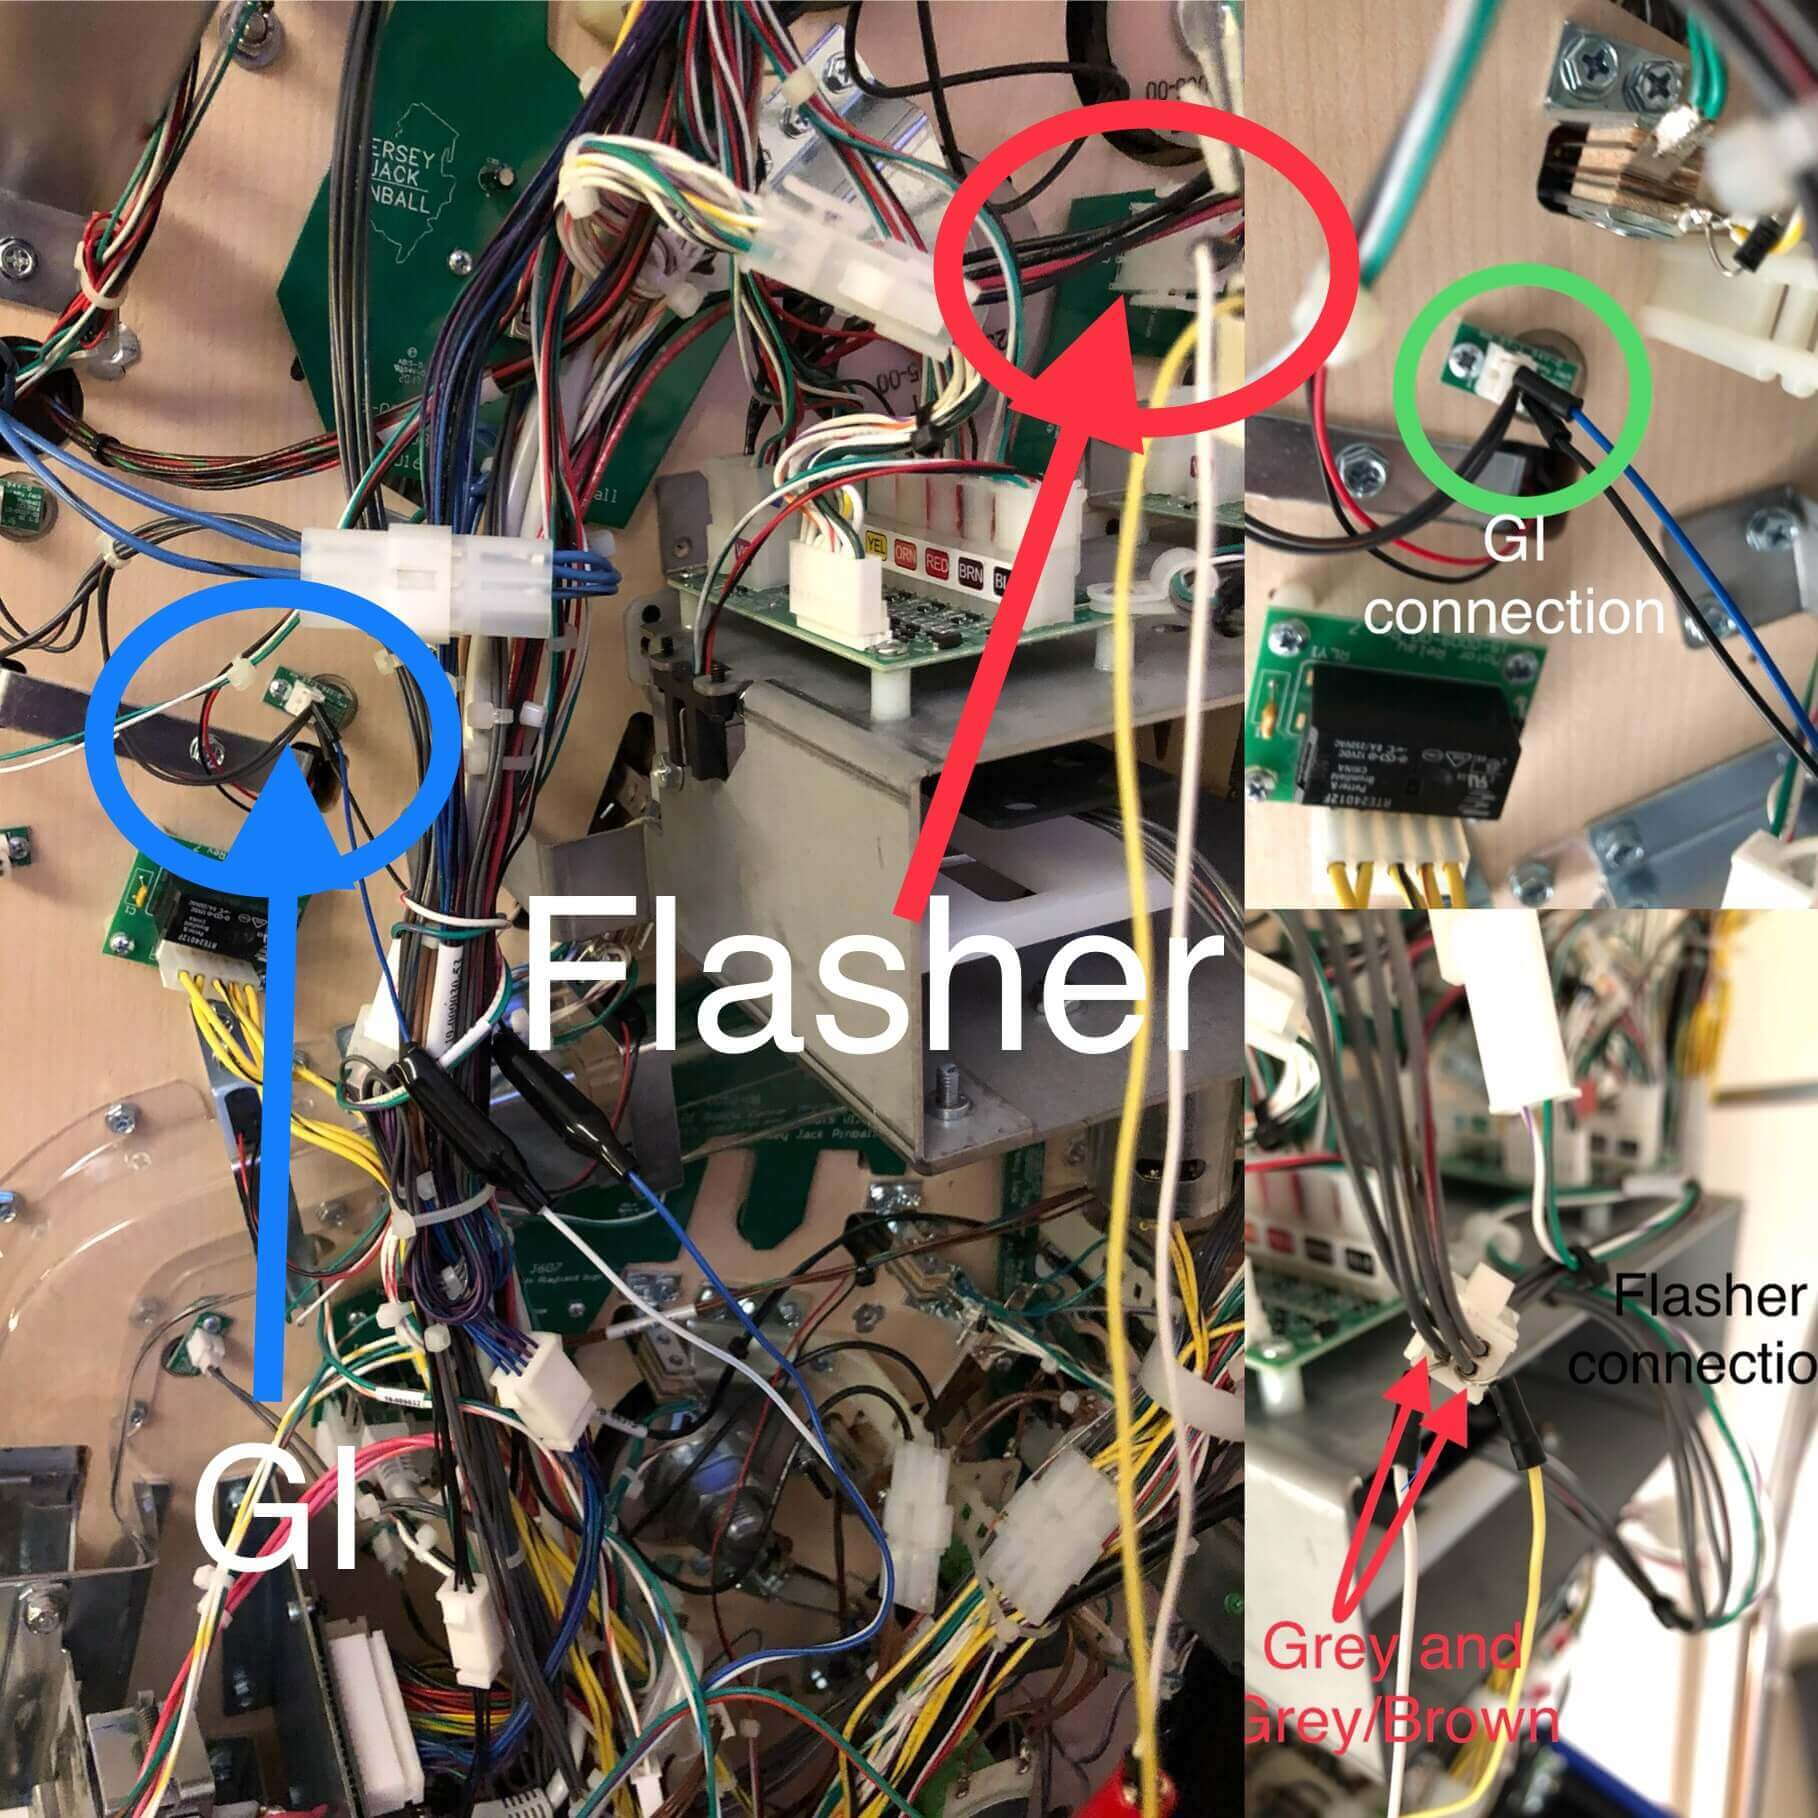
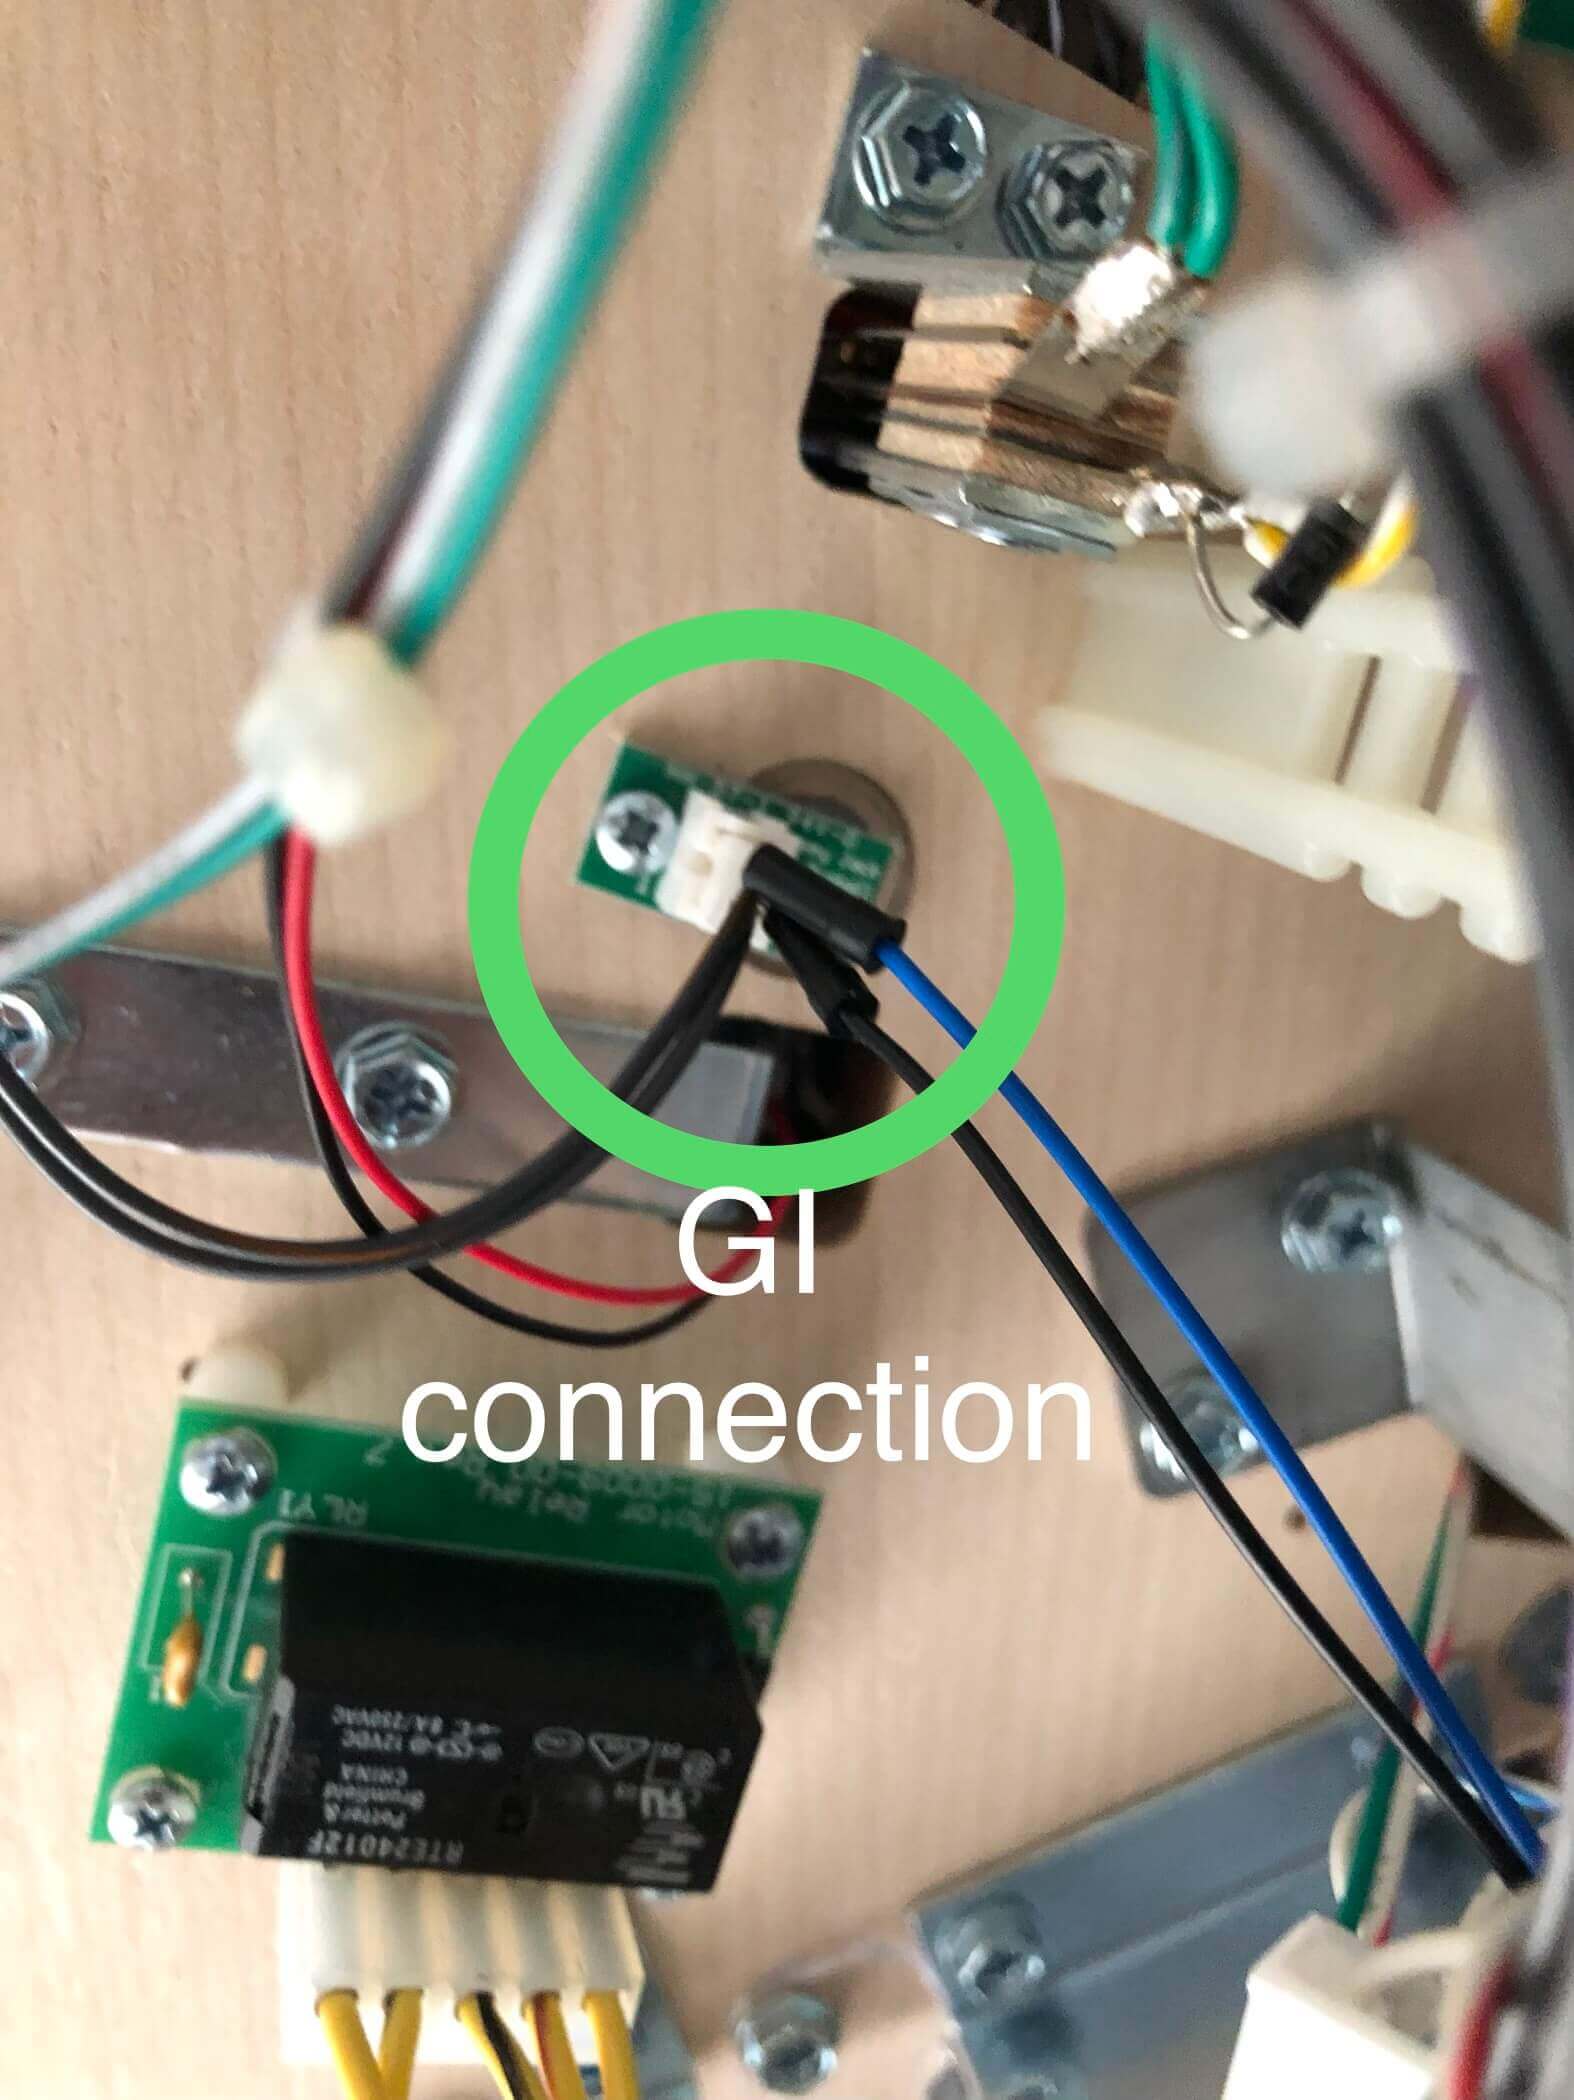
Dialed In
- GI/Flashers: Click Here
Pirates of the Caribbean
- GI/Flashers: Click Here
Spooky
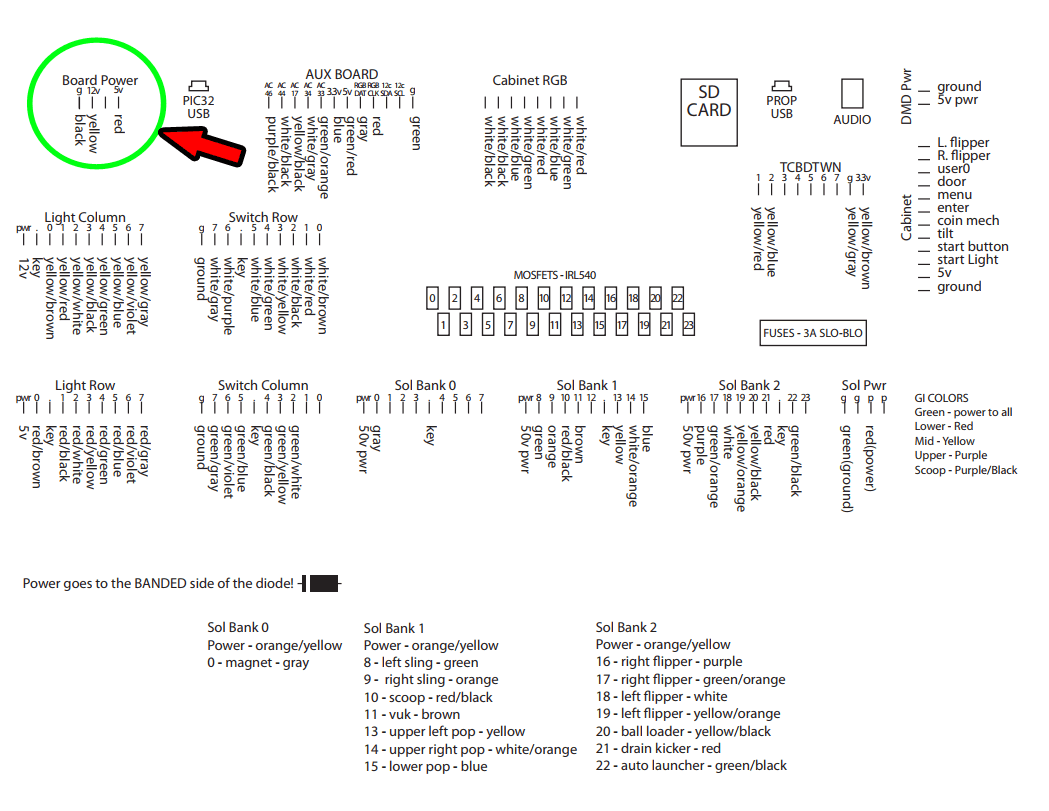
- America’s Most Haunted, Dominos, Jetsons, Rob Zombie, “Board Power” (backbox top left of board)
- TNA: Click Here (for power run a power cord into the machine from the wall or tap the 110V power source from the machine and add an outlet there)
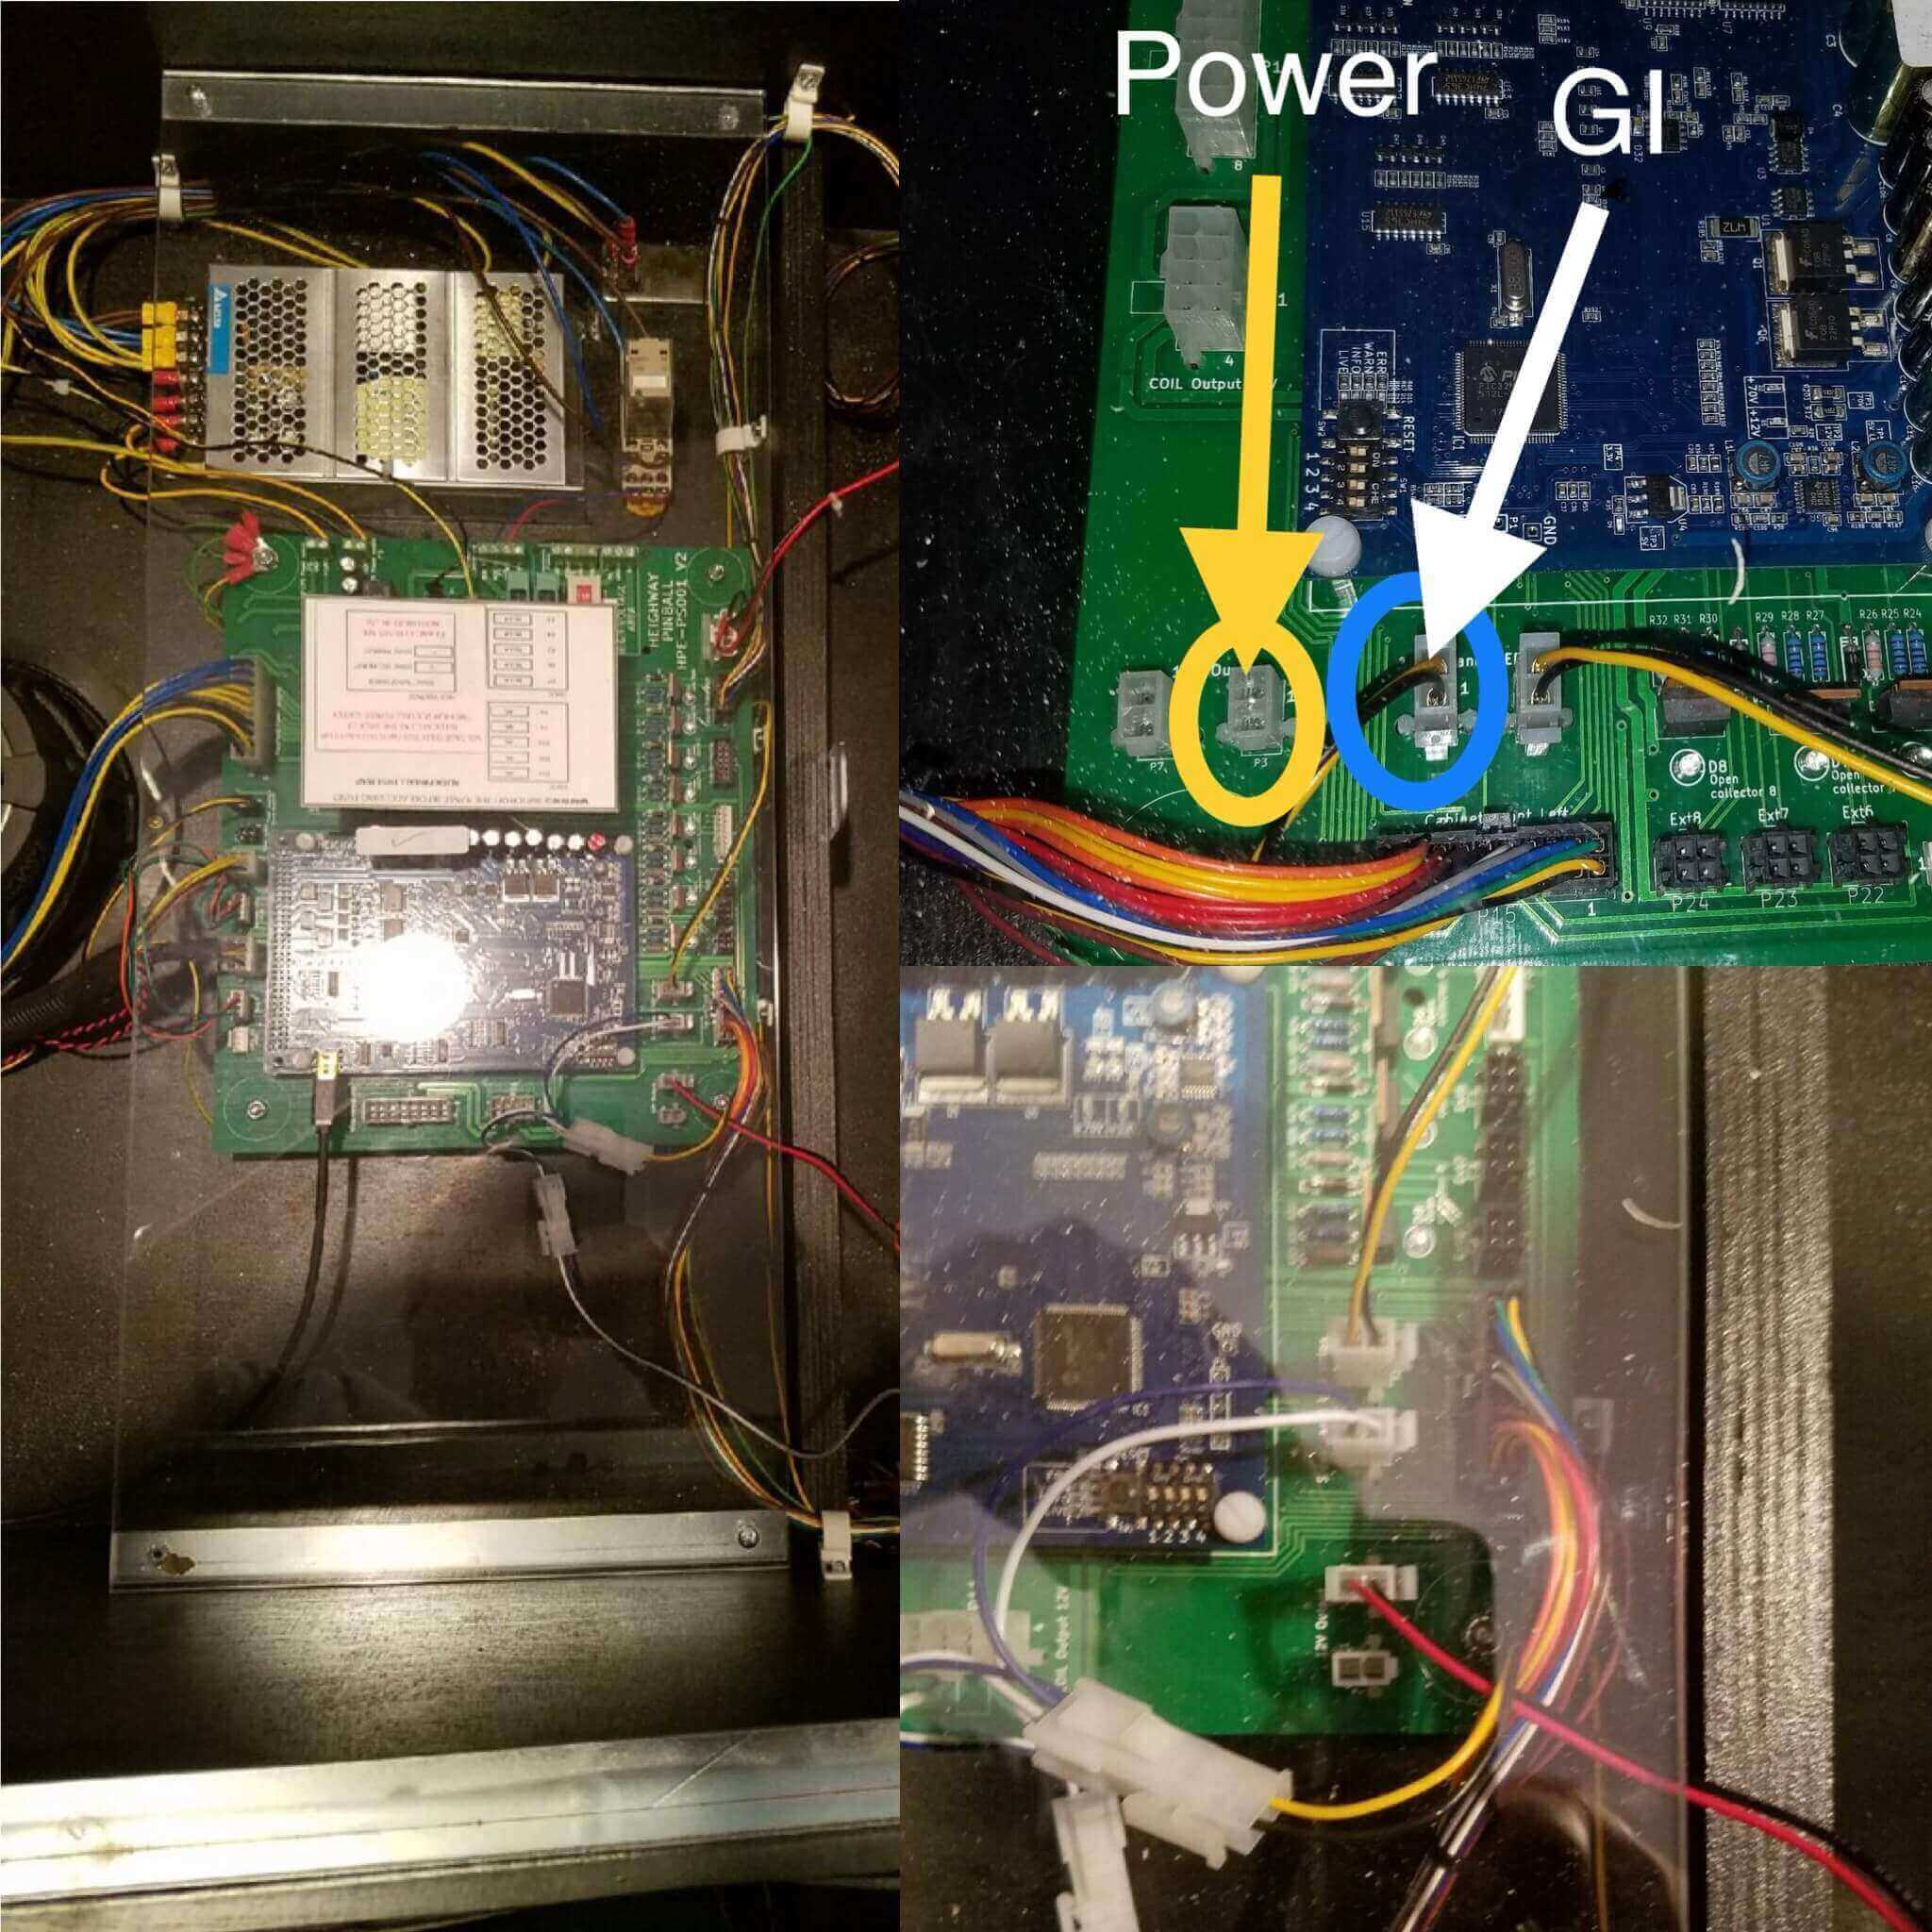
Heighway Pinball
- Alien
- Power/GI: Click Here
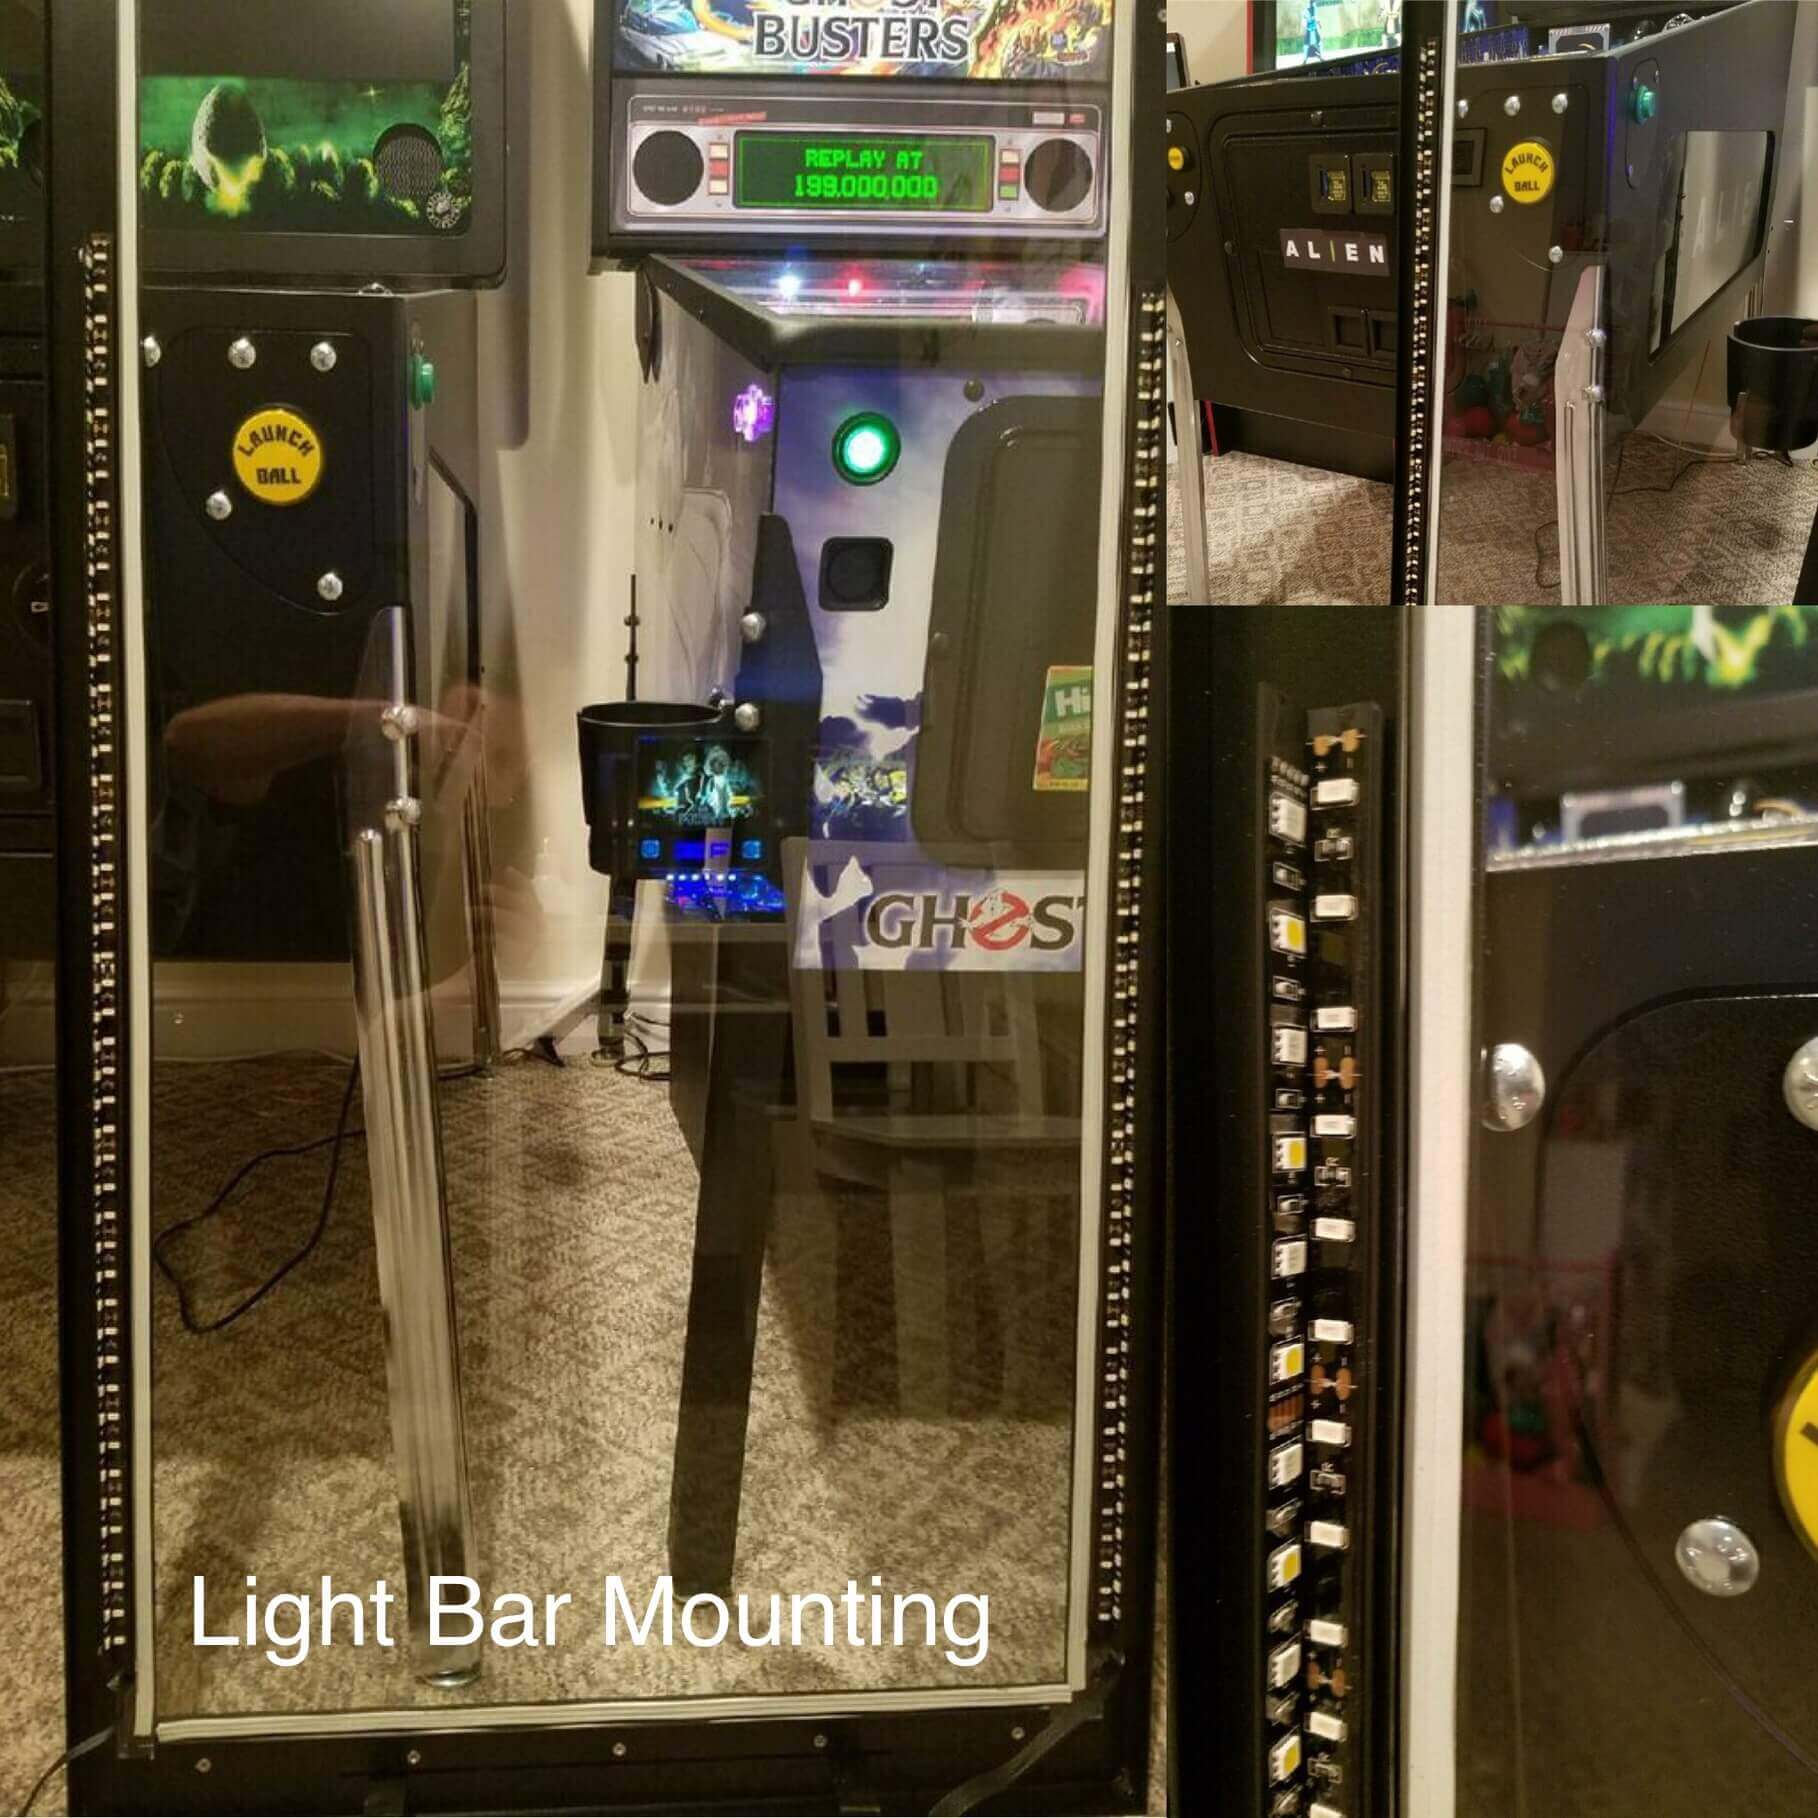
- Mounting: Click Here Mounting location is on the glass frame channel. IMPORTANT: In the picture above, the GI lights (square shaped) should point across the playfield and the flashers (rectangular shaped). Mount the light bar last just before glass goes back on. Raise it enough so that you reach in and attach the light bars in place on the glass frame. Then adjust the slack of the ribbon cable and tuck it out of the way.
- Flashers: TBD (Trigger can be any bulb or motor that is 24v-4v, anything higher will cause damage)
Note: It is best to hold the connector vertical, then insert about 1/8″ of the wire tap end in the hole then bend it over so it hangs. Then do that for the opposite side too.
Note: Polarity does not matter, so as long as you have the wire taps in good, the Pin Stadium GI module will figure out the polarity for you.
Next close up the GI connector on the wire taps while they are inserted (this is why it is important to hold it vertical so that they will stay in as you put the other end of the connector back together). The wire taps are now “pressure fitted” in safely and securely. Now simply bend the opposite ends of the wire taps all the way over on top of the black barrel so that it is thick enough for you to clip the alligator clips onto. (See instructions further down on this page for pictures and an explanation of how to properly use the wire taps).
Good job!!
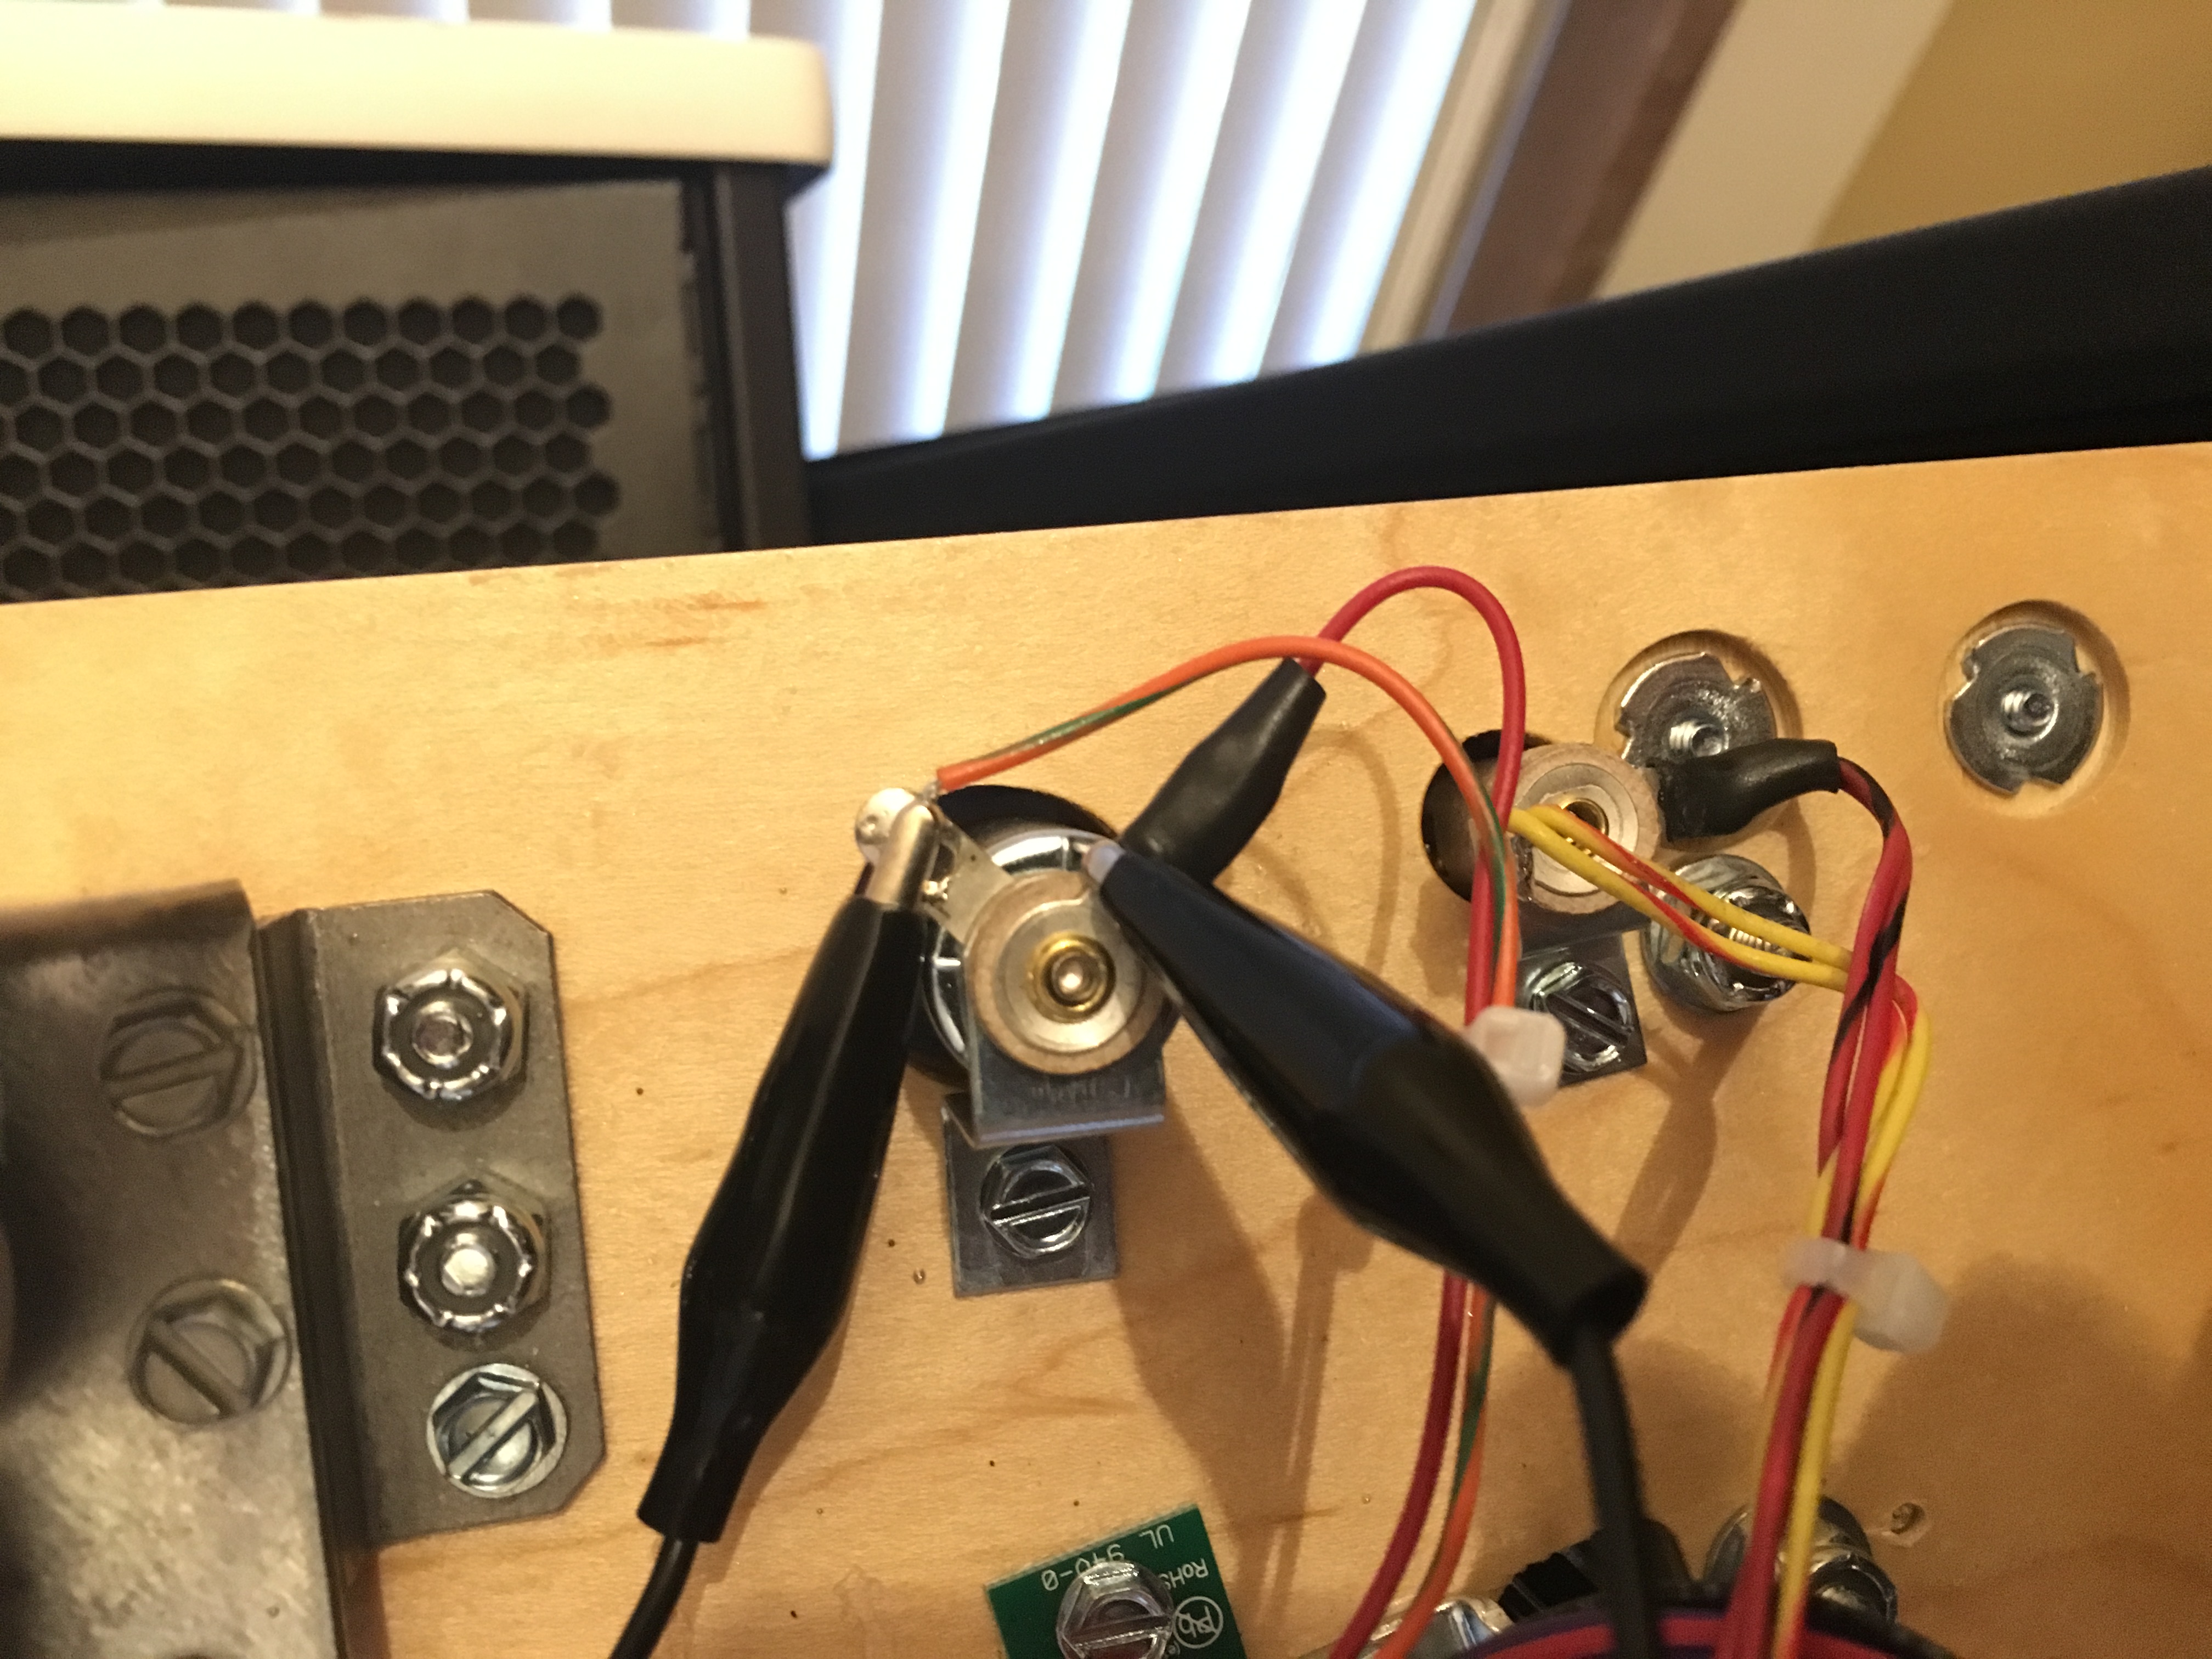
Now you are ready to connect the Red/Green Pin Stadium Flasher cables to the “Center Saucer” Dome connectors. Trace the wires that come down from the UFO Saucer under the playfield towards the back and you will see a multiple wire connector (in pictures below) that has Yellow and Violet(Purple) wires coming out of it. Simply insert the wire taps in from behind and pressure fit them into each of those. Polarity does not matter here either.
Step 2
Connect the Universal Power (pic below) to the service port of your machine. This is usually located in the bottom of the cabinet by the coin door to the right. If you have a newer Stern machine (Spike 1/Spike2) then it is behind the translite on the lower right side. The plug looks like standard wall outlet.


Note: On some older machines their is may be an adapter cable that might need. Your local computer store should have these or we sell them on our website here: https://pinstadium.com/product/service-port-adapter/
Step 3
Lower the playfield to resting angle position on the cabinet and rest the light bars on the playfield.
Then plug the power connector cable, GI, and Flasher cables into the Pin Stadium GI module as shown below:

Step 4
Place the now connected Pin Stadium GI Module over the backboard into the bottom of the cabinet out of the way of any moving objects.
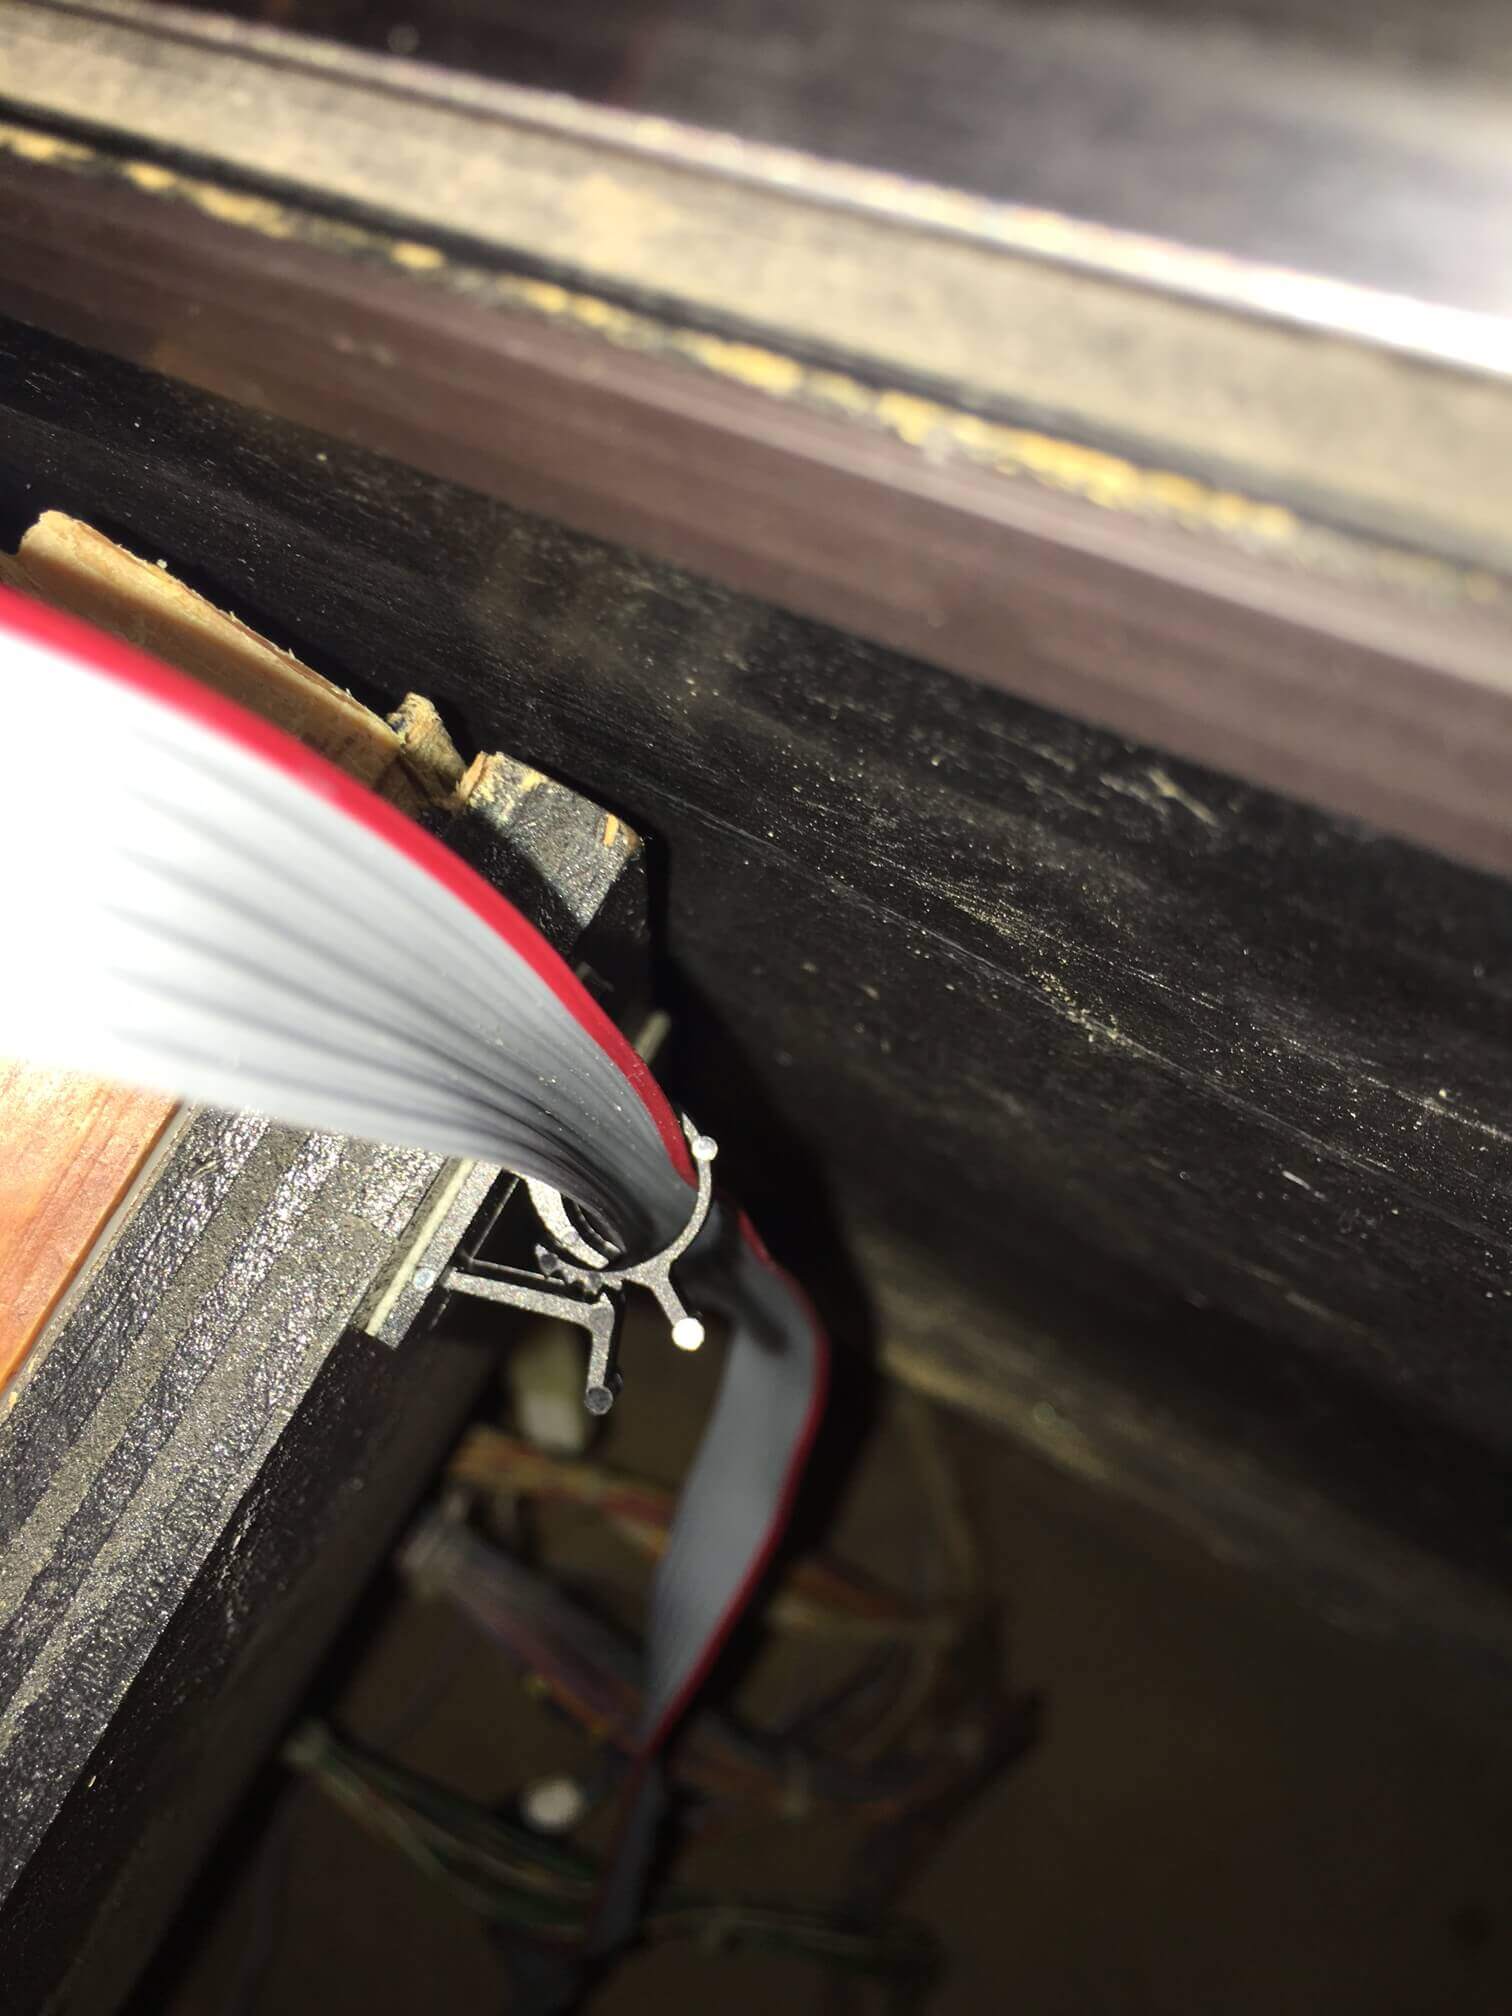
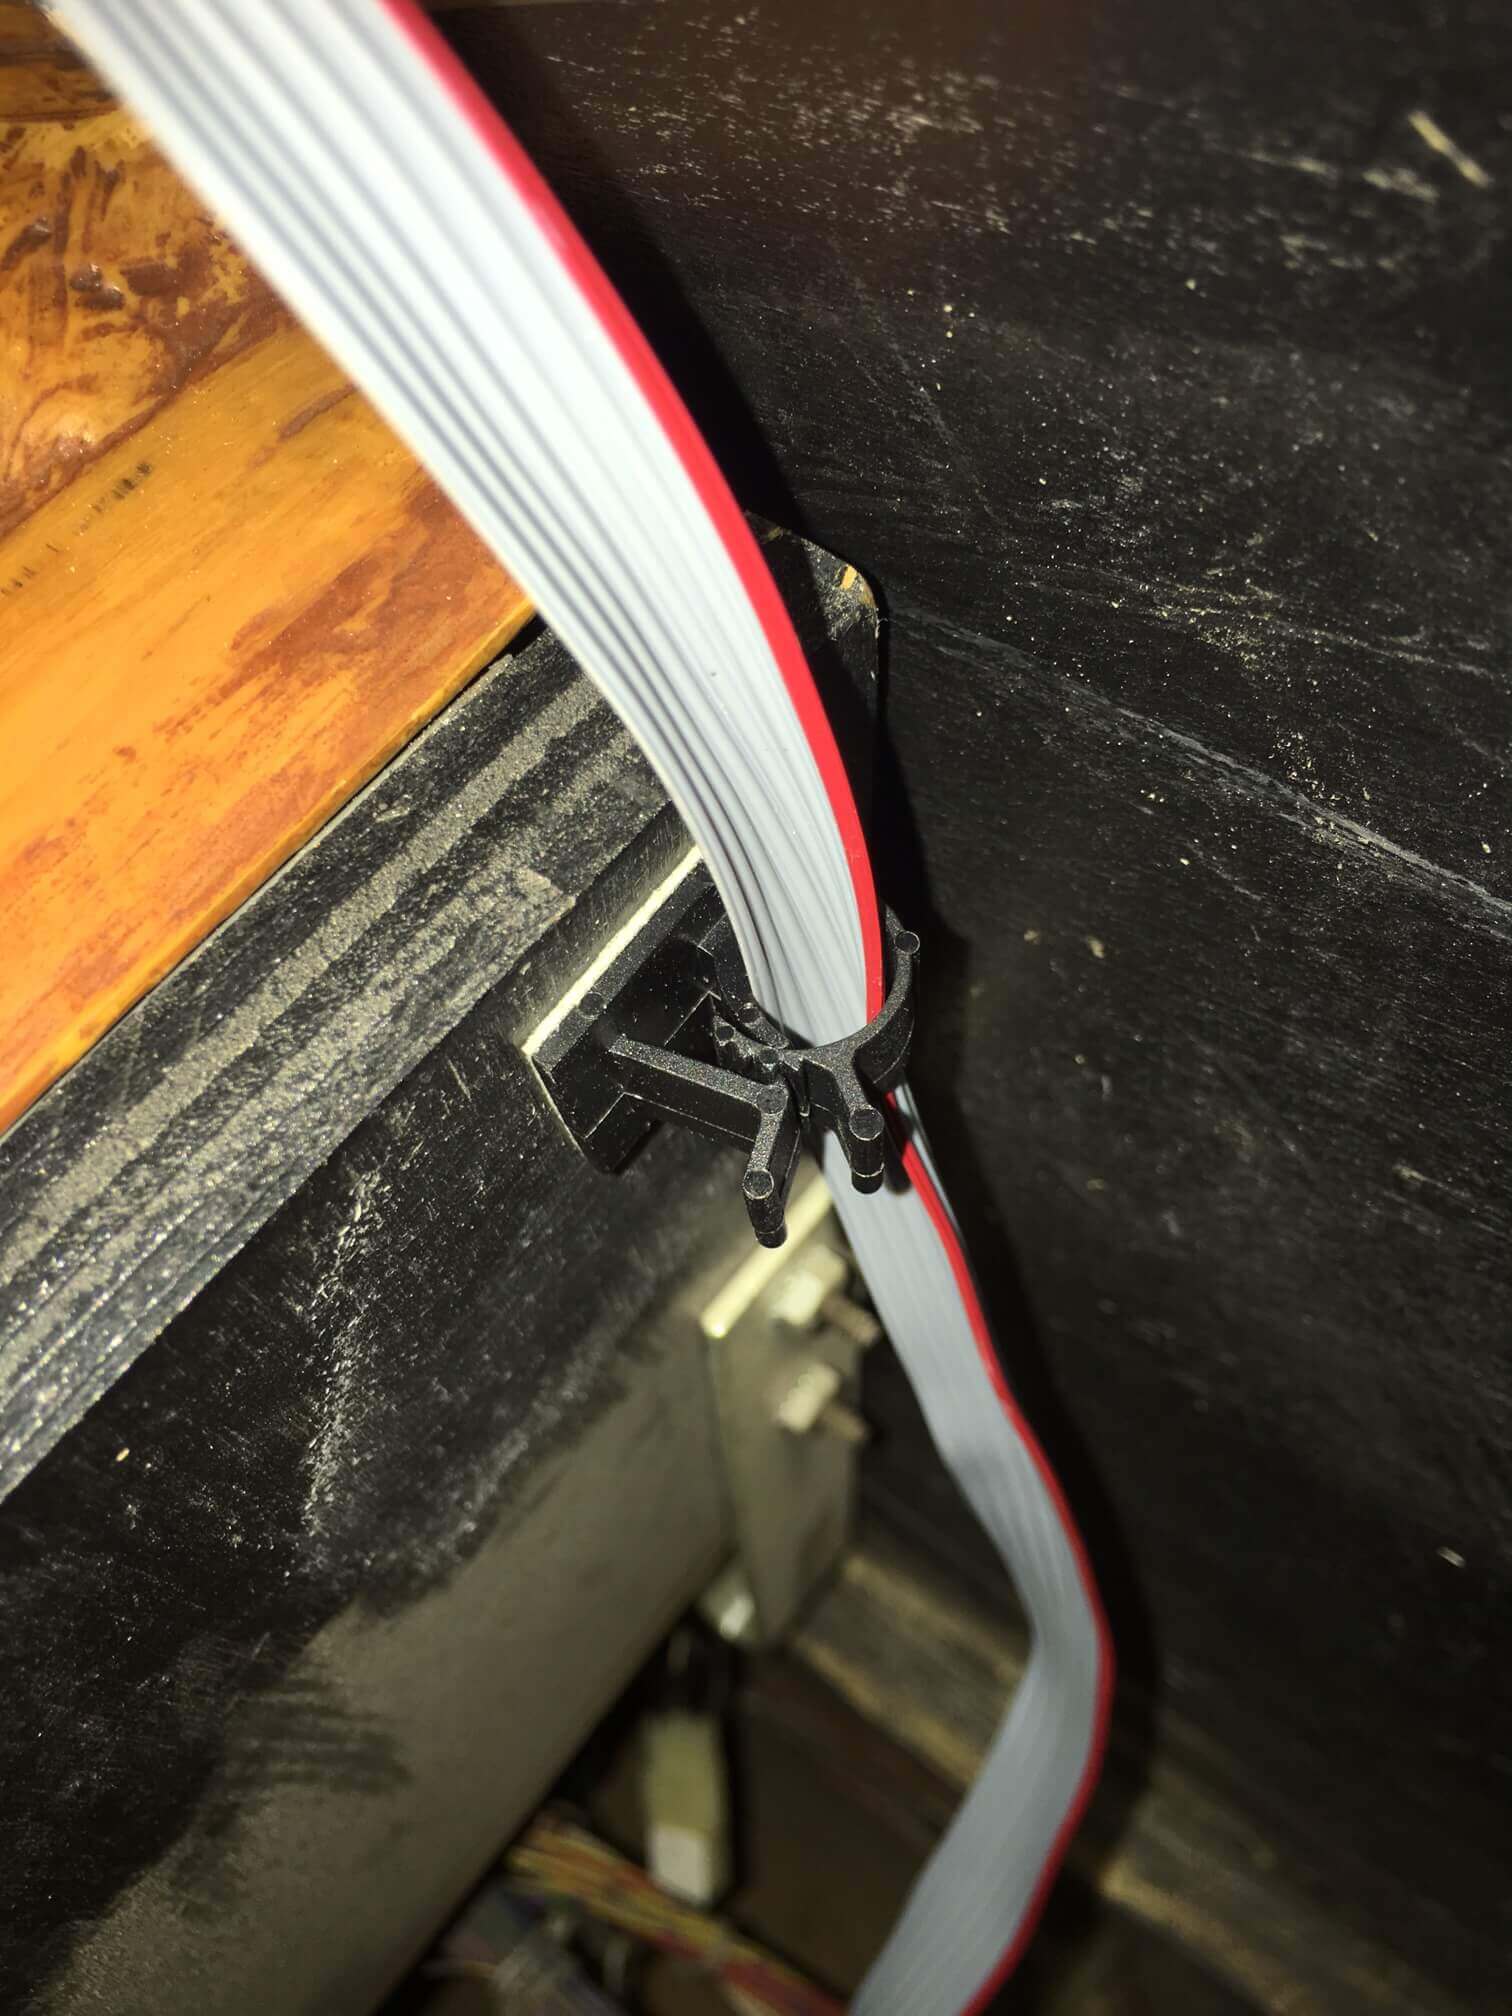
Next locate the accessory packet and inside of it are small adhesive ribbon cable clamps included to use to attach to the back of the playfield to help guide the ribbon cables. They are to be attached to the furthest upper left and right corners of on the backside of the playfield backboard. These are vital as they act as a guide to keep the cables clear of pinching and allow as a memory for your cable length to help keep the cable tucked away and hidden.
Tip: Bend the ribbon cable in half (as shown below) so that it slides easier in the cable clamp. This allow for easier adjustment for slack and helps when you go to tuck it out of site once the playfield is down. You will eventually find a sweet spot that works with each machine. The ribbon cable is designed to be bendable so that you can further tuck it up and out of the way for a nice stealth look.
Step 5
Lower the playfield back down to it’s level resting position and use the included alcohol wipe to clean just below the playfield glass track. Positioning of the lights will be 1/16th of an inch below the glass channel. Clean about 2 inches below so not to pick up any stray dust. It will need to be very clean and completely dry before proceeding. The wipe is to insure the best adhesion for the Magna-Mount system that hold the lights to the side of the cabinet. This is a VERY IMPORTANT step as this will insure the Pin Stadium lights a solid mount. Take your time here on this one please. Also DO NOT remove the other side of the Magna-Mounts from the light bar prior to installation. The light bars are to be installed with them on for two important reasons, one for correct positioning and also for polarity of the mounts. If you take them off and install them there is a good chance you will reverse polarity if they are not put on with the light bars. If polarity it wrong light bars will always shift when you re-attached them and never go in the correct spot. The two magnets fight against each other.
Notice here, I have roughly marked the length of the lights to know where to clean and positioning of the lights is critical for the best effect and clean factory finished look. The ribbon cable should be tucked just behind and under the back playfield glass receiver channel.
Step 6
Carefully peel off the white protective backing for the Magna-Mount system, paying attention to align the lights 1/16th inch below the channel and far enough back to hide the ribbon cable and to clear the backbox hinge.
Note: DO NOT separate either of the sides the Magna-Mounts from the back of the light bar as it needs to be installed together as the magnetic polarity is set for proper mounting. This is very important!
Press firmly all along the entire length of the light channel with your fingers to create maximum bonding. Repeat for the opposite side of the cabinet. Take your time here as this is a vital part of the install to insure proper mounting.
Step 7 (Finished)
Restore the playfield to normal play position and replace the balls. Attach the Pin Stadium lights to their Magna-Mount backs on the side of the cabinet. Replace the playfield glass and lockbar.
**Important: Remember to always remove the lights and rest them on the playfield before raising your playfield. They will get potentially get damaged if you do not do this. Try to remind yourself as this is SUPER important especially since you are not used to doing this each time when raising your playfield. If you plan to raise the playfield to a vertical position then we suggest that you wedge the light bars on the playfield safely under a slingshot plastic or habtrail ball return above an inlane. Each machine is different and you will need to find a good spot on each machine to secure them.
If you are installing Invisi-Shields It is recommended adding these “after” you mount the light bars.
Invisi-Shield installation instructions:
Peel off the adhesive back and then align the Invisi-Shield to the edge of the Pin Stadium light bar starting at the front (near the flippers). Make sure to have good lighting so that you can see the alignment and leave a 1/16″ width gap between the Invisi-Shields and the Pin Stadium light bar. I hope this helps. It’s really simply but let me know if you have questions. Install them while the light bars are still in the machine is best I found. Now you are Stealth!!

FINISHED!!!
Now enjoy the light show and your new vision of your pinball machine! Please post up your impressions on the Pin Stadium Pinside thread as many others are really wanting to see and hear the results. It would be really great if you can take a picture in the dark of your machine with the lights OFF and then with them ON! Thank you again for your order and support of this product.
